
Lightweight and Free CI/CD for Small Teams Using GitLab Pipeline and a Self-Hosted Runner
The Pain Point
A typical software delivery workflow involves multiple environments:
- Development (DEV)
- Testing / QA (QAT)
- User Acceptance Testing (UAT)
- Production (PROD)
As the number of projects grows and environments multiply, manual application deployments become a real headache — and human error can easily cause a deployment to land in the wrong environment. Adopting a CI/CD tool solves this by automating builds and deployments.
What CI/CD Solves
- Eliminates conflicts caused by multiple branches or multiple environments.
- Reduces manual deployment errors and failures, and shortens recovery time.
- Lets developers stay focused on development.
- Improves team communication and collaboration efficiency.
What Is CI/CD?
In software engineering, CI/CD (Continuous Integration / Continuous Delivery or Continuous Deployment) bridges the gap between development and operations teams by automating the build, test, and deployment stages of an application. Modern DevOps practice encompasses continuous development, continuous testing, continuous integration, continuous deployment, and continuous monitoring throughout the development lifecycle. (Wikipedia)
My CI/CD Architecture
- Host a .NET Core project configured with Docker on GitLab.
- Set up a GitLab Runner on a local machine to build and deploy the application.
Planned Deployment Flow
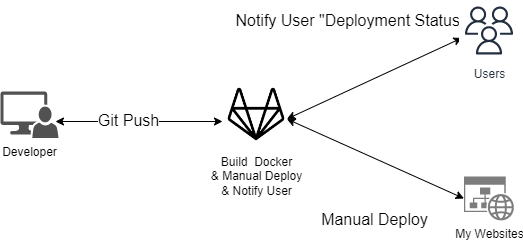
1. Build Stage
Git Commit > Trigger build stage > Build Docker image using PowerShell
2. Deploy Stage
Manual deploy > Trigger deploy stage > Notify user "Deployment Start" > Deploy Docker image to container server > Notify user "Deploy End"
Let's Get Started
1. Prerequisites
- Your project must be hosted on GitLab with a Dockerfile configured.
- Set up a Dockerfile for your project (see the earlier article).
2. Go to the GitLab Admin Panel > Settings > CI/CD
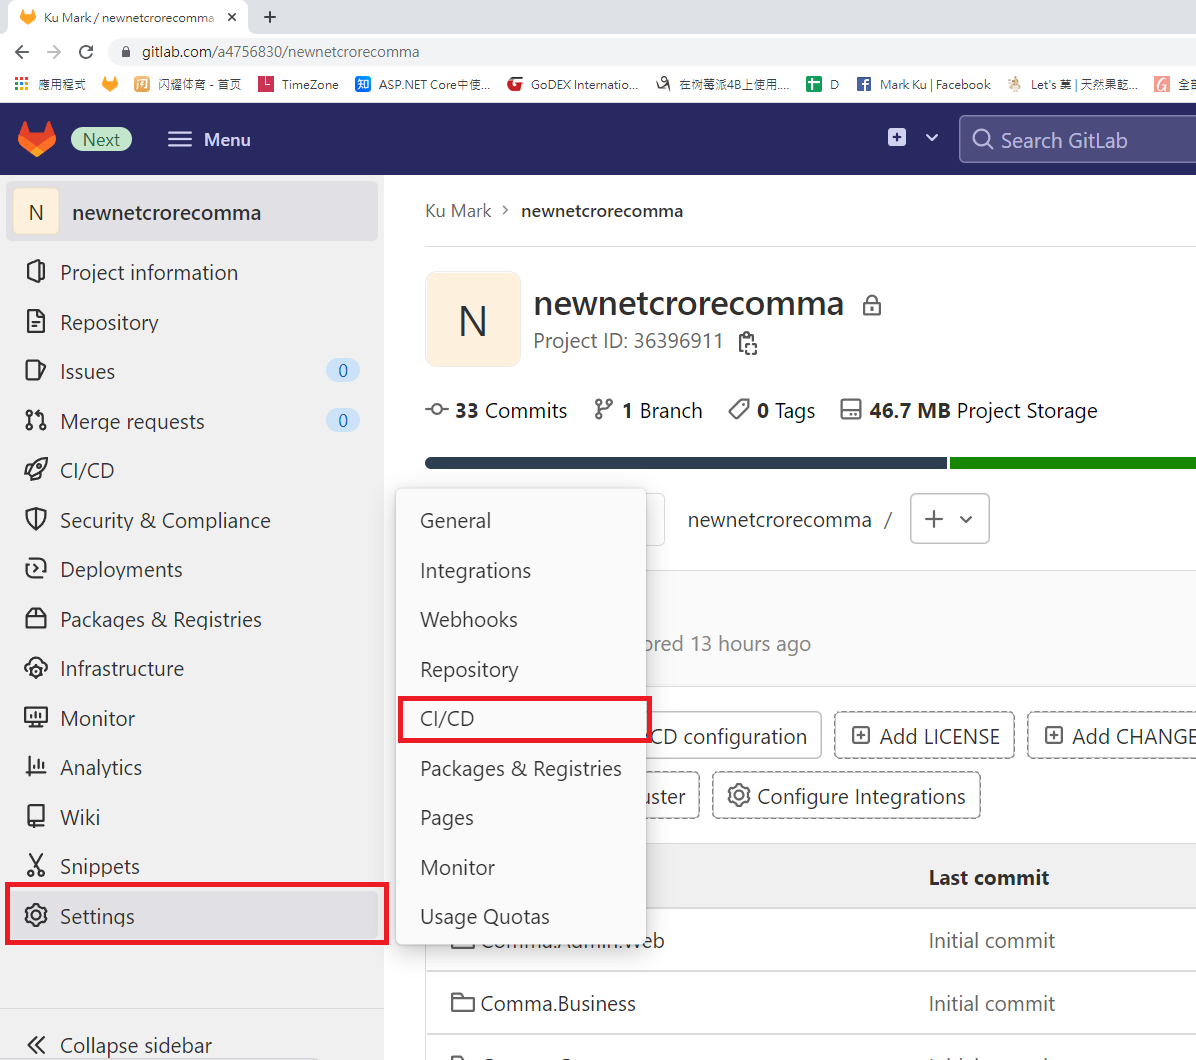
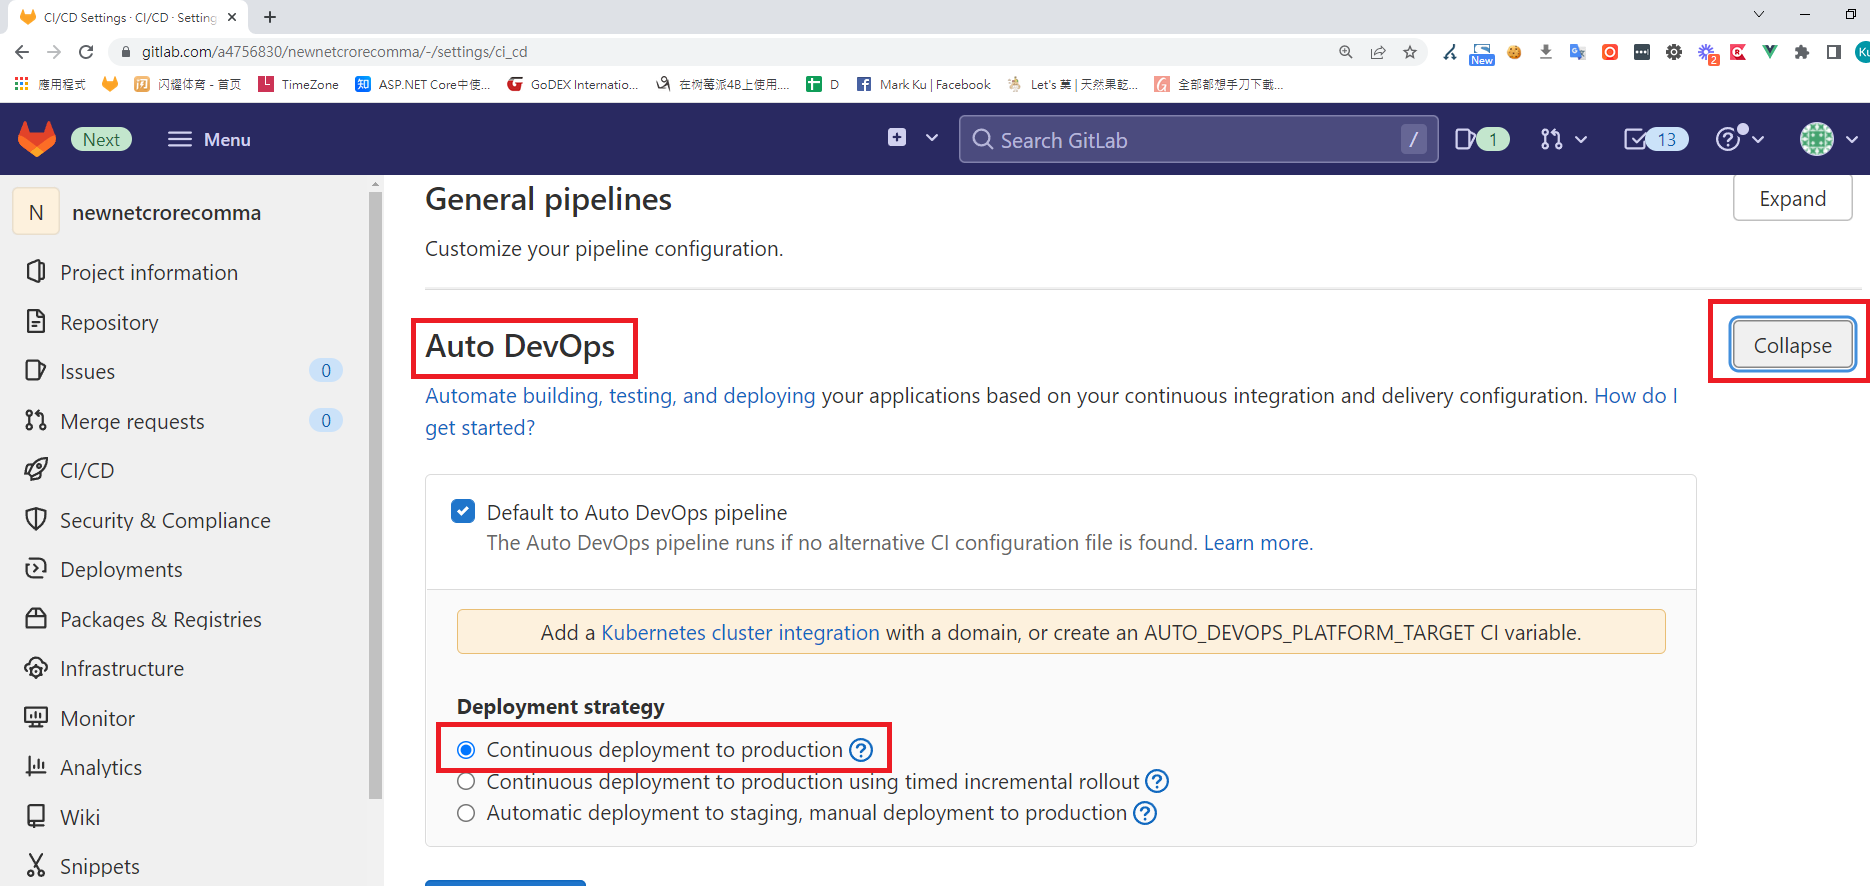
3. Find Auto DevOps > Expand > Check "Continuous deployment to production" > Save changes
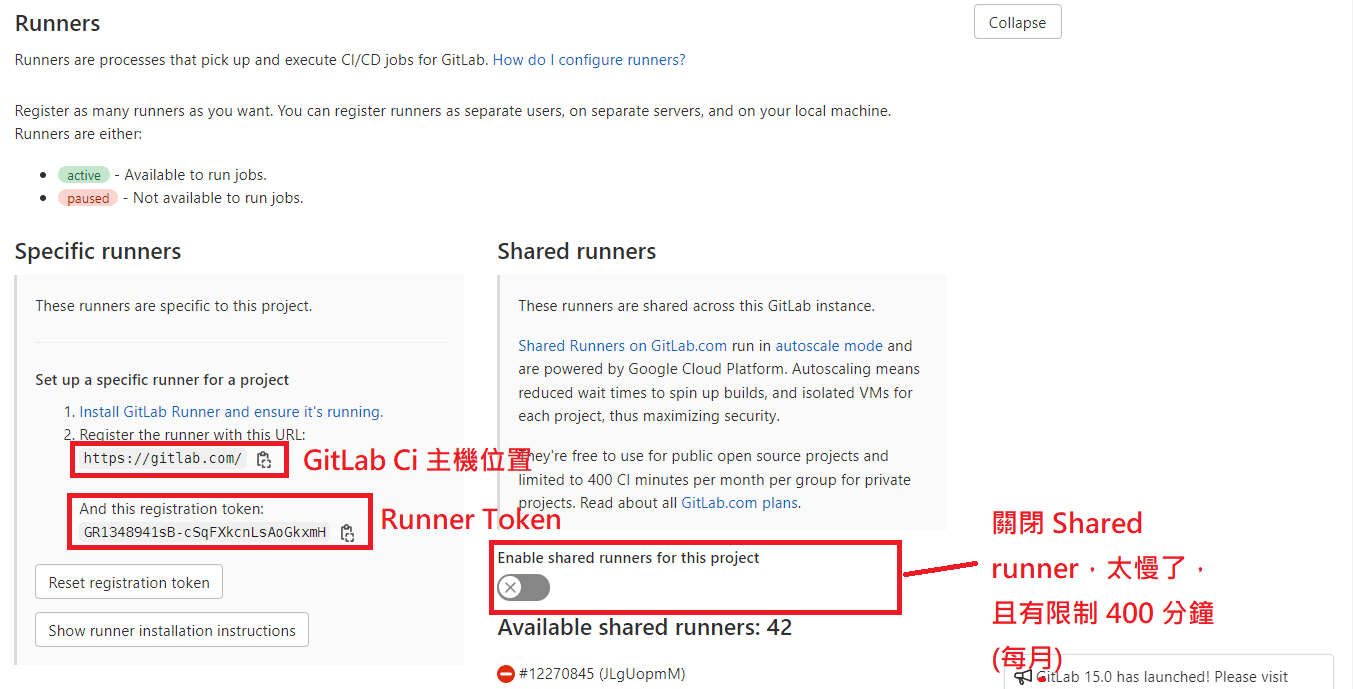
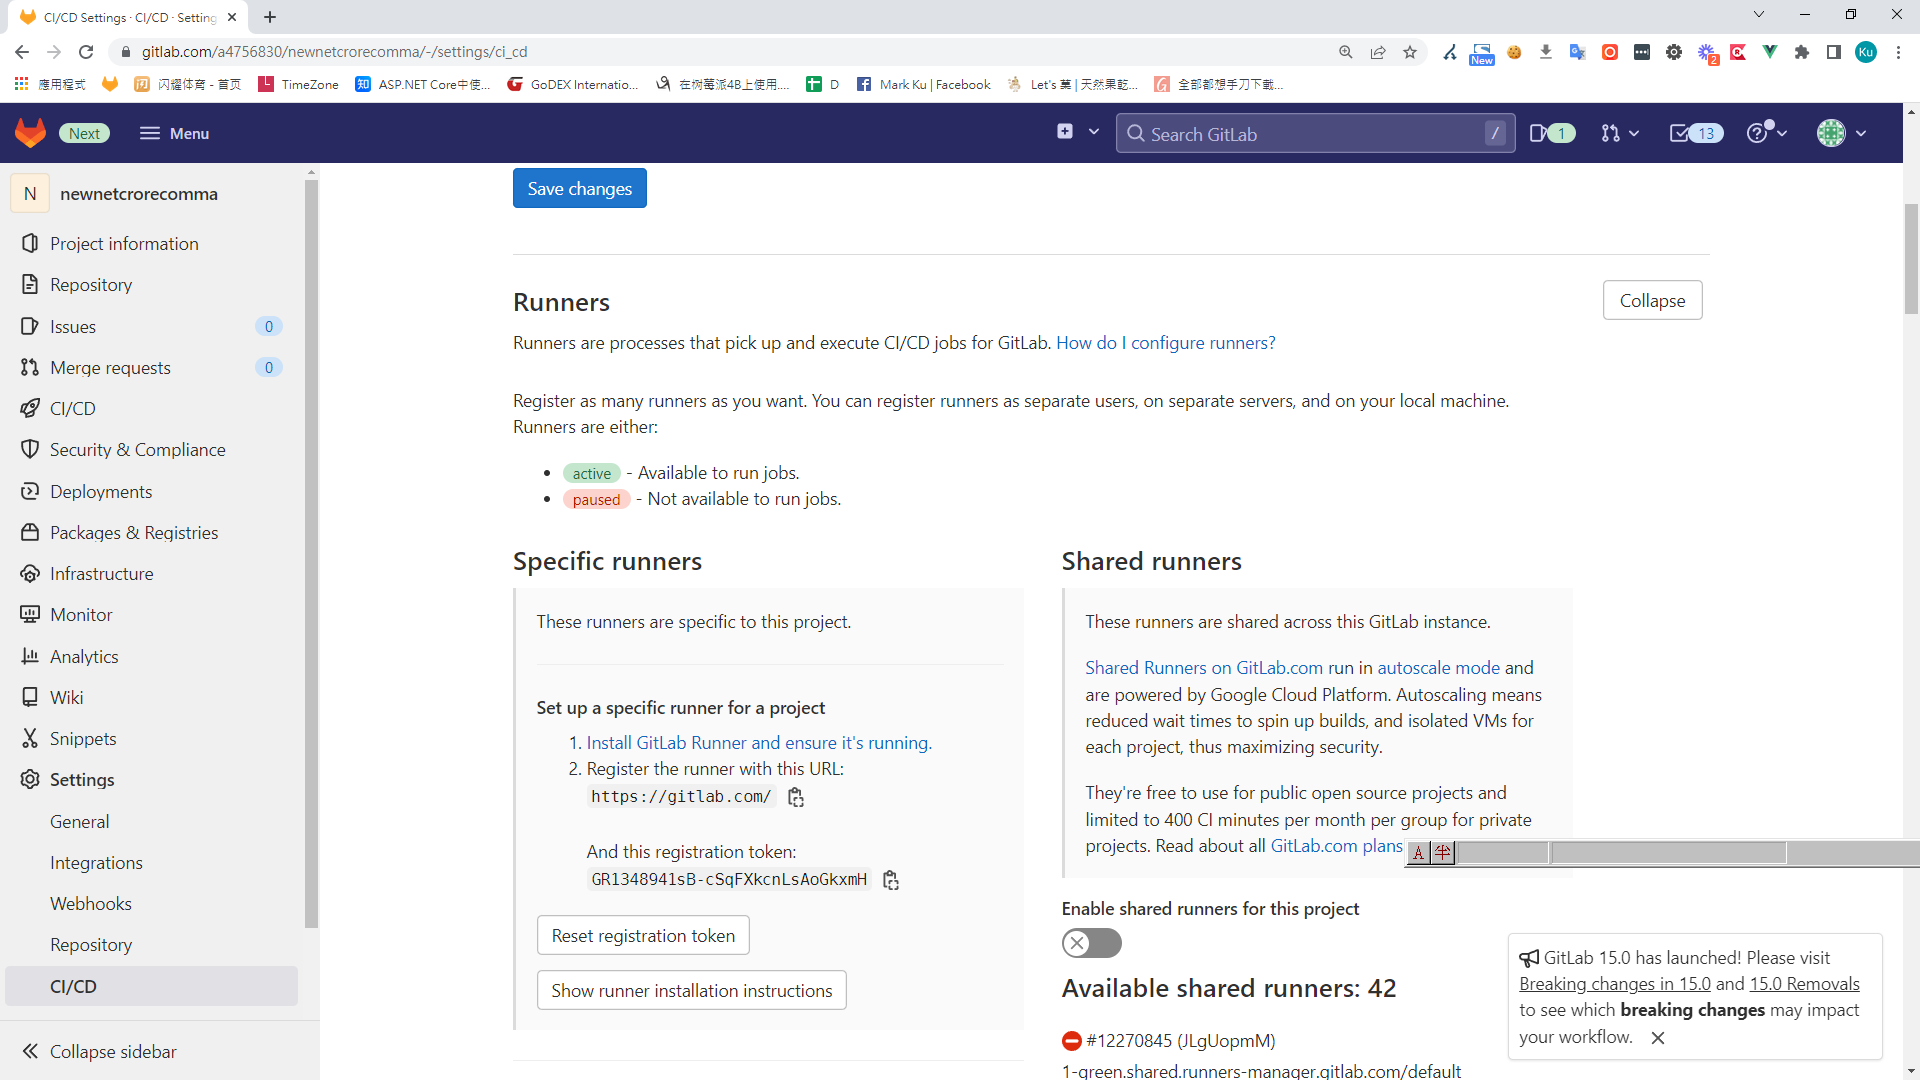
4. Scroll down to Runners > Expand > Disable Shared Runners, then copy the GitLab CI URL and token to register your local runner
5. Install gitlab-runner
choco install gitlab-runner
gitlab-runner --version  // 測試版本
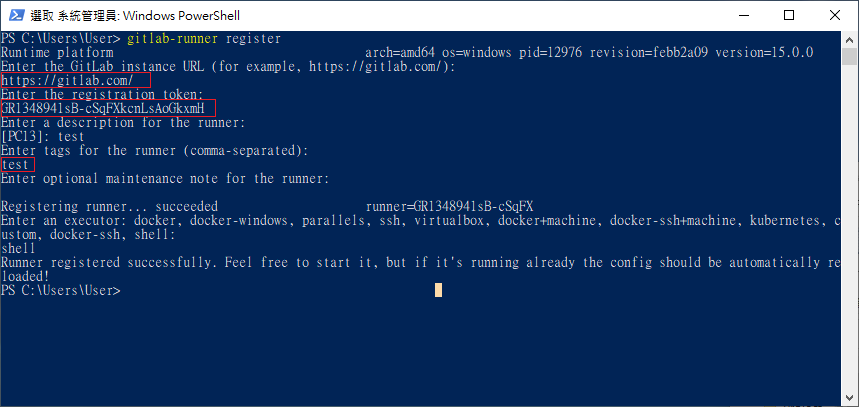
6. Register the gitlab-runner
gitlab-runner register
7. Start the runner
gitlab-runner run
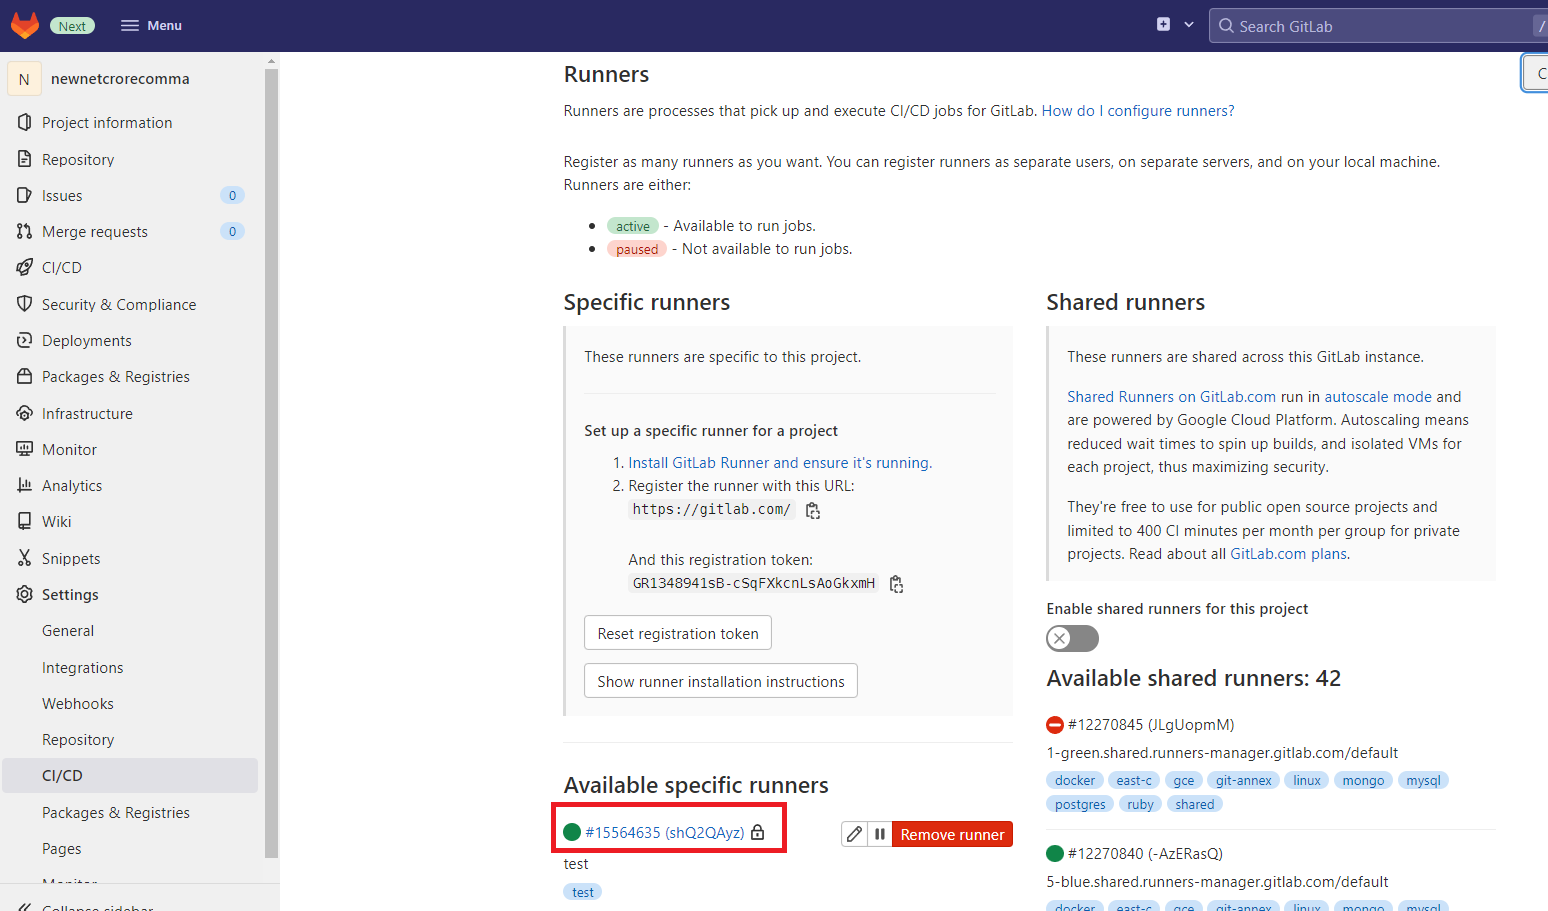
8. After the runner starts, you'll see a new active runner in the GitLab admin panel
9. Add a .gitlab-ci.yml file in the project root — GitLab will execute the defined stages when conditions are met
stages:
  - build
  - deploy

build:
  stage: build
  script:
    - ./build.ps1 # build docker image
  only:
    - main

deploy:
  stage: deploy
  script:
    - ./tg-notify.ps1 "deploy start" # telegram bot 通知部署開始
    - ./linebot-notify.ps1 "deploy start" # line bot 通知部署開始
    - ./deploy.ps1 # deploy docker image to container
    - ./tg-notify.ps1 "deploy end" # telegram bot 通知部署結束
    - ./linebot-notify.ps1 "deploy end" # line bot 通知部署結束
  when: manual

default:
  interruptible: true # 新的流水線工作建立時,目前的這工作是否繼續執行(預設為 false)
  tags:
  - test
10. Add a PowerShell script for Telegram notifications (tg-notify.ps1) in the project root
[Net.ServicePointManager]::SecurityProtocol = [Net.SecurityProtocolType]::Tls12

$botToken = 'your token'
$chatID = 'your chatId'
$messageText = $args[0]

$telegramURI = ("https://api.telegram.org/bot" + $botToken + "/sendMessage")
$telegramJson = ConvertTo-Json -Compress @{chat_id = $chatID; text=$messageText}
$telegramResponse = Invoke-RestMethod -Uri $telegramURI -Method Post -ContentType 'application/json;charset=utf-8' -Body $telegramJson
11. Add a PowerShell script for Line Bot notifications (linebot-notify.ps1) in the project root
$token = your token
$toUserId = linebotUserid
$Header = @{
         'Authorization' = 'Bearer $token'
}

$postParams =  @"
{
     "to": "$toUserId",
     "messages": [
         {
             "text": "$args",
             "type": "text"
         }
     ]

}
"@

Invoke-WebRequest -Uri https://api.line.me/v2/bot/message/push -Method POST -ContentType 'application/json' -Headers $Header -Body $postParams
12. Add a PowerShell script to build the Docker image (build.ps1) in the project root
$containerUrl = "tcp://192.168.50.52:2376"
$imageName = "shopcart"
$dockerfile = "./Comma.Web/Dockerfile"
$outputPath = "./"
$imageFilePath = $outputPath + $imageName
$port="8888:80"

# 本地建置映像檔
docker build -t $imageName . -f $dockerfile

docker save -o $imageFilePath  $imageName # save 要搭配 load ; import 搭配 export
13. Add a PowerShell deployment script (deploy.ps1) in the project root
$containerName = "shopcart-1"
$containerUrl = "tcp://192.168.20.20:2376"
$imageName = "shopcart"
$outputPath = "./"
$imageFilePath = $outputPath + $imageName
$port="8888:80"

# 停用容器
docker --tls -H="$containerUrl" ps -a -f ancestor=$containerName --no-trunc -q | foreach-object { docker --tls -H="$containerUrl" stop $_ }
docker --tls -H="$containerUrl" ps -a -f name=$containerName --no-trunc -q | foreach-object { docker --tls -H="$containerUrl" stop $_ }

# 移除容器
docker --tls -H="$containerUrl" ps -a -f ancestor=$containerName* --no-trunc -q | foreach-object { docker --tls -H="$containerUrl" rm -f $_ }
docker --tls -H="$containerUrl" ps -a -f name=$containerName* --no-trunc -q | foreach-object { docker --tls -H="$containerUrl" rm -f $_ }

# 移除映像檔

$existingImages = docker --tls -H="$containerUrl" images $imageName
If ($existingImages.count -gt 1) {
write-host "[Removing image]Removing the existing image.."
docker --tls -H="$containerUrl" rmi -f $imageName
} else {
write-host "[Removing image]The image does not exist"
}

# 將本地的映像檔匯入 Docker 主機
docker --tls -H="$containerUrl" load --input  $imageFilePath

# 建立及啟動容器應用
docker --tls -H="$containerUrl" run -d --name $containerName --restart=always -p $port $imageName
Screenshots
1. Any git commit to the project triggers an automatic GitLab build
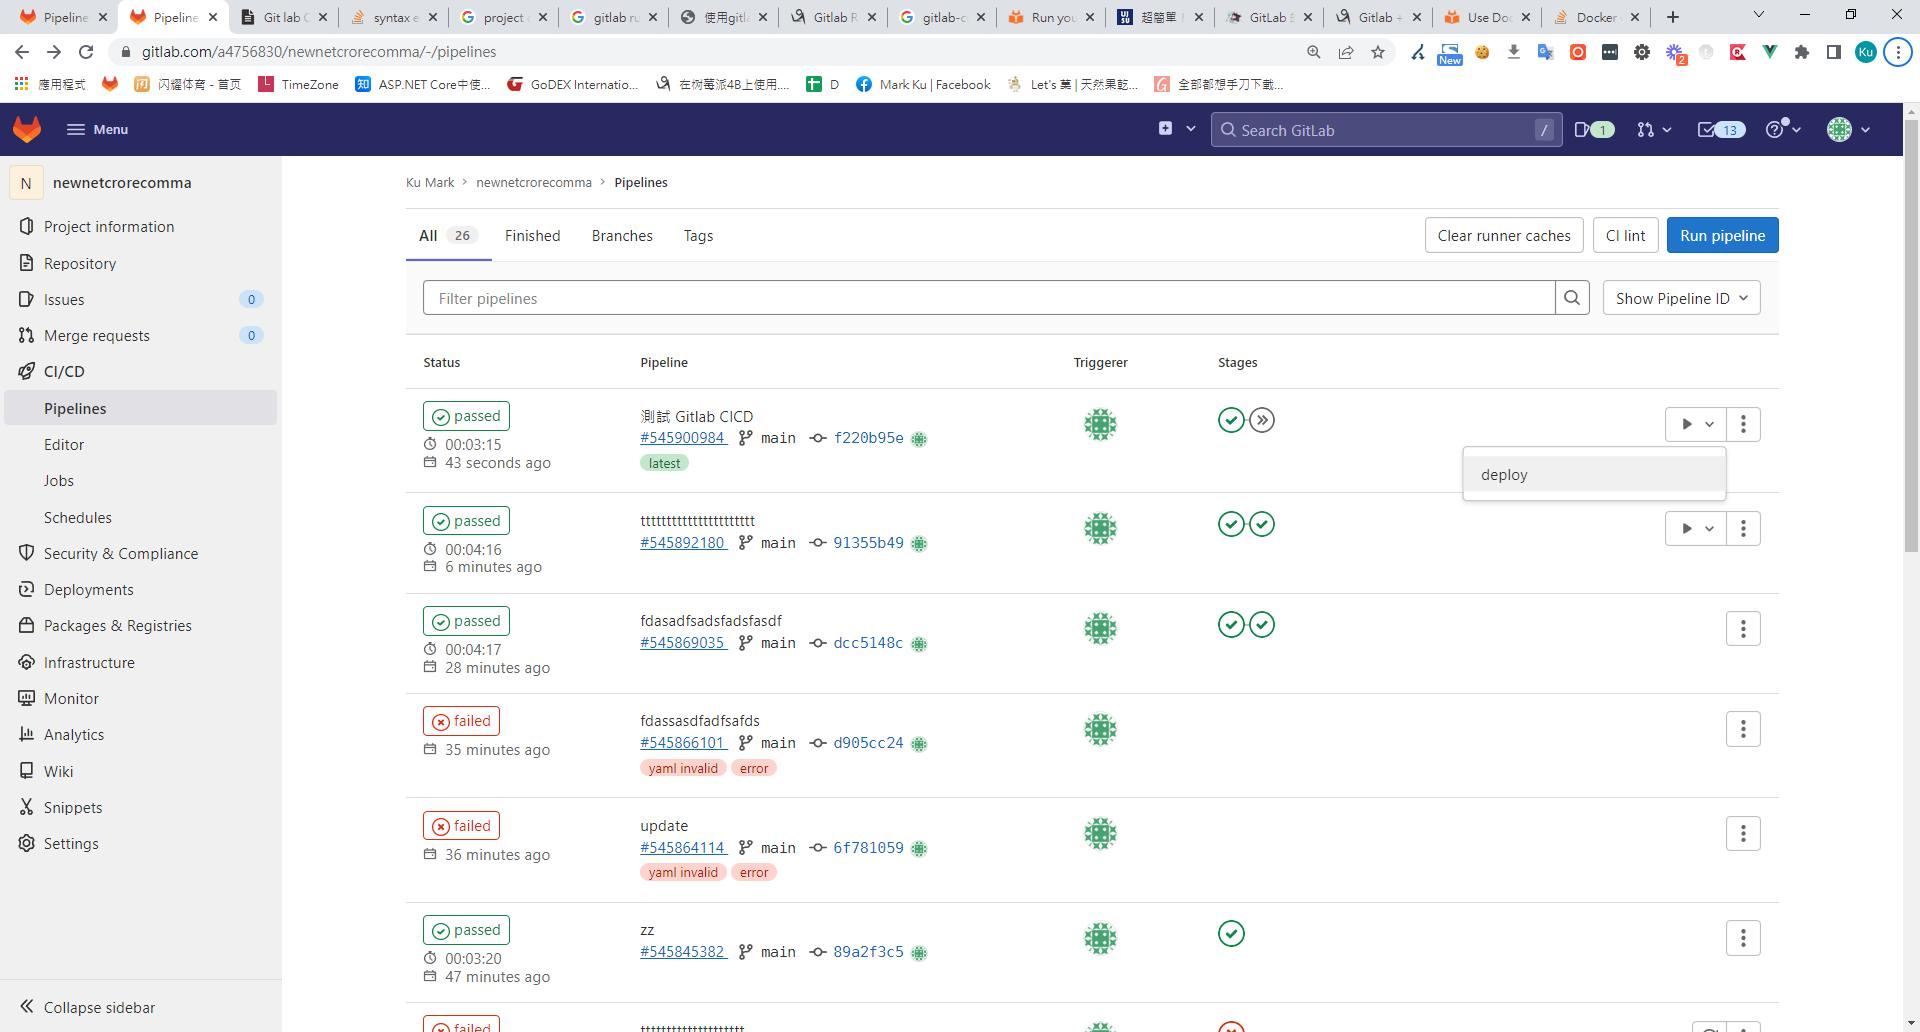
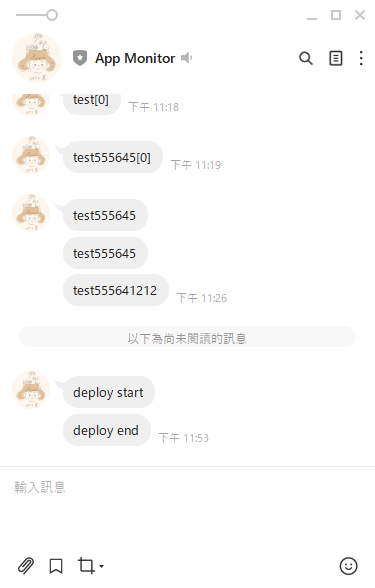
2. After the build completes, manually triggering a deploy notifies users via Line and Telegram about the deployment status
Wrap Up
GitLab Pipelines is a fantastic tool — and it's completely free. Without standing up a single server, cloud GitLab combined with a local Runner gave me full CI/CD, with Line Bot notifications keeping the team informed whenever a deployment is in progress.


Comments