

Introduction
Previously, I enabled Kubernetes on Windows Docker Desktop, but because Windows Kubernetes only supports a single node, isn't very stable, and consumes a lot of resources, I decided to set up a home lab with the more mainstream Linux version of Kubernetes.
Environment
- Ubuntu 22.04
- Docker pre-installed
Install Required Software
Run the following commands to update the system and install packages:
sudo apt-get update
sudo apt-get upgrade
sudo apt-get install -y net-tools git
- Use Chrony to configure time synchronization Chrony provides faster synchronization, higher precision, and uses fewer resources.
Install Chrony
sudo apt update
sudo apt install chrony
Modify Chrony configuration
sudo vim /etc/chrony/chrony.conf
pool 0 asia.pool.ntp.org iburst
pool 1.pool.ntp.org iburst
pool 2.pool.ntp.org iburst
pool 3.pool.ntp.org iburst
pool 4.pool.ntp.org iburst
Restart and test
sudo systemctl start chrony
sudo systemctl enable chrony
sudo chronyc -a makestep // 立刻同步時間
chronyc tracking // 檢查 Chrony 同步狀態
chronyc sources -v // 還可以查看連線的 NTP 伺服器列表及其同步狀態
timedatectl status //  確認系統時間狀態
- Disable the firewall:
  # 允許 Kubernetes API server 通信
  sudo ufw allow 6443/tcp   # Kubernetes API server

  # etcd 集群通訊
  sudo ufw allow 2379/tcp   # etcd client communication
  sudo ufw allow 2380/tcp   # etcd server-to-server communication

  # kubelet API
  sudo ufw allow 10250/tcp  # Kubelet API
  sudo ufw allow 10255/tcp  # Read-only Kubelet API (可選)
  sudo ufw allow 10248

  # Controller manager 和 scheduler
  sudo ufw allow 10251/tcp  # kube-scheduler
  sudo ufw allow 10252/tcp  # kube-controller-manager

  # Kubernetes DNS (CoreDNS)
  sudo ufw allow 53/tcp     # DNS TCP
  sudo ufw allow 53/udp     # DNS UDP

  # NodePort services (範圍可自定義,預設 30000-32767)
  sudo ufw allow 30000  # NodePort services

  # 啟用防火牆
  sudo ufw enable
  sudo ufw status verbose
- Disable OS Swap to prevent containers from being killed when memory is low:
sudo swapoff -a
sudo sed -i '/ swap / s/^\(.*\)$/#\1/g' /etc/fstab
Install Kubernetes
Add Kernel Parameters
sudo tee /etc/modules-load.d/containerd.conf <<EOF
overlay
br_netfilter
EOF
sudo modprobe overlay
sudo modprobe br_netfilter
sudo tee /etc/sysctl.d/kubernetes.conf <<EOF
net.bridge.bridge-nf-call-ip6tables = 1
net.bridge.bridge-nf-call-iptables = 1
net.ipv4.ip_forward = 1
EOF
Load the configuration changes:
sudo sysctl --system
Install the Containerd Runtime
Containerd is a lightweight container runtime that manages basic functions like starting and stopping containers.
sudo apt install -y curl gnupg2 software-properties-common apt-transport-https ca-certificates

sudo curl -fsSL https://download.docker.com/linux/ubuntu/gpg | sudo gpg --dearmour -o /etc/apt/trusted.gpg.d/docker.gpg
sudo add-apt-repository "deb [arch=amd64] https://download.docker.com/linux/ubuntu $(lsb_release -cs) stable"

sudo apt update
sudo apt install -y containerd.io

containerd config default | sudo tee /etc/containerd/config.toml >/dev/null 2>&1
sudo sed -i 's/SystemdCgroup \= false/SystemdCgroup \= true/g' /etc/containerd/config.toml

sudo systemctl restart containerd
sudo systemctl enable containerd
Install Kubernetes Components
sudo apt-get update
# apt-transport-https may be a dummy package; if so, you can skip that package
sudo apt-get install -y apt-transport-https ca-certificates curl gpg

curl -fsSL https://pkgs.k8s.io/core:/stable:/v1.29/deb/Release.key | sudo gpg --dearmor -o /etc/apt/keyrings/kubernetes-apt-keyring.gpg

# This overwrites any existing configuration in /etc/apt/sources.list.d/kubernetes.list
echo 'deb [signed-by=/etc/apt/keyrings/kubernetes-apt-keyring.gpg] https://pkgs.k8s.io/core:/stable:/v1.29/deb/ /' | sudo tee /etc/apt/sources.list.d/kubernetes.list

sudo apt-get update
sudo apt-get install -y kubelet kubeadm kubectl
sudo apt-mark hold kubelet kubeadm kubectl
Initialize the Kubernetes Master Node
Reload
sudo systemctl daemon-reload && sudo systemctl restart kubelet
sudo sysctl --system
Restart Docker:
sudo systemctl daemon-reload && sudo systemctl restart docker
sudo systemctl enable kubelet && sudo systemctl restart kubelet
Initialize kubeadm
sudo kubeadm init
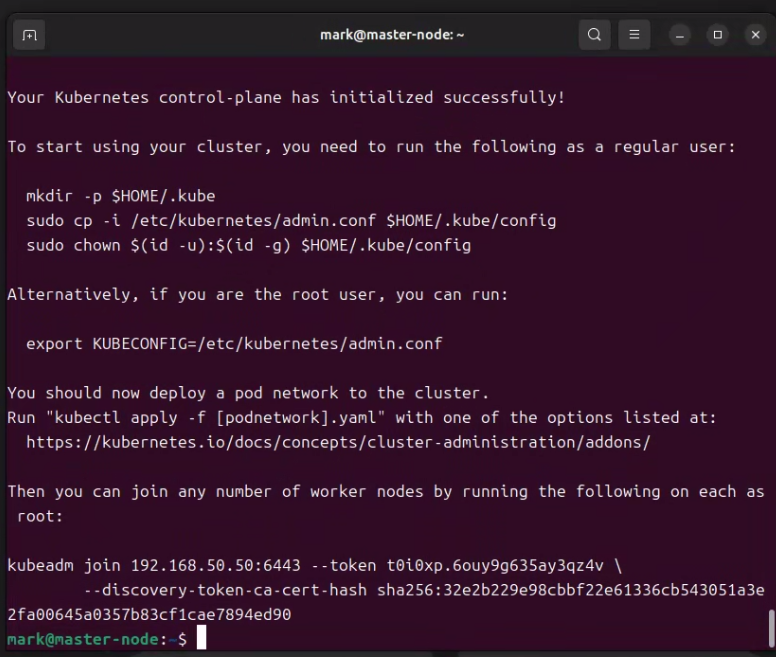
After initialization succeeds, follow the prompt to copy the kubectl configuration for your user:
mkdir -p $HOME/.kube
sudo cp -i /etc/kubernetes/admin.conf $HOME/.kube/config
sudo chown $(id -u):$(id -g) $HOME/.kube/config
Install the Pod Network
kubectl apply -f https://raw.githubusercontent.com/projectcalico/calico/v3.25.0/manifests/calico.yaml
As prompted, run the following command on other machines to add them as worker nodes
kubeadm join 192.168.50.50:6443 --token <TOKEN> --discovery-token-ca-cert-hash sha256:<HASH>
Check the Status of All Nodes
kubectl get nodes
Check detailed node status
kubectl describe node master-node

Create the First Kubernetes Container
Prepare the Persistent Volume path:
sudo mkdir /var/docker-pvc
sudo chmod 777 /var/docker-pvc
Deployment Configuration File deployment.yaml (On Windows, you don't need to specify the Persistent Volume location, but on Linux, it's required, e.g., hostPath: path: /var/docker-pvc)
Create the Kubernetes deployment file
sudo vim deployment.yaml
apiVersion: v1
kind: PersistentVolume
metadata:
  name: uptime-kuma-pv
spec:
  capacity:
    storage: 1Gi
  accessModes:
    - ReadWriteOnce
  hostPath:
    path: /var/docker-pvc

---

apiVersion: v1
kind: PersistentVolumeClaim
metadata:
  name: uptime-kuma-pvc
spec:
  accessModes:
    - ReadWriteOnce
  resources:
    requests:
      storage: 1Gi
  volumeName: uptime-kuma-pv

---

apiVersion: apps/v1
kind: Deployment
metadata:
  name: uptime-kuma-deployment
spec:
  replicas: 1
  selector:
    matchLabels:
      app: uptime-kuma
  template:
    metadata:
      labels:
        app: uptime-kuma
    spec:
      containers:
      - name: uptime-kuma
        image: louislam/uptime-kuma:1
        ports:
        - containerPort: 3001
        volumeMounts:
        - name: uptime-kuma-volume
          mountPath: /app/data
      volumes:
      - name: uptime-kuma-volume
        persistentVolumeClaim:
          claimName: uptime-kuma-pvc

---

apiVersion: v1
kind: Service
metadata:
  name: uptime-kuma-service
spec:
  type: NodePort
  selector:
    app: uptime-kuma
  ports:
  - port: 3001
    targetPort: 3001
    nodePort: 30000
Deploy the application
kubectl apply -f ./deployment.yaml
Remove the Control Plane Taint (for single-node environments)
kubectl taint nodes --all node-role.kubernetes.io/control-plane-
This command is primarily used to address a resource scheduling issue on Kubernetes control plane nodes. By default, Kubernetes applies a "taint" to control plane nodes (usually the master node) to prevent general workloads (Pods) from being scheduled on them. This ensures that the control plane nodes can focus on managing the cluster and remain stable.
Final Result
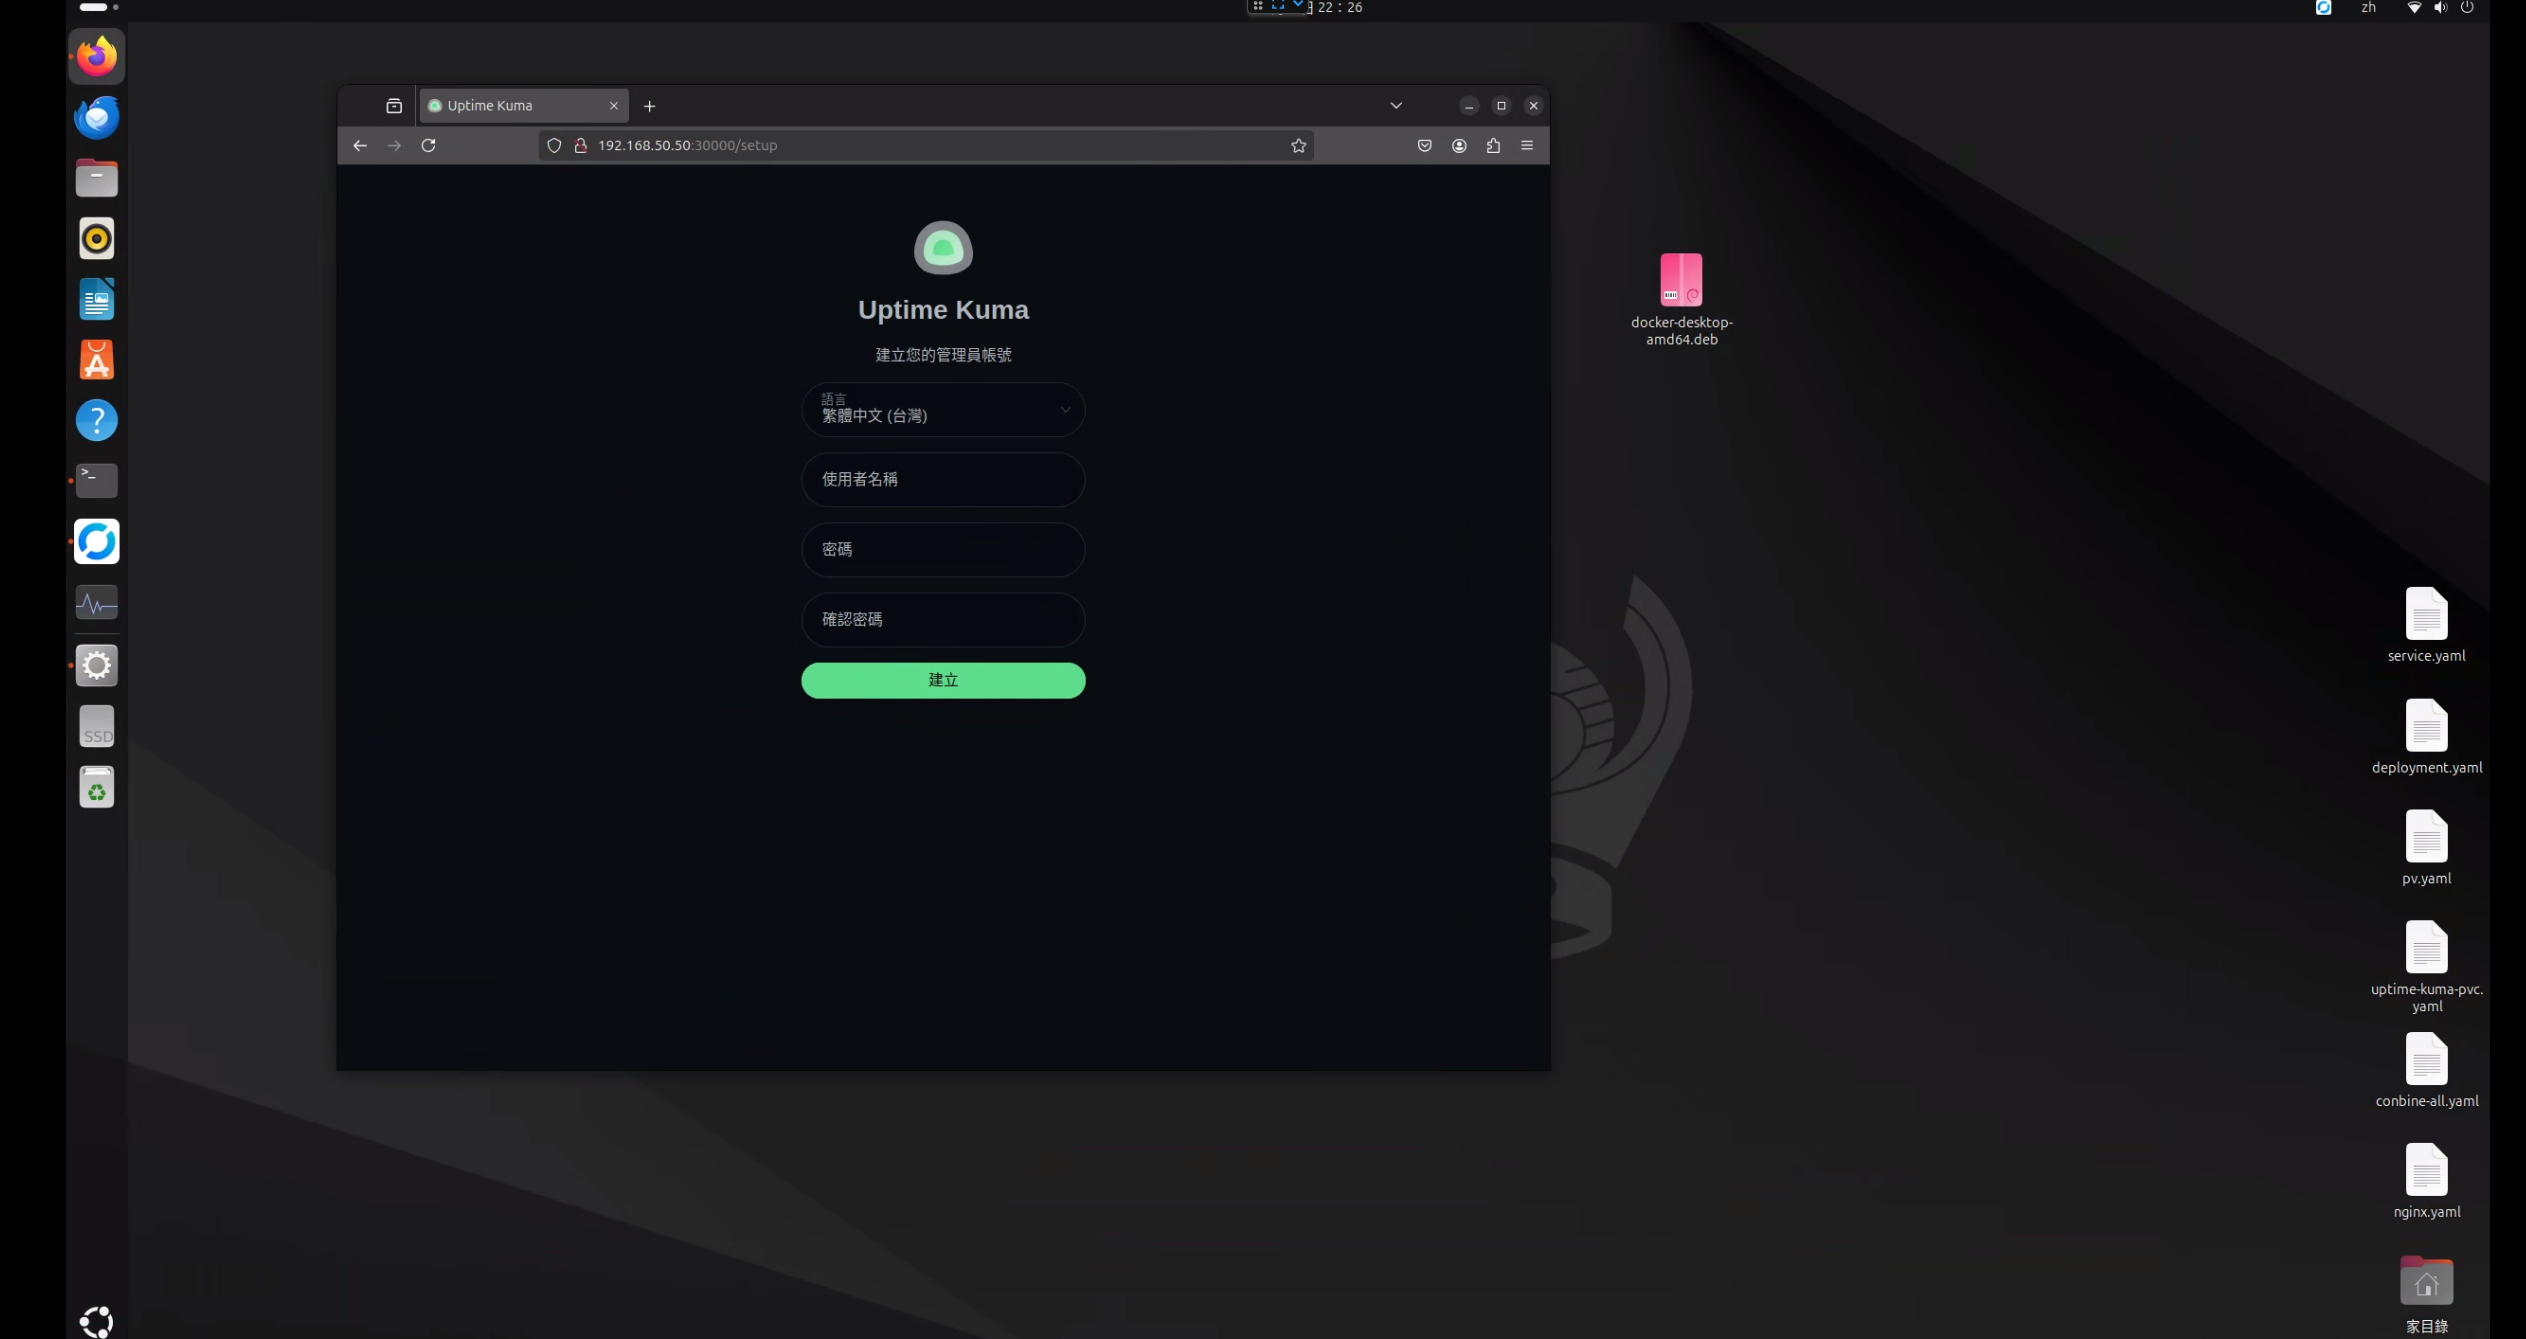
Now, if you visit localhost:30000, you should see this screen:
Appendix - If the Installation Fails or to Reinstall Kubernetes
sudo kubeadm reset -f
sudo rm -rf ~/.kube
sudo rm -rf /etc/kubernetes /var/lib/etcd /var/lib/kubelet /var/lib/kubeadm /etc/cni /opt/cni
sudo systemctl status docker
sudo systemctl status containerd
sudo apt-get remove --purge -y kubeadm kubectl kubelet kubernetes-cni cri-tools
sudo apt-get autoremove -y
sudo dpkg --purge kubectl kubeadm kubelet
sudo apt-get autoremove --purge -y
sudo rm -rf /etc/kubernetes /var/lib/etcd /var/lib/kubelet /etc/cni /opt/cni ~/.kube
sudo rm /etc/apt/sources.list.d/kubernetes.list
sudo apt-get update


Comments