
📖 Features Page | ⬇️ Install from VS Code Marketplace
Free to use. You can also install it directly in VS Code by pressing
Ctrl+Pand pastingext install mark-ku.refactory.
Introduction
After moving my main development workflow to VS Code, the thing I missed most was refactoring (improving code readability without changing its external behavior).
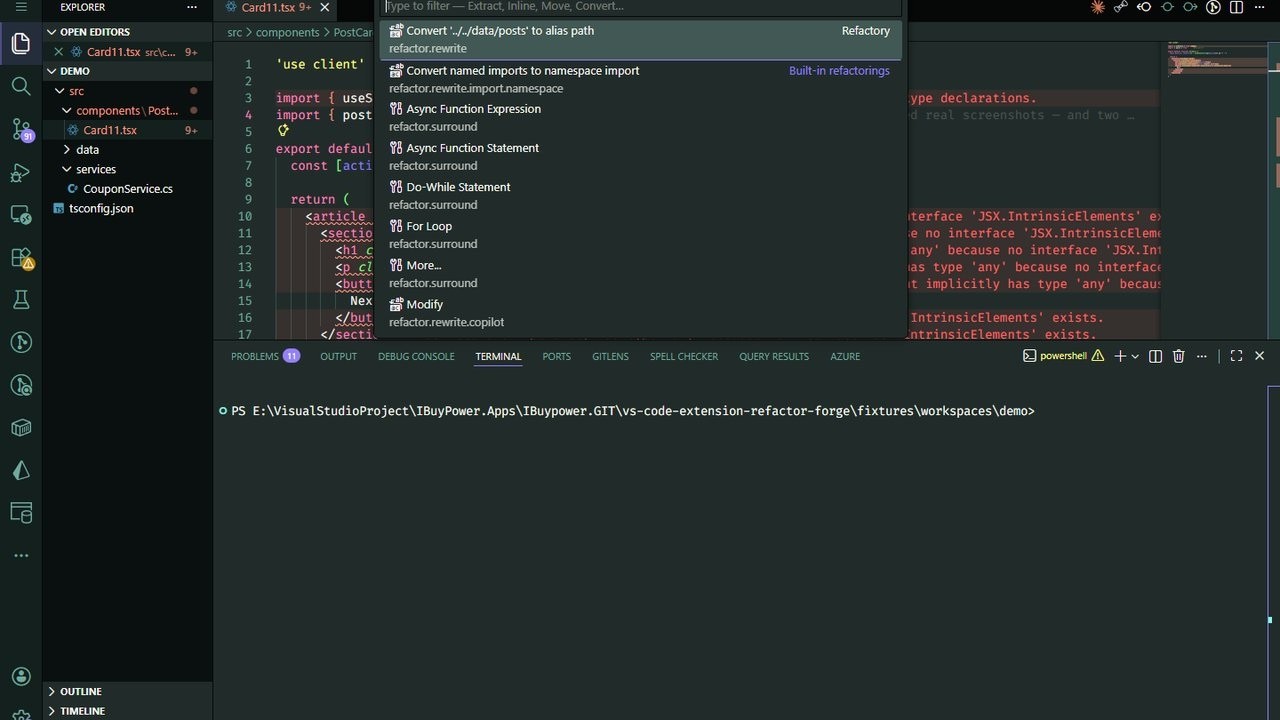
In traditional commercial IDEs, you press a key, and a list of all possible actions for the current location appears. In VS Code, these features are scattered, and many are missing. Even when they exist, the generated code doesn't match your project's style: Which folder should interfaces go in? Where are DI registrations written? Should 'use client' be carried over? Generic tools have no idea.
So I built Refactory. It's available on the Marketplace, free to use, with 34 refactoring actions + 38 code smell checks across 18 languages.
This post will only cover how to use it: where to place your cursor, what keys to press, and what the code looks like afterward.
1. Installation (30 seconds)
In VS Code, press Ctrl+P and paste ext install mark-ku.refactory, or search for Refactory in the Extensions panel. It works right after installation, no configuration needed.
To use the C# features, you'll need the .NET 8 runtime on your machine. If it's not installed, only the C# half will be disabled; React / TypeScript features are unaffected.
2. Just Remember One Keybinding
| Key | When to Press |
|---|---|
Ctrl+Alt+Shift+T | Primary. Lists all actions available at the cursor's position. |
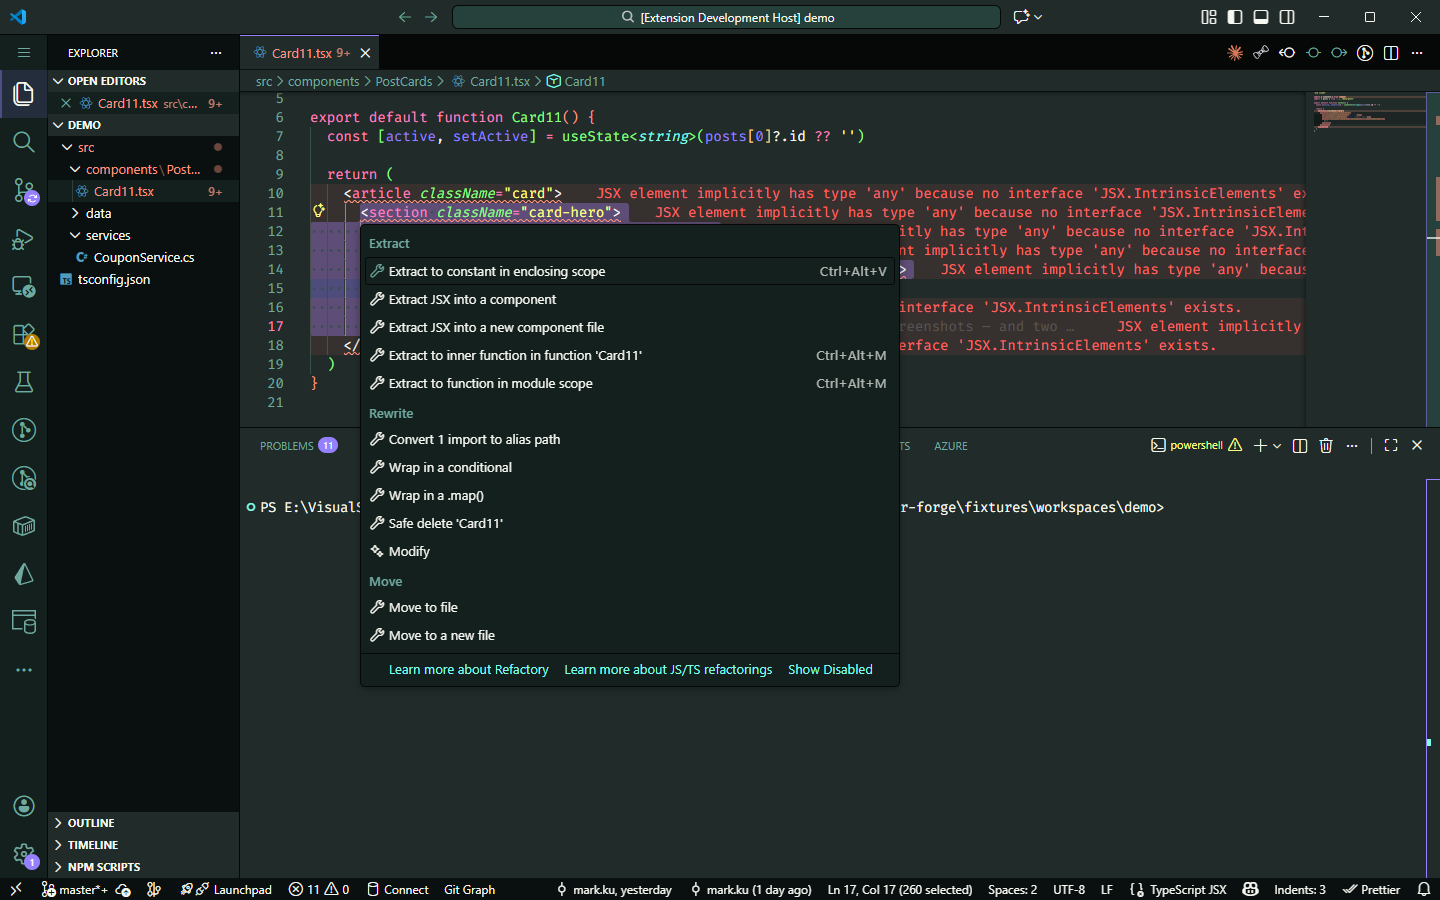
Ctrl+. | The native lightbulb menu, which also includes Refactory's actions. |
Ctrl+Shift+P → type Refactory | Commands that operate on the "entire file". |
| Right-click in the editor | The context menu also has a "Refactor Here..." item, which is the same as the first row. |
You only need to remember the first one.
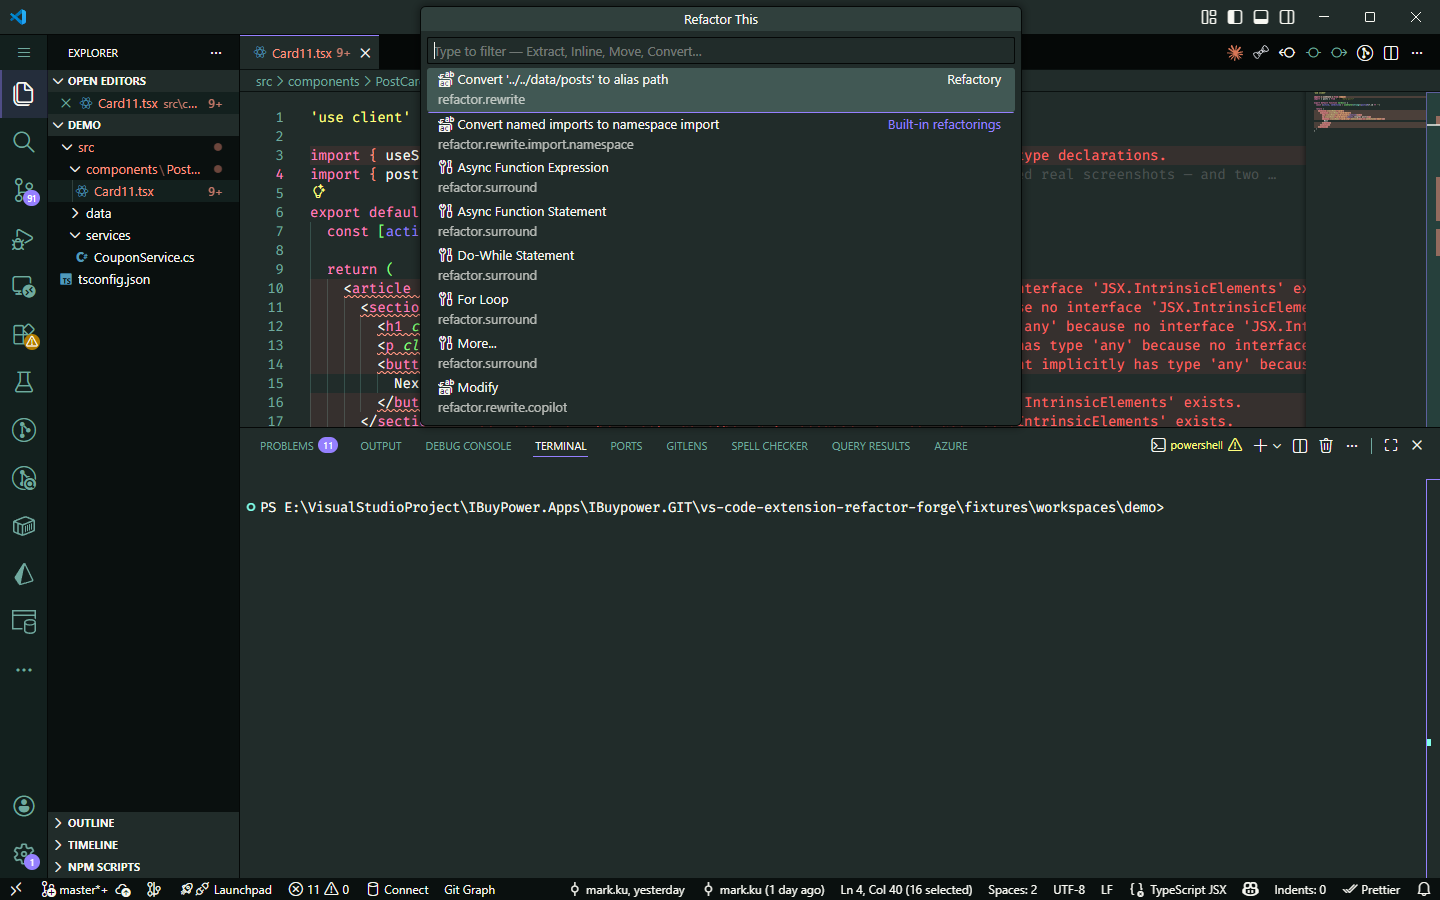
Two things that will help you: recently used actions float to the top, and unavailable actions are also listed with an explanation, so you don't have to guess.
If you're used to pressing Ctrl+., you don't need to change your habit; the actions are still there:
3. React / Next.js
3-1. Extract a JSX snippet into a component
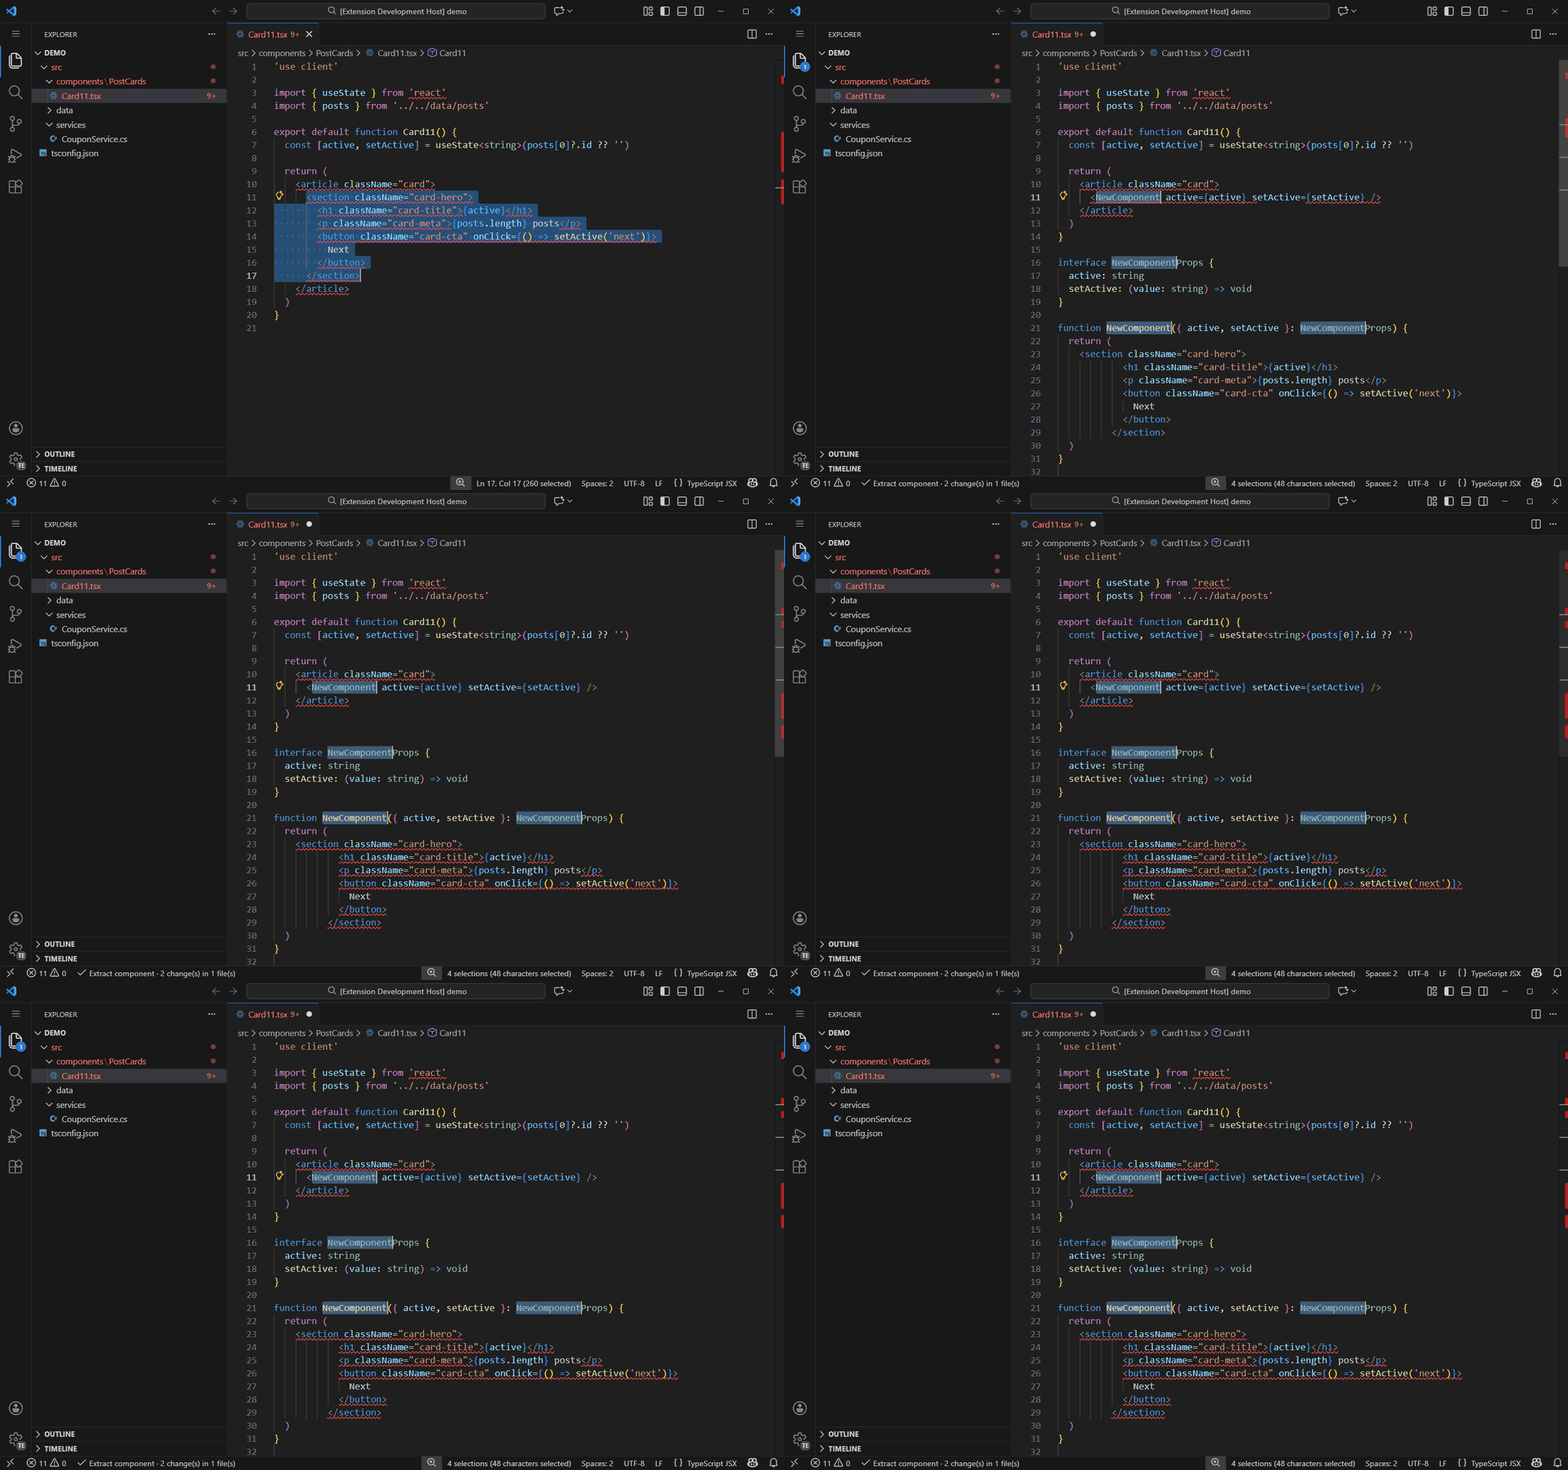
How to use
- Select a complete block of JSX.
- Press
Ctrl+Alt+Shift+T.- Choose
Extract JSX into a component(in the same file) or…into a new component file(in a new file).- Type the name and press Enter.
Select this → It generates this (props types are automatically inferred, no need to fill them in yourself):
1-<section className="hero">2- <h1>{active}</h1>3- <button onClick={() => setActive('next')}>Next</button>4-</section> 1+interface NewComponentProps {2+ active: string3+ setActive: (value: string) => void4+}5+6+function NewComponent({ active, setActive }: NewComponentProps) {7+ return (8+ <section className="hero">9+ <h1>{active}</h1>10+ <button onClick={() => setActive('next')}>Next</button>11+ </section>12+ )13+}The original location is automatically replaced with <NewComponent active={active} setActive={setActive} />.
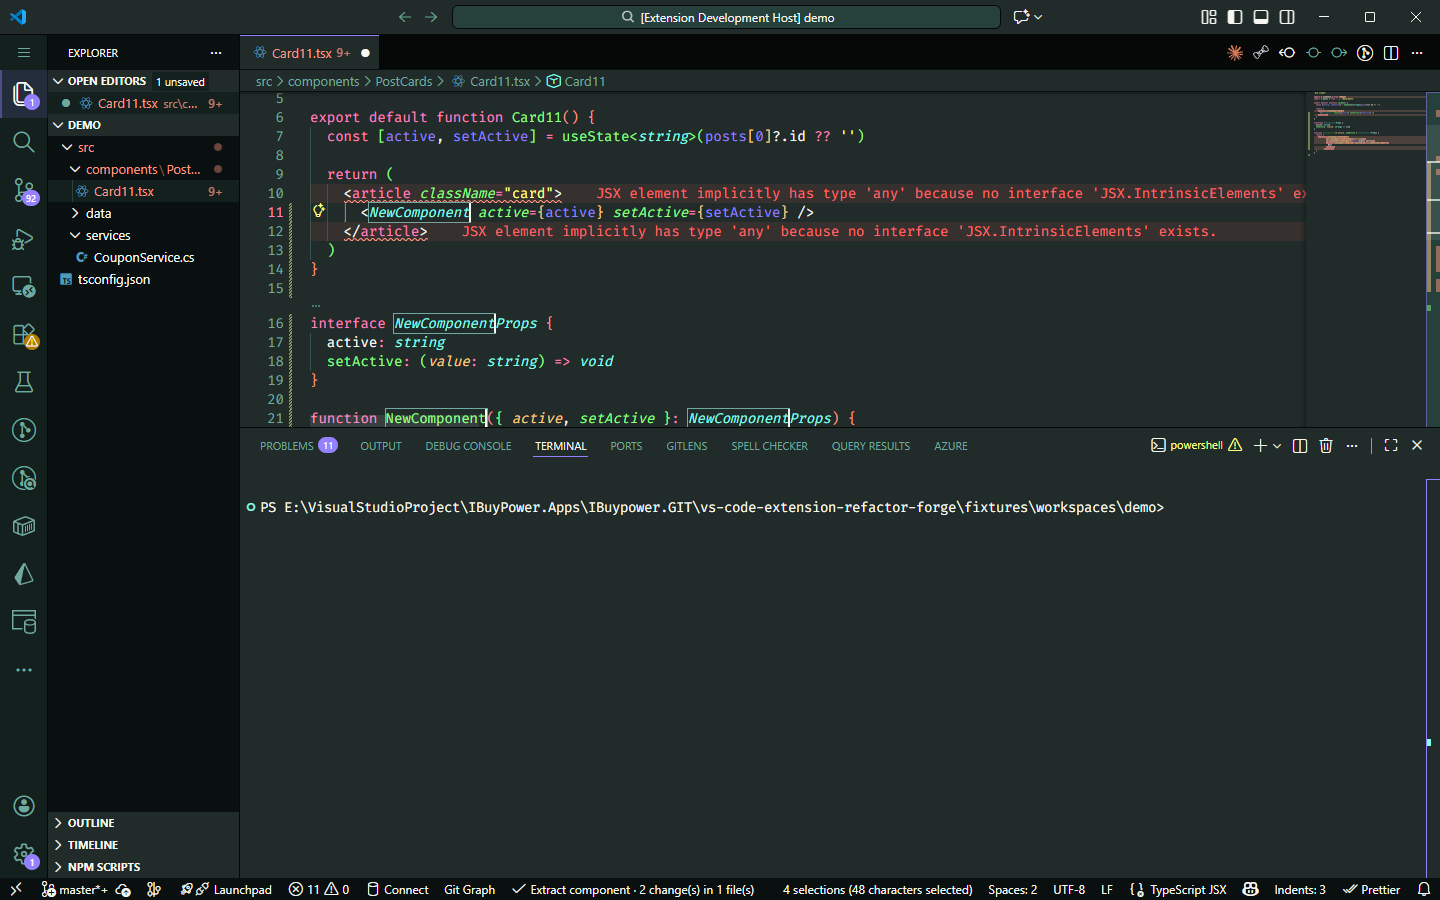
Notice the 4 selections in the status bar: the call site, interface name, function name, and type reference all enter edit mode simultaneously. Type once to change all four places.
When extracting to a new file, it also handles these things for you: carries over 'use client', moves only the necessary imports, converts shared constants to export + import (instead of duplicating them), and follows your project's conventions for file location and naming.
Cross-file operations will first open the Refactor Preview panel, allowing you to confirm each change before writing to disk.
3-2. Extract a chunk of state logic into a custom hook
How to use: Select a few consecutive lines (containing at least one hook call) →
Ctrl+Alt+Shift+T→Extract into a custom hook→ Type the name.
1-const [query, setQuery] = useState('')2-const [results, setResults] = useState<Post[]>([])3-useEffect(() => {4- if (!query) return5- fetchPosts(query).then(setResults)6-}, [query]) 1+function useSearch() {2+ const [query, setQuery] = useState('')3+ const [results, setResults] = useState<Post[]>([])4+ useEffect(() => {5+ if (!query) return6+ fetchPosts(query).then(setResults)7+ }, [query])8+9+ return { query, setQuery, results }10+}The dependency array of useEffect will never be touched. If the dependencies look strange after moving, it means the original code was already problematic—that's a matter for another commit.
3-3. Wrap JSX: conditional, .map(), fragment
All three are done by selecting a complete JSX block and pressing Ctrl+Alt+Shift+T; the only difference is which item you choose from the menu.
Wrap in a conditional render:
1 <div>2- <b>{n}</b> 3 </div>1 <div>2+ {condition && (3+ <b>{n}</b>4+ )}5 </div>Wrap in .map():
1 <ul>2- <li>{name}</li> 3 </ul>1 <ul>2+ {items.map((item) => (3+ <li key={item}>{name}</li>4+ ))}5 </ul>condition, items, and item are all in-place editable cursor points. Press Tab to jump to the next one and type to rename directly, no need to go back and find them.
key={item} is pre-filled for you, along with a warning: nobody knows what unique key your data uses, so it provides a default value that compiles and explicitly says "please replace with a stable id," rather than silently leaving an empty space for React to complain about in the console later.
When you select two or more sibling nodes, the menu offers to wrap them in a fragment (<>…</>). .map() only appears when you select a single root node—wrapping a single node in a fragment is pointless, and wrapping two nodes with .map() would produce invalid JSX.
3-4. Convert const X: FC<Props> to a function declaration
How to use: Place the cursor on the component declaration line →
Ctrl+Alt+Shift+T→ Choose "Convert to function declaration".
1 interface Props {2 title: string3 }4 5-const Card: FC<Props> = ({ title }) => {6 return <b>{title}</b>7 }8-9-export default Card1 interface Props {2 title: string3 }4 5+export default function Card({ title }: Props) {6 return <b>{title}</b>7 } Two details: the type is moved from the variable to the parameter, and a separate export default Card line below is absorbed, leaving no orphan line. A shorthand body (=> <b>{title}</b>) will be expanded to return.
This action always comes with a warning: FC implicitly includes a children prop, which is lost after converting to a function declaration. If your component actually receives children, type checking for them will only truly begin from this moment. Generic components (<T,>) are rejected outright because you can't write generics with FC<Props> anyway.
3-5. Rename a prop, including all call sites
This is one of the easiest things to miss when doing it manually: you change the type, you change the destructuring, but you miss a <Card title="…" /> in another file.
How to use: Place the cursor on the property within the props type →
Ctrl+Alt+Shift+T→ Choose "Rename prop" → Type the new name.
1 interface CardProps {2- title: string3 count: number4 }5 6-export function Card({ title, count }: CardProps) {7- return <b>{title}: {count}</b>8 }1 interface CardProps {2+ heading: string3 count: number4 }5 6+export function Card({ heading, count }: CardProps) {7+ return <b>{heading}: {count}</b>8 }The same action will also change call sites in other files:
1 export function Panel() {2- return <Card title="hello" count={1} />3 }1 export function Panel() {2+ return <Card heading="hello" count={1} />3 }The adjacent count is not touched at all. If you already used an alias during destructuring (e.g., { title: heading }), it will only change the type member and won't touch the local name you've already chosen.
It will reject call sites with spread attributes like <Card {...props} />: whether that object actually contains title can only be known through type inference, and a lexical-level indexer shouldn't pretend to know.
3-6. Inline variable and import path conversion
Inline variable (expand an intermediate variable used only once):
1 export function Panel() {2- const label = 'hello'3- return <b>{label}</b>4 }1 export function Panel() {2+ return <b>{'hello'}</b> 3 }If it's used more than once and the initialization has no side effects, it will be inlined everywhere, with parentheses added where needed to preserve operator precedence (e.g., n * 2 becomes {n * 2}{n * 2}). It will refuse in three cases: let (the value changes), initialization has side effects and is used more than once (it would run multiple times), and variables listed in a useEffect dependency array (inlining would silently change the dependencies).
Import path conversion (place cursor on the path string):
1-import { posts } from '../../data/posts'2-import type { TPost } from '../../data/types'1+import { posts } from '@/data/posts'2+import type { TPost } from '@/data/types'Aliases are read from the paths of the tsconfig.json that governs this file, no extra configuration needed. It recognizes import type, export … from, dynamic import(), and side-effect-only imports. It also preserves the original single or double quotes. You can convert back and forth, and converting back will give you the exact original text.
3-7. Where to place the cursor: a complete reference table
Placing the cursor in the wrong spot is the most common sticking point for tools like this, so just consult this table:
| What you want to do | Cursor / Selection position |
|---|---|
| Extract JSX to component | Select a complete block of JSX |
| Extract custom hook | Select a few consecutive lines, containing at least one hook call |
Convert const X: FC<Props> to function declaration | On the component declaration |
Wrap in fragment / conditional / .map() | Select a complete block of JSX |
| Inline variable | On the const declaration or any of its references |
| Convert single import to alias / relative path | On the path string (e.g., '../../data/posts') |
| Convert all imports in entire file | Ctrl+Shift+P → Refactory: TypeScript: Convert Imports… |
| Move declaration to a separate file | On the declared name (references will be updated) |
| Safe delete | On the declared name; will refuse and list usages if it's in use |
| Rename prop (including all call sites) | On the property within the props type |
'use client' fix | No action needed, appears in the Problems panel, apply with Ctrl+. |
Three reminders: Also works for JavaScript (output will be untyped, file extension follows the source); import aliases require no setup and are read directly from the governing tsconfig.json; whole-file conversions are intentionally placed only in the command palette to avoid popping up on every cursor movement.
3-8. Automatic 'use client' reminders (Next.js)
No action needed, these appear as you type in a Next.js project:
| Situation | How it's handled |
|---|---|
Used useState but forgot the directive | A warning appears, Ctrl+. → Add 'use client' directive |
| Added the directive, but the same file also exports server-only code | No quick fix is offered. It explicitly states: you should extract the client part into a separate component, not move the boundary up. |
| Added the directive but it's not needed | A hint with the lowest severity. Removing it prevents the component from being bundled for the browser. |
3-9. Real-time React code smell reminders
"Code smells" = code that compiles but will cause you pain later. They are highlighted with squiggles as you type, and each comes with a Ctrl+. quick fix.
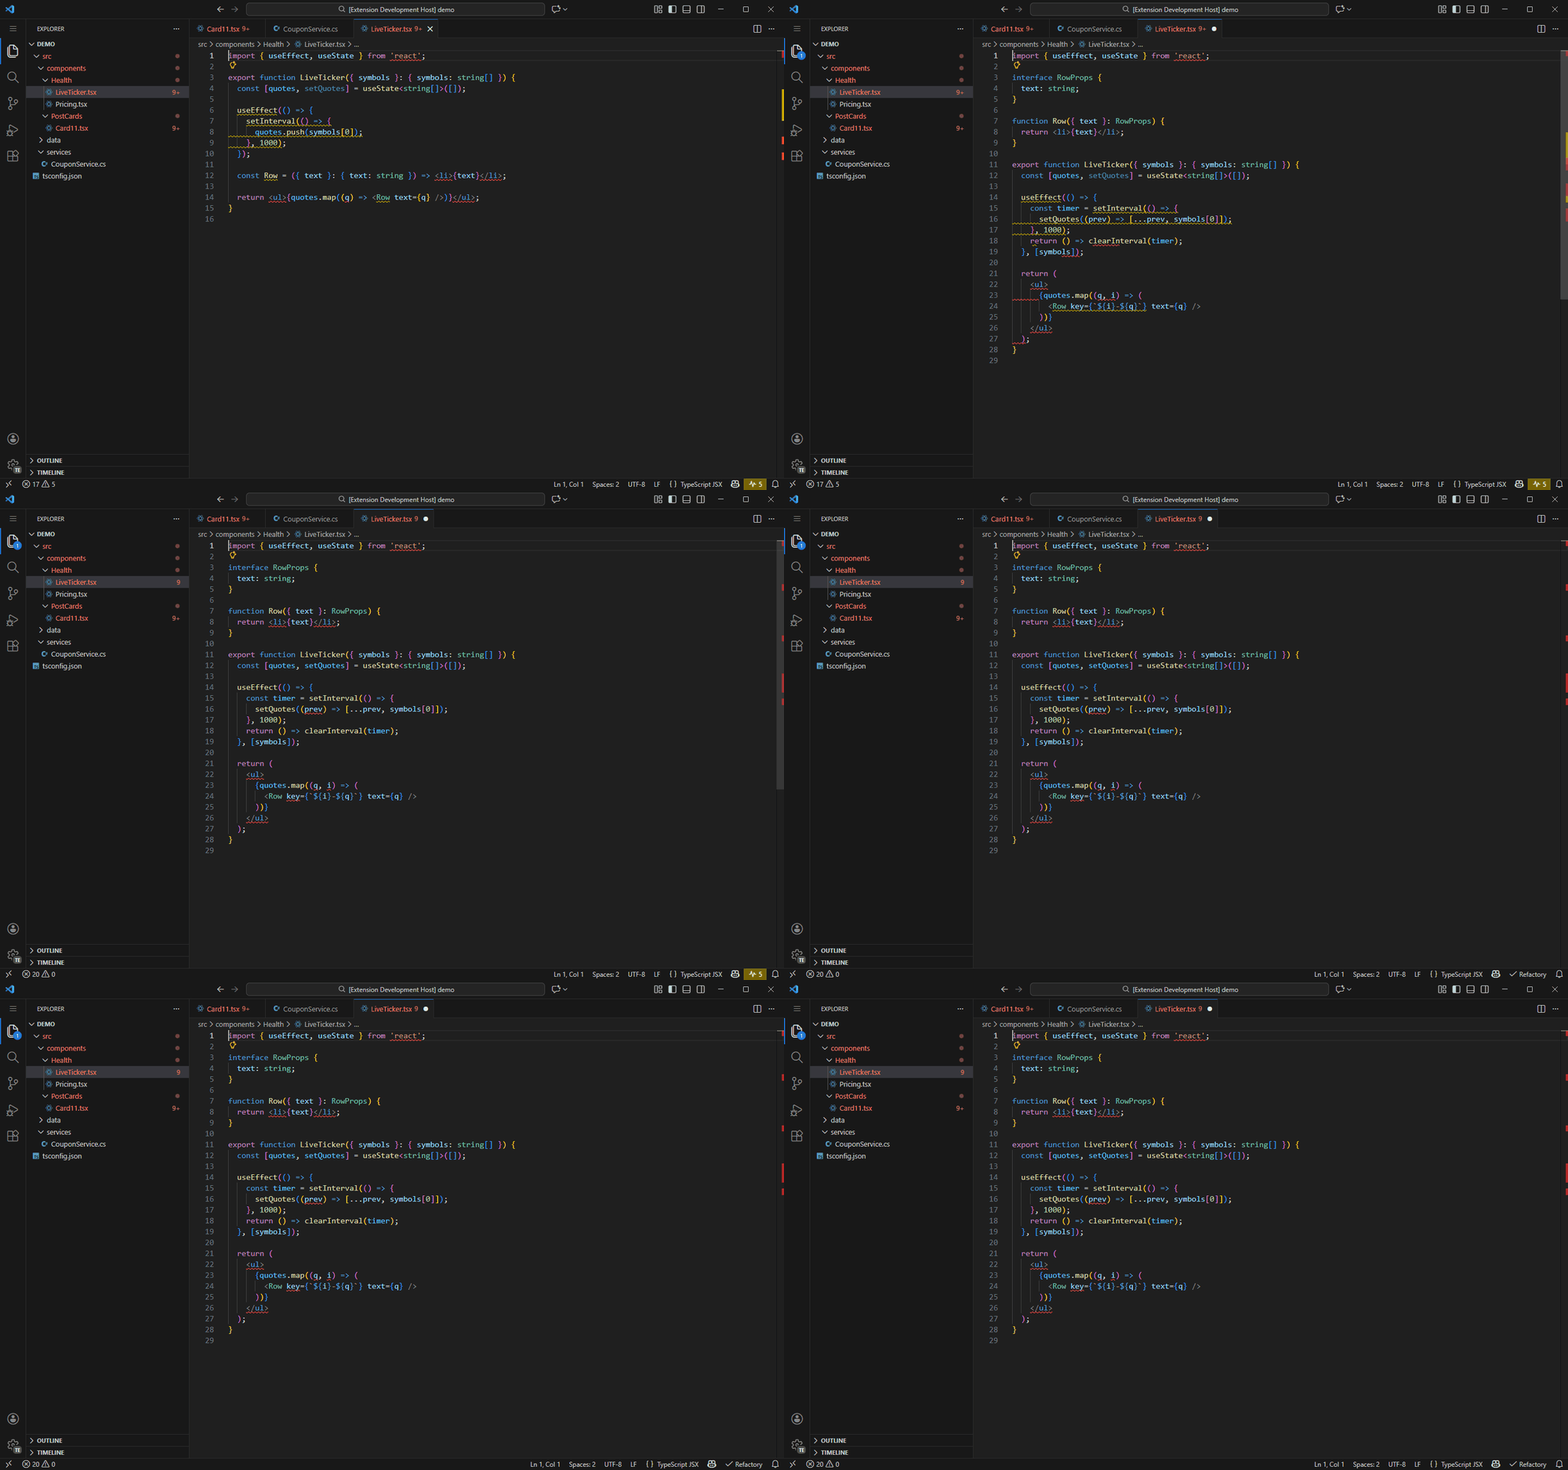
- Defining a component inside another component (becomes a new type on every render, resetting its state; this is the most severe one)
- Mutating state directly: doing
items.push(...)on auseStatevalue, the UI will never update useEffect: missing dependency array, async callback, subscription without cleanup, oversized effect- Using the index from
.map()as akey - Too many hooks, too many props, component too large, JSX too deeply nested, nested ternaries in JSX
- Using native
<img>in a Next.js project (should usenext/image) - General TypeScript: explicit
any, emptycatch,console.log, file too long
Severity levels are intentionally tiered: things that will break are warnings, structural issues are information, and style issues are the faintest hints, so that truly important signals aren't drowned out.
3-10. A 15-line component with five code smells
The file below is one of the extension's own test cases, and it's the LiveTicker.tsx from the dashboard screenshot in section 5. It compiles, it runs, it looks harmless, but it triggers five warnings:
1 import { useEffect, useState } from 'react';2 3 export function LiveTicker({ symbols }: { symbols: string[] }) {4- const [quotes, setQuotes] = useState<string[]>([]);5 6 useEffect(() => {7- setInterval(() => {8- quotes.push(symbols[0]);9 }, 1000);10- });11-12- const Row = ({ text }: { text: string }) => <li>{text}</li>;13 14- return <ul>{quotes.map((q) => <Row text={q} />)}</ul>; 15 }1 import { useEffect, useState } from 'react';2 3+let nextId = 0;4+5+const Row = ({ text }: { text: string }) => <li>{text}</li>;6+7 export function LiveTicker({ symbols }: { symbols: string[] }) {8+ const [quotes, setQuotes] = useState<{ id: number; text: string }[]>([]);9 10 useEffect(() => {11+ const timer = setInterval(() => {12+ setQuotes((prev) => [...prev, { id: nextId++, text: symbols[0] }]);13 }, 1000);14+ return () => clearInterval(timer);15+ }, [symbols]); 16 17+ return (18+ <ul>19+ {quotes.map((q) => <Row key={q.id} text={q.text} />)}20+ </ul>21+ );22 }The five smells are:
| Line | Rule ID | Why it will bite you |
|---|---|---|
useEffect(() => {…}) | react.effectWithoutDeps | No dependency array, so it re-runs on every render. |
setInterval(…) | react.effectMissingCleanup | No cleanup function. On remount, the old timer is still running (you get two in StrictMode). |
quotes.push(…) | react.mutatedState | It mutates the same array. The reference doesn't change, so React doesn't see anything to re-render. |
const Row = … | react.componentInComponent | It's a new component type on every render. React will unmount it, discarding its state and DOM. |
.map((q) => <Row …>) | react.missingKey | No key provided. React silently falls back to using the index. |
All five of these are warnings because each one will bite you at runtime; they're not just "suboptimal style." The fixes are what you'd expect: capture the timer ID and clear it in the cleanup, replace push with setQuotes to create a new array, move Row to the module scope, and bind the key to a stable ID from the data itself.
4. C#
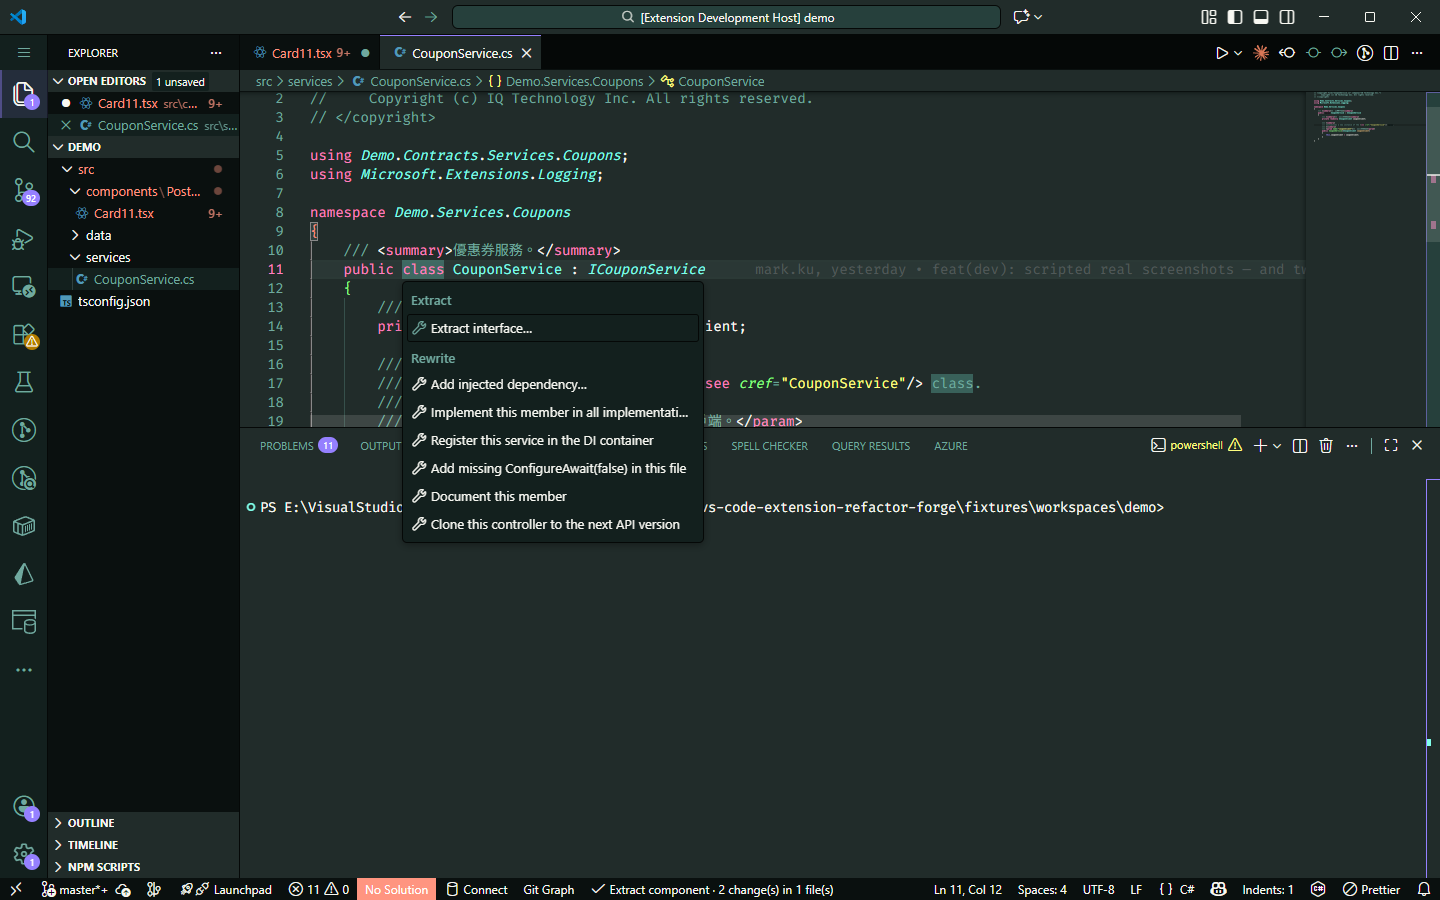
| Action | What it does |
|---|---|
| Add injected dependency | Modifies six places at once (detailed below) |
| Extract Interface | Extracts an interface and places it in your project's actual interface folder |
| Sync interface members | An interface has a new member; update all implementations with one click |
| Register with DI | Registers the service with the DI container |
Add ConfigureAwait | Adds ConfigureAwait(false) throughout the file |
| Generate XML documentation | Generates XML comments for a member (uses wording from the interface if available) |
| Clone controller to next version | Copies a v1 controller to v2, updating relevant references |
These seven actions only appear when you press Ctrl+Alt+Shift+T. They don't proactively trigger the lightbulb (determining if the cursor is in a class requires querying Roslyn, which is too slow to do on every cursor move).
4-1. Add injected dependency: one action, six changes
Dependency Injection (DI) means "don't new it yourself, have someone else pass it in." Manually adding a dependency requires changing six places; miss one, and it won't compile.
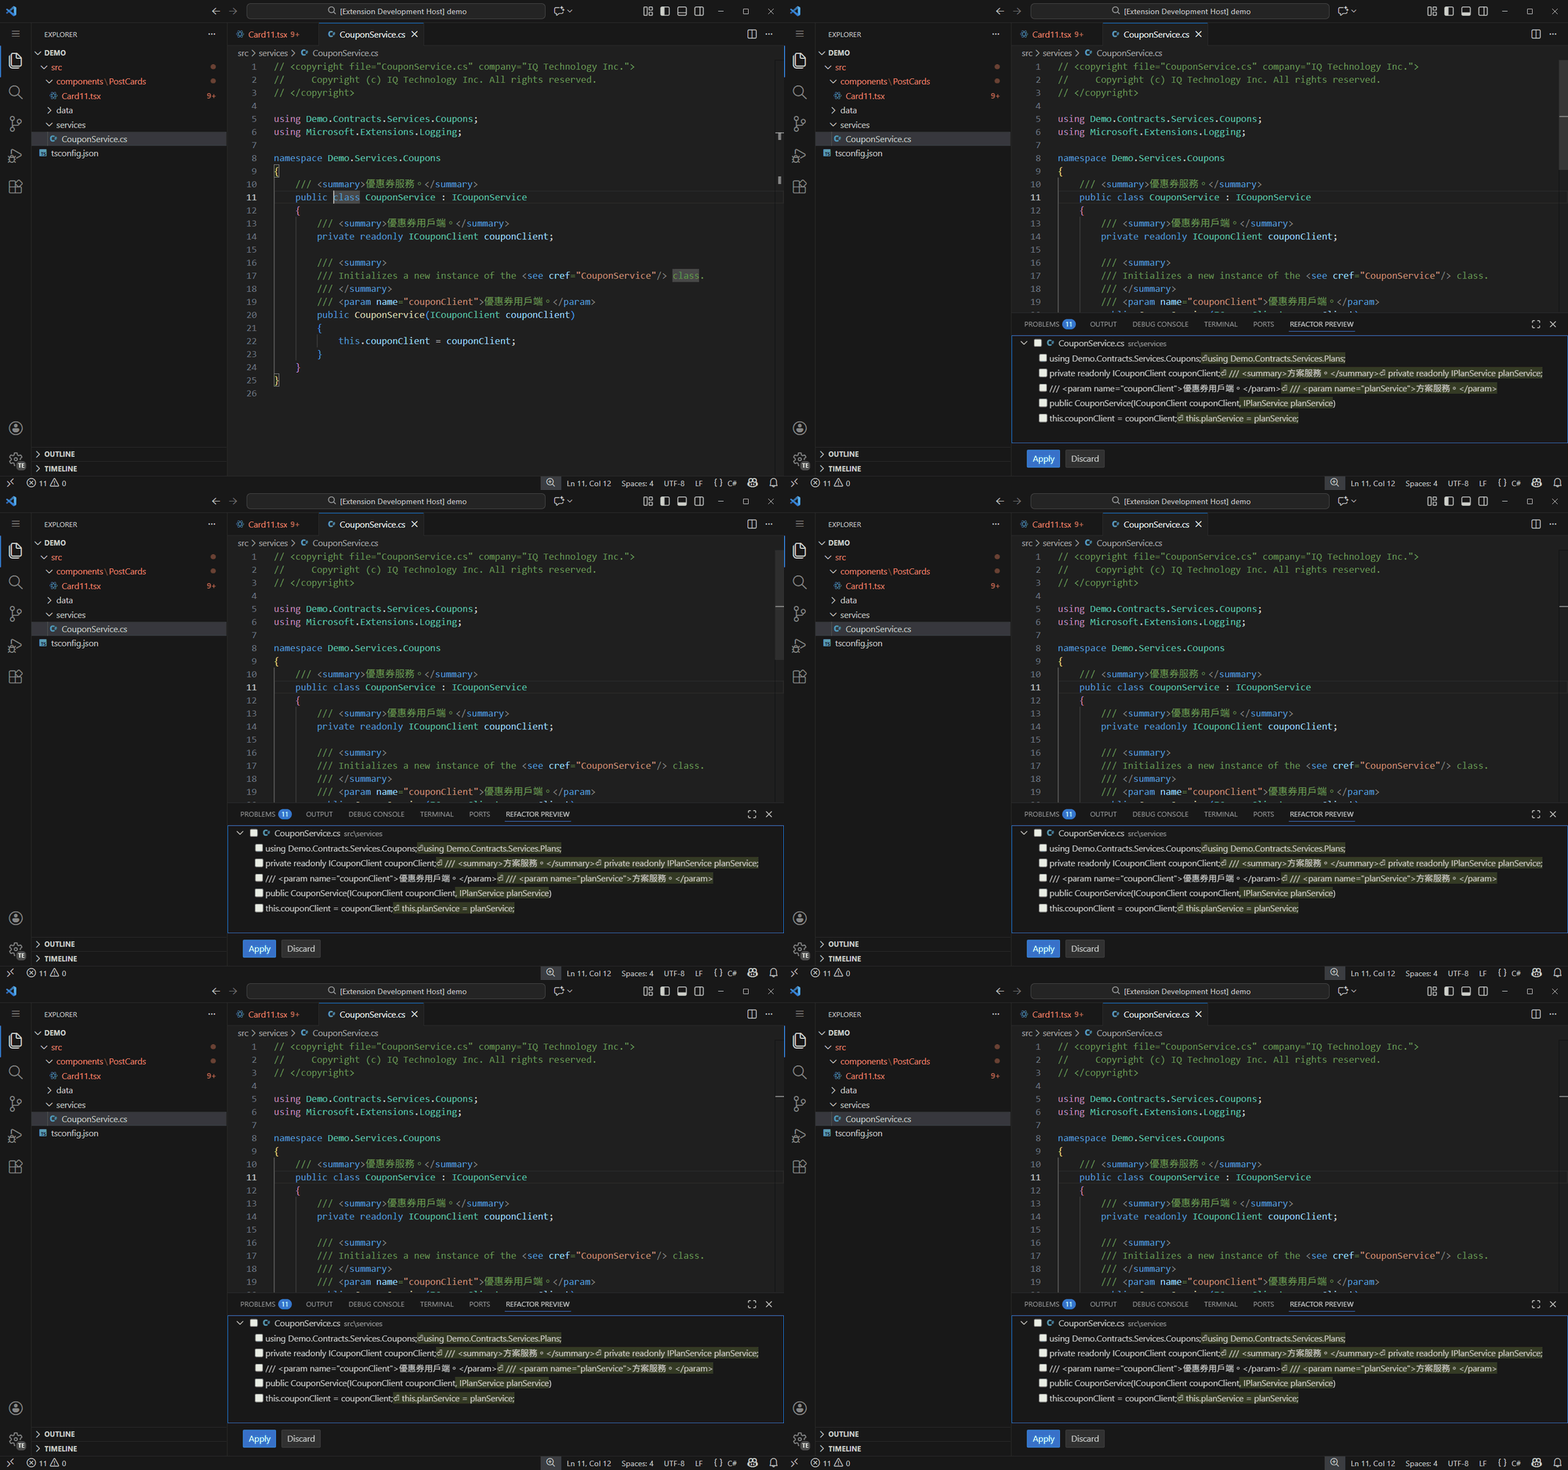
How to use: Place the cursor anywhere inside the class →
Ctrl+Alt+Shift+T→Add injected dependency…→ Enter the type (e.g.,IPlanService) → Enter the namespace (can be left blank).
// 原本的 class
public class CouponService : ICouponService
{
    /// <summary>優惠券用戶端。</summary>
    private readonly ICouponClient couponClient;

    /// <param name="couponClient">優惠券用戶端。</param>
    public CouponService(ICouponClient couponClient)
    {
        this.couponClient = couponClient;
    }
}
After you press Enter, these six places are changed simultaneously:
- The
usingstatement (inserted alphabetically, not at the end). - A new
private readonlyfield. - XML documentation for the field.
- A constructor parameter.
- A
<param>tag (inserted at the corresponding parameter position, as StyleCop checks the order). - The
this.assignment in the constructor.
Six edits, all reverted with a single undo. And you get to review them before they're applied:
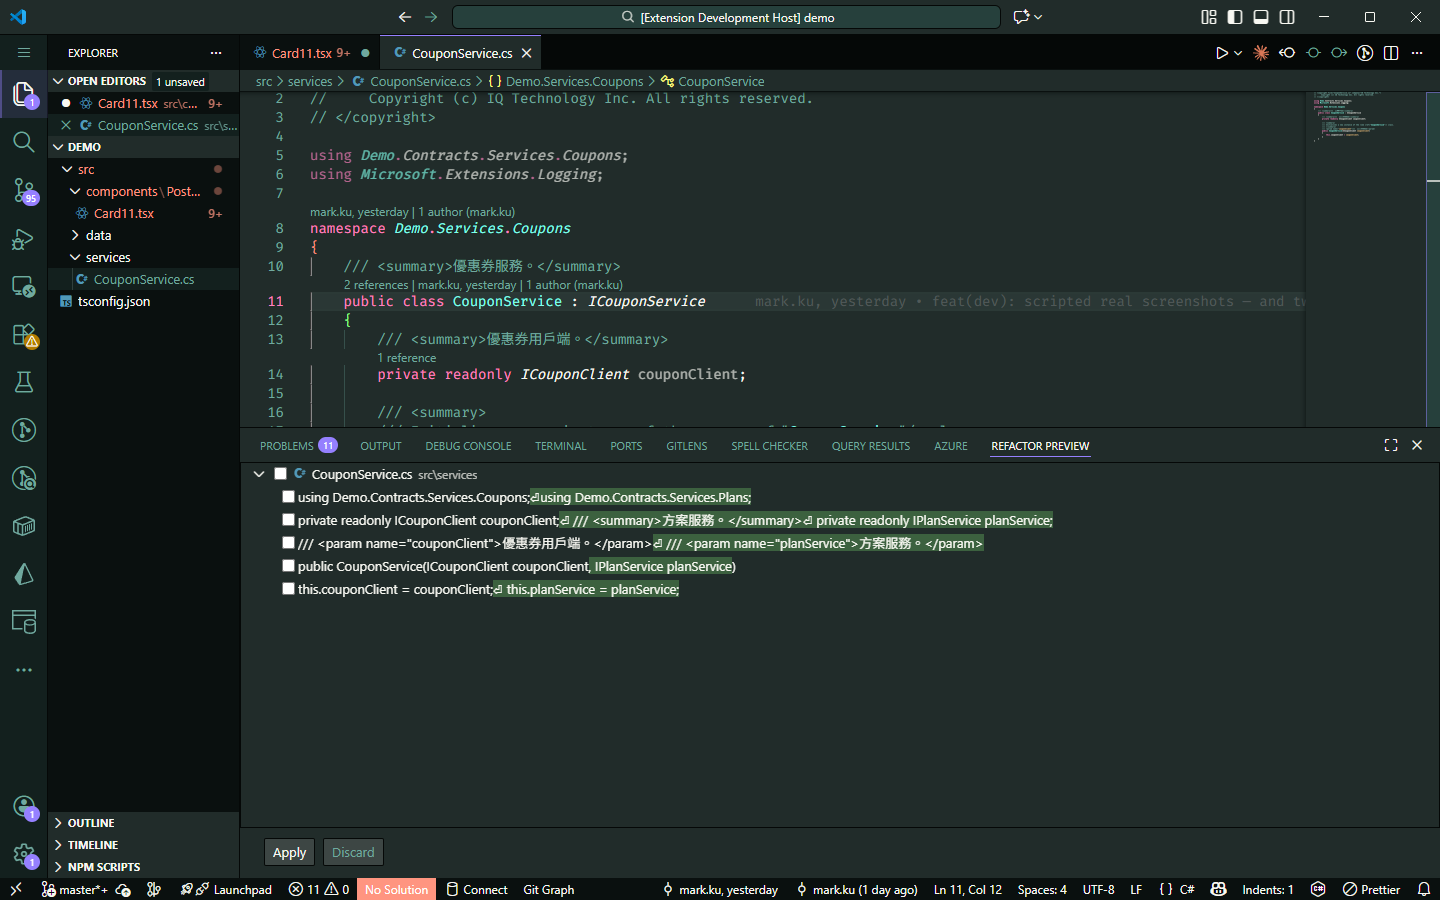
There are five rows in the panel, not six—the field and its XML comment are inserted as a single block, so they're shown as one item. From top to bottom, they correspond to the using, the field (with its comment), the <param>, the constructor parameter, and the this. assignment.
The generated style is "measured" from the class you're editing, not read from a config file. Whether fields have an underscore prefix, assignments use this., or XML comments are present—it all follows the existing pattern.
It will reject the action outright in two cases: if the class has call sites with manual new Foo(...) (forcing a null! would compile but crash at runtime); and it never pretends to check if the dependency is registered with DI, instead stating this explicitly and forcing a preview.
4-2. Extract Interface: learning the target folder from neighbors
How to use: Place the cursor on the class name →
Ctrl+Alt+Shift+T→Extract Interface
The built-in version writes the new file next to the class, but many layered projects keep interfaces in a mirrored folder structure:
BLL/
├── Contracts/Services/Coupons/ICouponService.cs   ← 介面在這
└── Services/Coupons/CouponService.cs              ← 實作在這
Refactory's approach is to look at other classes in the same folder that already have interfaces, find out where their interfaces live, and take a majority vote. The inferred result is shown in the prompt (e.g., "Inferred from 3 sibling classes"), and it will tell you if it can't learn anything. The generated interface file will include your project's copyright header, XML comments, and BOM.
4-3. Add ConfigureAwait(false) to the entire file
Missing ConfigureAwait(false) in library code is a classic source of deadlocks in older synchronous environments. This action scans the entire file at once and only adds it where it's missing.
How to use: Place the cursor anywhere inside the class →
Ctrl+Alt+Shift+T→Add missing ConfigureAwait(false) in this file
1 public async Task RunAsync()2 {3 var a = await this.client.GetAsync().ConfigureAwait(false);4- var b = await this.client.PostAsync();5- await this.client.FlushAsync();6 }1 public async Task RunAsync()2 {3 var a = await this.client.GetAsync().ConfigureAwait(false);4+ var b = await this.client.PostAsync().ConfigureAwait(false);5+ await this.client.FlushAsync().ConfigureAwait(false);6 }The first line already had it, so it won't be added a second time. await Task.Yield() is skipped (it doesn't even have an ConfigureAwait). If you run it again after everything is added, it will simply report that there's nothing to do, rather than generating an empty edit.
4-4. Generate XML documentation for a member
How to use: Place the cursor on a method, property, or constructor declaration →
Ctrl+Alt+Shift+T→Document this member
1 public Task<int> GetAsync(string code, int page)2 {3 return Task.FromResult(0);4 }1+/// <summary></summary>2+/// <param name="code"></param>3+/// <param name="page"></param>4+/// <returns></returns>5 public Task<int> GetAsync(string code, int page)6 {7 return Task.FromResult(0);8 }It generates one <param> for each parameter, in the same order as the signature. void methods don't get a <returns>. Constructors get the phrase configured in .refactory.json (defaults to Initializes a new instance of the <see cref="Service"/> class.).
If this member implements an interface and that interface already has comments, it will copy the wording from the interface—even if it's in Chinese—and add a note: StyleCop's SA1625 dislikes verbatim duplicate documentation, so you might want to rephrase it. It will refuse to run on members that already have comments, so it won't overwrite your work.
4-5. C# code smell checks (run on open and save)
Each one comes with a Ctrl+. quick fix:
- Sync-over-async: Using
.Result/.Wait()/.GetAwaiter().GetResult()on a Task, a classic source of deadlocks. asyncmethods containingThread.Sleep, orasync voidoutside of event handlers.- Too many constructor injections (more than 5), empty
catch, catching without rethrowing. - Method too long, class too large, file too long, nesting too deep.
- Magic numbers, nested ternary operators, public mutable fields.
- Multiple top-level types in one file, TODO / FIXME markers.
The thresholds have been calibrated on real projects (an 85-file Next.js backend, a 1,312-file layered C# solution). Methods like OnModelCreating and ConfigureServices that are inherently long are exempted from the long method rule.
5. Code Health Dashboard
How to use:
Ctrl+Shift+P→ Refactory: Code Health Dashboard, or click the$(pulse)counter in the bottom-right of the status bar.
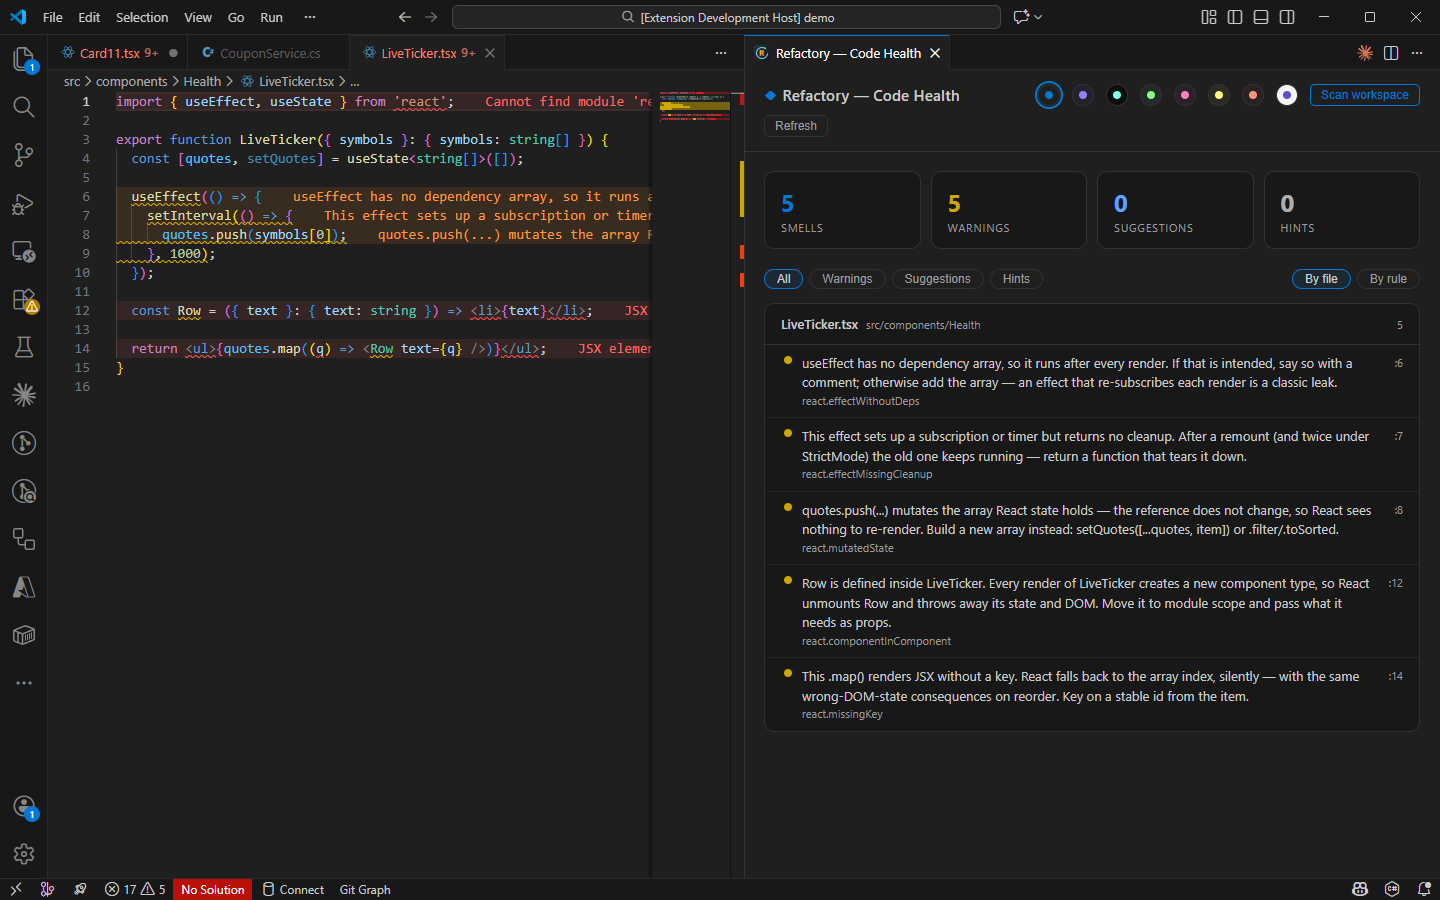
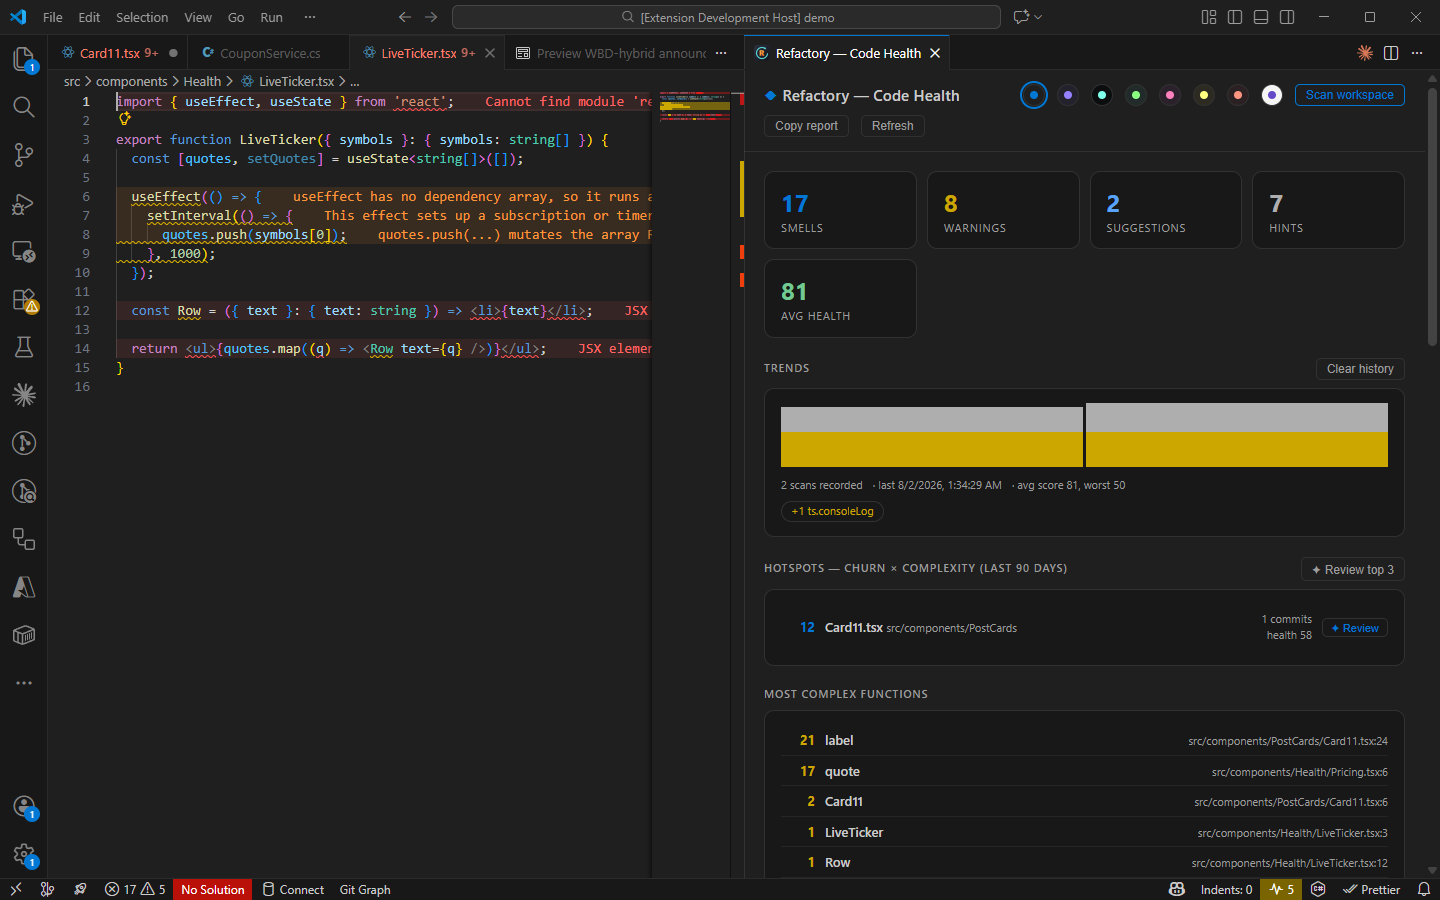
When first opened, it shows issues for the "current file" (the image above is before a scan: four metric cards, no "Copy report" button). Press Scan workspace in the top right to expand the scope to the entire workspace. This will also add the average health score, Trends, and Hotspots—the image in section 5-3 shows the dashboard after a scan.
There are three key terms inside; let's explain them in plain English.
5-1. Cyclomatic Complexity: How many paths can this function take?
The higher the number, the more branches you have to consider to understand it or to write tests that cover it. The calculation starts at 1 and adds 1 for every branch (if, loops, each case, catch, ternary operators, each &&, ||, and ??):
function getDiscount(user, cart) {          // 起始 1
  if (!user) return 0                       // +1 → 2
  if (user.isVip && cart.total > 1000) {    // +1 (if) +1 (&&) → 4
    return 0.2
  }
  for (const item of cart.items) {          // +1 → 5
    if (item.onSale) return 0.1             // +1 → 6
  }
  return user.coupon ? 0.05 : 0             // +1 → 7
}
This function's complexity is 7, and the default threshold is 15, so it's very healthy.
Note: Anonymous callbacks and lambdas are counted towards the nearest named function, so a React component's complexity includes its inline handlers and .map() bodies (since you have to understand them all to understand the component).
5-2. Health Score: Starts at 100 and goes down
| Deduction | Points |
|---|---|
| Each warning (will break at runtime) | 10 points |
| Each suggestion (structural issue) | 3 points |
| Each hint (style issue) | 1 point |
| Function complexity over the threshold | 1 point per point over |
Suppose a file has 2 warnings, 3 suggestions, 1 hint, and one function with a complexity of 20 (5 over the threshold of 15):
扣分 = 2×10 + 3×3 + 1×1 + 5 = 35
分數 = 100 − 35 = 65 → D
Grades: 90+ is A, 80–89 is B, 70–79 is C, 60–69 is D, and below 60 is F.
The score won't block your build or show a warning. It's only used for sorting, to answer the question, "Which file should I look at first today?"
5-3. Hotspots: Frequently Changed × Unhealthy = Highest Priority
A terrible file that hasn't been touched in six months has a completely different priority from one that's changed daily. So we multiply two factors:
熱點分數 = 最近常不常改 × 有多不健康(100 − 健康分數)
The key is multiplication, not addition. If either side is 0, the result is 0. A file that's terrible but untouched, or one that's changed daily but clean, won't rank high. Only files that are both frequently changed and unhealthy will rise to the top.
"Frequently changed" is determined by running git log and counting how many commits have touched the file in the last 90 days. If there's no git repository, this section simply won't appear, and it won't bother you with an error.
5-4. How to use the dashboard
After a scan, from top to bottom, you'll see: five metric cards (smells / warnings / suggestions / hints, plus the average health score which appears after a scan) → Trends (one bar is added per scan, showing the last 30, so you can see if this week is better or worse than last) → Hotspots → Most complex functions (the top 10, click to jump to them) → File list (grade badge + list of issues, click an issue to jump to that line).
| Button | What it does |
|---|---|
| Scan workspace | Scans the entire workspace. Reads directly from disk, doesn't open files or flood the Problems panel. Can be canceled mid-scan. Max 2,000 files each for TS/JS and C#. |
| Copy report | Copies the findings as Markdown, ready to paste into a PR description (appears after a scan). |
| Refresh | Refreshes the view. |
| The colored dots in the top right | Eight panel themes; the first one follows your VS Code theme. |
5-5. Clean up mechanical issues with one click
How to use:
Ctrl+Shift+P→ Refactory: Clean Up This File
- TypeScript / JavaScript: Deletes all "standalone"
console.log(...)comments. - C#: Changes
throw ex;in catch blocks tothrow;(to preserve the stack trace).
After running, it reports what it did (e.g., 3 console.logs removed, 1 rethrow fixed), and a single undo reverts everything.
6. One-click fix with local Claude Code
If you have the Claude Code CLI installed locally and in your PATH, three new entry points will appear:
Entry point 1: The
Ctrl+.menu for any code smell will have a new item:Fix with Claude Code…. Entry point 2: The✦ Reviewbutton next to each file in the dashboard (the Hotspots section also has a✦ Review top 3button). Entry point 3:Ctrl+Shift+P→ Refactory: Deep Review This File with Claude (AI), without needing to open the dashboard first.
Entry point 1 opens an integrated terminal and starts your own claude session. The prompt includes the rule ID, file, line number, and message, and asks for the minimal possible change.
Entry points 2 and 3 first write a briefing for Claude (line count, function count, max and average complexity, health score and grade, most complex functions, recent commits that touched it, and all found issues), asking it to generate prioritized refactoring suggestions. The briefing is written to .refactory/reviews/, and that folder has its own .gitignore with the content *, so it won't be committed.
It's your login, your model, your approval process. The extension just prepares the prompt. Nothing is applied automatically; you review the diff before applying it.
7. 13 Other Languages: The Most Common Refactorings
Python, Go, Java, Kotlin, Rust, PHP, C, C++, Objective-C, Objective-C++, Dart, Swift, and Scala each get 11 structural refactorings, without needing a language server, SDK, or anything else installed. Open a .go file, and even if you don't have the Go extension, these will still be available.
| Action | In which languages |
|---|---|
| Invert if condition | All |
| Merge nested if · Split if condition | All |
| Add braces · Remove braces | Those with curly braces |
| Introduce variable · Inline variable | All (except TS/JS, where the built-in is better) |
| Apply De Morgan's law | All |
Replace if with ?: | All except Go (it has no ternary operator) |
| Convert to interpolated string | Python, C#, Kotlin, PHP, Dart, Swift |
Convert .format() / % to f-string | Python |
How to use: Place the cursor on the
ifkeyword or its condition (not just anywhere in the body) →Ctrl+Alt+Shift+T.
The cursor must be on the condition; otherwise, a four-level nested if would offer all four at once, and you wouldn't be able to tell which is which.
Note: Except for Introduce variable and Convert to interpolated string (which are deferred to VS Code's better, type-aware built-in versions), the actions above also work in TypeScript / JavaScript. The examples below use different languages just to show that the same action produces idiomatic code for each language.
7-1. Invert if: bring the happy path back to the left
Cursor on
if→Invert if condition
1-if err == nil {2- process(data)3-} else {4 return err 5 }1+if err != nil { 2 return err3+} else {4+ process(data)5 }It negates the condition and swaps the two branches. It won't presume to remove the else for you—that's a separate decision that shouldn't be mixed into the same action. If the condition already has a !, it will remove it rather than creating a !!. Expressions like !(a && b) will be cleaned up to a && b, including the parentheses.
A small detail others miss: inverting if (a < b) to if (a >= b) is not equivalent for floating-point numbers (both are false for NaN). When an operand looks like a float, it will show a warning and force a preview. Most tools on the market just flip it for you.
7-2. Merge nested if: flatten the pyramid
Cursor on the outer
if→Merge nested if
1 function f(user) {2- if (user) {3- if (user.isActive) {4- send(user)5- log(user)6- }7 }8 }1 function f(user) {2+ if (user && user.isActive) {3+ send(user)4+ log(user) 5 }6 }It also works in Python and will fix the indentation (using and, not &&):
1 def f(user):2- if user:3- if user.is_active:4- send(user)5- log(user)1 def f(user):2+ if user and user.is_active:3+ send(user)4+ log(user) The reverse, Split if condition, is another item in the same menu: it splits an if (a && b) back into two levels, usually because you want to insert an else in between.
7-3. De Morgan's: works in both directions for !(a && b)
1-if (!(a && b)) {2 x()3 }1+if (!a || !b) {2 x()3 }Both directions are offered. Pressing it on if (!a || !b) will collapse it back to if (!(a && b)). Converting back and forth gives you the exact original text. Comparison operators are not negated with a !, but are flipped directly:
1-if (!(a === 1 && b > 2)) {2 x()3 }1+if (a !== 1 || b <= 2) {2 x()3 }Python uses its own keywords: if not (ready and done): ⟷ if not ready or not done:. This action is not offered on conditions that are already non-negated, like if (a && b)—there's nothing to distribute.
7-4. Convert if to conditional expression: different syntax for each language
The same action produces the actual syntax for that language, not just a generic ?::
1-if (user.isAdmin()) {2- role = "admin";3-} else {4- role = "guest";5-}1+role = user.isAdmin() ? "admin" : "guest"; 1 def role(user):2- if user.is_admin:3- return "admin"4- else:5- return "guest"1 def role(user):2+ return "admin" if user.is_admin else "guest" Kotlin gets an if-expression (role = if (user.isAdmin) "admin" else "guest"), and Rust gets a braced if-expression (role = if user.is_admin { "admin" } else { "guest" };). The two branches must be the same kind of statement—both returns, or both assignments to the same variable—otherwise, it's not offered.
7-5. Python: Convert .format() / % to f-string
Cursor inside the string literal →
Convert to an f-string
1-msg = "Hello, {}!".format(name)2-row = "{:>8}|{:<8}".format(left, right)3-title = "Hi {who}".format(who=user.name)1+msg = f"Hello, {name}!"2+row = f"{left:>8}|{right:<8}"3+title = f"Hi {user.name}"Alignment formats (:>8) and conversion flags (!r) are carried over verbatim. Explicitly positioned arguments like {1} … {0} are also correctly mapped.
It intentionally does not convert "%d" % value: the result of "%d" % 3.7 is "3", while f"{3.7}" is "3.7"—this isn't a format difference, the value changes. Only %s and %r can be converted without changing their meaning, so only they are converted.
8. Settings
| Setting | Default | Description |
|---|---|---|
refactory.preview | multiFile | When to use the preview panel. Plans with warnings always force a preview. |
refactory.dotnetPath | "" | Specify the dotnet path for the C# engine. |
refactory.disabledLanguages | [] | Language IDs to completely ignore. |
refactory.smells.react / .csharp | on | Disable half of the code smell checks respectively. |
refactory.developerMode | false | Enable Dev: diagnostic commands. |
refactory.keymap | none | Setting to riderStyle will also bind Ctrl+Alt+M / Ctrl+Alt+V to VS Code's built-in extract actions. Off by default because Ctrl+Alt+<字母> and AltGr+<字母> are indistinguishable on non-US keyboards. |
Teaching it your project's conventions: .refactory.json
Conventions are a property of the project, not a personal preference, so this file goes in the repo root, under version control, and is shared by the whole team. All fields are optional; unspecified ones will be auto-detected:
{
  "version": 1,
  "typescript": {
    "components": { "declaration": "exportDefaultFunction", "propsStyle": "interfaceSuffixProps" },
    "hooks": {
      // 先寫特定路徑、最後放 catch-all,第一個符合的贏
      "location": [
        { "when": "src/components/admin/**", "dir": "src/components/admin/_hooks" },
        { "when": "**", "dir": "src/hooks" }
      ],
      "fileNaming": "camelCase"
    }
  },
  "smells": { /* 個別規則關閉或調門檻,id 見 docs/SMELLS.md */ },
  "exclude": ["**/node_modules/**", "**/.next/**"]
}
exclude also controls code smell checks, so you won't see a screen full of squiggles when you open a generated migration file.
9. Pressed a key but "nothing happened"?
How to use: Set
"refactory.developerMode": true→Ctrl+Shift+P→ Refactory: Dev: Why Is Nothing Offered Here?
It will tell you directly: which tsconfig governs this file, what aliases were inferred, whether the language is recognized, if the file can be parsed correctly, if the cursor is inside a string or comment, and which actions were intentionally deferred to the editor's built-in versions.
The most common culprit is an unclosed string earlier in the file, which can invalidate the rest of the file. If you're still stuck, the Refactory output channel has a full trace.
Notes
- Traditional Chinese UI: If your VS Code language is set to Traditional Chinese, you'll see "重構這裡…" and "程式碼健康儀表板".
- C# requires the .NET 8 runtime; the .NET sidecar won't even start in a pure front-end session.
- Kotlin requires any Kotlin extension to be installed first (VS Code doesn't register the
kotlinlanguage ID itself). - Ruby is intentionally not supported: its lexical structure is genuinely ambiguous without a parser, and an analysis that's wrong 1% of the time is worse than no support at all.
- Introduce variable and Convert to interpolated string are intentionally not provided for TypeScript / JavaScript; the built-in versions understand types and are better.
- Won't slow down VS Code: It doesn't load solutions or TypeScript programs. Cross-file questions are answered using a declaration index (built in under a second for thousands of files).
Conclusion
Generic refactorings are provided by all the major vendors. But knowing where your project puts interfaces, where DI registrations are written, and whether 'use client' should be added—that's something only a tool that understands your repo can do.
- Install: Search for Refactory on the VS Code Marketplace, or use
ext install mark-ku.refactory. - Tool Page: Refactory Introduction Page (feature overview, screenshots, and demo videos).
Install it and press Ctrl+Alt+Shift+T. You'll see what you've been missing.


Comments