
Preface
This year our team plans to launch a "web content compliance check" extension on Chrome. The main goals: increase product exposure and offer users a genuinely useful tool.
This article covers the full picture:
- Chrome Extension dev essentials — Architecture and must-know concepts
- Keycloak SSO integration — How to do single sign-on inside an extension
- Lead-generation strategy — Turning free-tool users into paying customers
- Chrome Web Store submission — Packaging through review
Product positioning and target users
The main target users are marketing managers and community operators. Before posting, they often need to confirm whether content complies with regulations — to avoid ad copy that violates rules and triggers fines.
Use case
Picture this scenario:
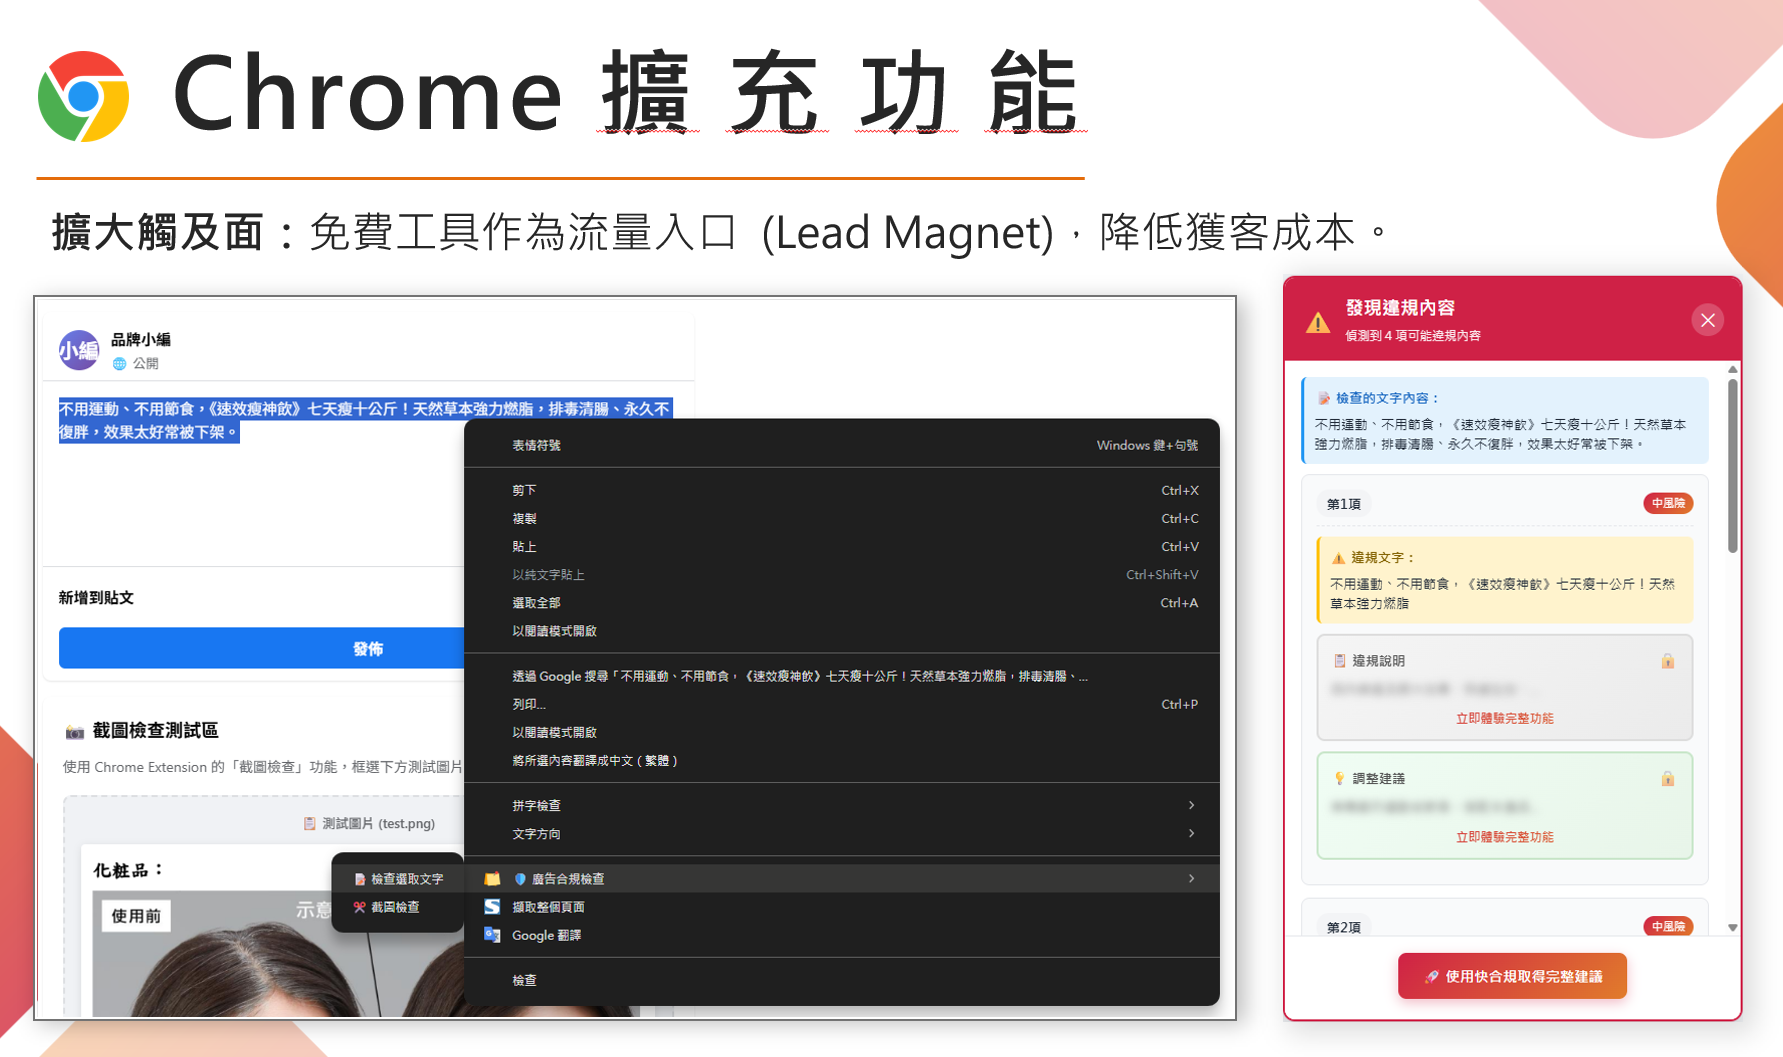
A marketer is preparing to publish a Facebook post about a health supplement promotion. Before going live, she wants to check the copy for forbidden wording. She just selects the text, right-clicks, and quickly verifies whether the content is compliant.
Core feature design
Right-click menu
After users select text on a webpage, they can quickly run a check via the right-click menu:
Four check modes
- 📝 Check selected text — Directly check the selected text
- 🔗 Check link content — Fetch and analyze webpage content
- 🖼️ Check image text — OCR text from images
- ✂️ Screenshot check — Capture a screen region and run OCR + check
Architecture
The project is built on Manifest V3, with the following stack:
chrome-extension/
├── manifest.json          # Extension config (Manifest V3)
├── background.js          # Service Worker
├── content.js             # Content script
├── config.js              # Centralized config
│
├── auth/                  # Auth module (Keycloak integration)
│   ├── auth-config.js     # Auth config
│   ├── auth-service.js    # Login logic
│   ├── auth.html          # Login page
│   └── auth.js            # Login UI control
│
├── core/                  # Core modules
│   ├── utils.js           # Shared utilities
│   ├── risk-levels.js     # Risk-level definitions
│   └── api-client.js      # API call wrapper
│
├── handlers/              # Feature handlers
│   ├── text-handler.js    # Text check
│   ├── link-handler.js    # Link check
│   ├── image-handler.js   # Image OCR
│   └── screenshot-handler.js # Screenshot check
│
├── ui/                    # UI components
│   ├── loading.js         # Loading animation
│   ├── dialog.js          # Dialog
│   ├── result-panel.js    # Result panel
│   └── styles.css         # Styles
│
├── popup/                 # Popup page
│   ├── popup.html
│   ├── popup.css
│   └── popup.js
│
└── options/               # Settings page
    ├── options.html
    ├── options.css
    └── options.js
Chrome Extension dev essentials
If you're building a Chrome Extension for the first time, here are the core concepts to know:
What is a Chrome Extension?
In simple terms, a Chrome Extension is a small program that runs inside the browser, capable of:
- Adding new features to web pages (right-click menus, floating buttons)
- Reading or modifying webpage content
- Communicating with external APIs
- Storing user settings
Manifest V3 vs V2: must use the new version!
Chrome now requires new extensions to use Manifest V3, and V2 is being phased out starting in 2024.
| Difference | Manifest V2 (old) | Manifest V3 (new) |
|---|---|---|
| Background execution | Background Page (always on) | Service Worker (on-demand) |
| Permissions | Looser | Stricter, must declare explicitly |
| Security | Standard | Higher — restricts remote code |
| Submission | No longer accepted | Required |
The five core files
You'll always need these files when building a Chrome Extension:
Sample manifest.json
This is the most important file in an extension — it tells Chrome what permissions the extension needs:
{
  "manifest_version": 3,
  "name": "Quick Compliance Check",
  "version": "1.1.0",
  "description": "Select any text and quickly check whether it complies with ad regulations",

  "permissions": [
    "contextMenus",    // Right-click menu
    "activeTab",       // Access the current tab
    "storage",         // Store data
    "notifications",   // Show notifications
    "scripting",       // Inject scripts dynamically
    "identity"         // OAuth login
  ],

  "host_permissions": [
    "https://api.textcomply.com/*",  // API URL
    "https://sso.example.com/*"       // SSO URL
  ],

  "background": {
    "service_worker": "background.js"
  },

  "action": {
    "default_popup": "popup/popup.html",
    "default_icon": "logo/icon128.png"
  }
}
How do components communicate?
Different parts of a Chrome Extension are "isolated" and need to talk via Message Passing:
Code example:
// content.js — send a message to background
chrome.runtime.sendMessage(
  { action: 'checkText', text: 'Selected text content' },
  (response) => {
    console.log('Check result:', response);
  }
);

// background.js — receive and handle the message
chrome.runtime.onMessage.addListener((message, sender, sendResponse) => {
  if (message.action === 'checkText') {
    // Call API to check the text
    checkTextApi(message.text).then(result => {
      sendResponse(result);
    });
    return true; // Indicates an async response
  }
});
Integrating Keycloak SSO
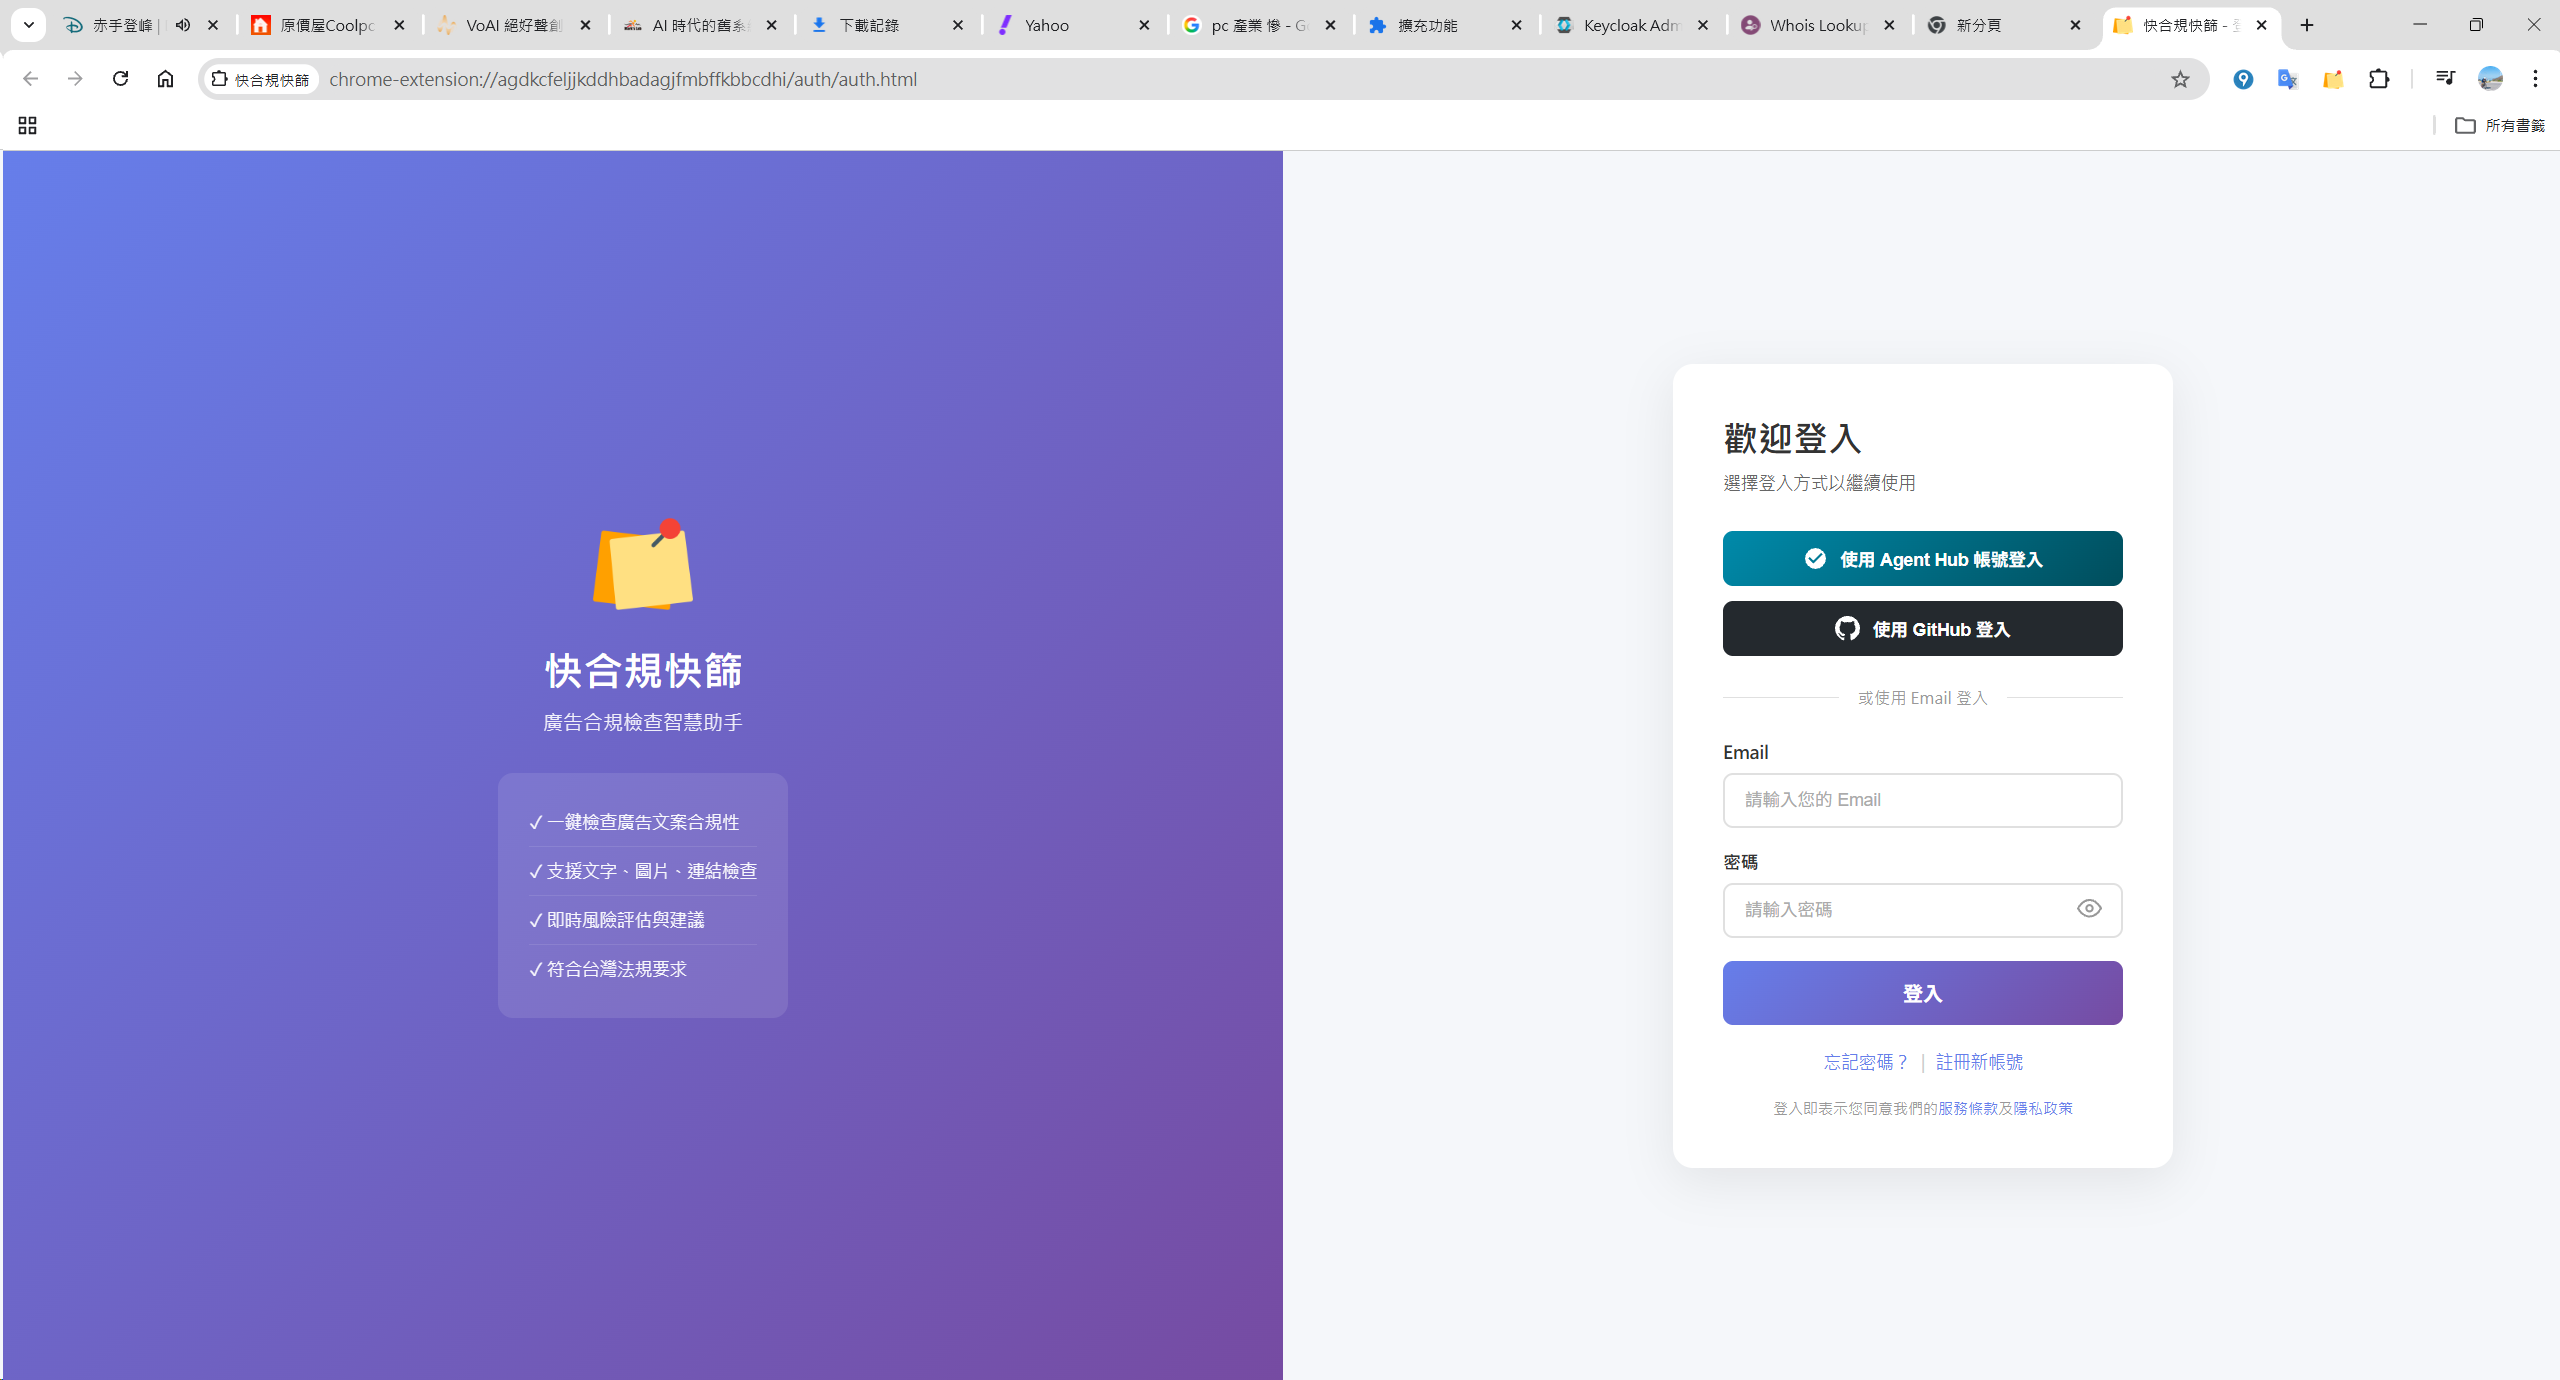
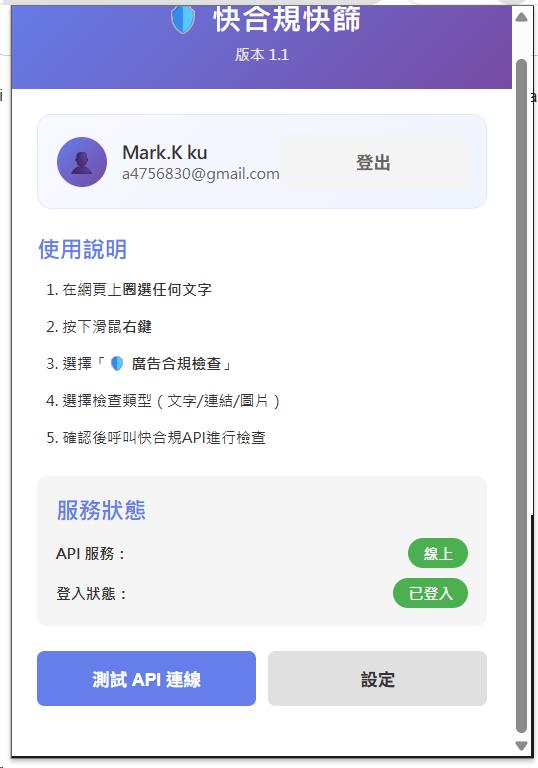
If your product needs user login, you can integrate Keycloak (or any other OAuth2 / OIDC provider) for single sign-on.
Why Keycloak?
- ✅ Open-source and free — No license fees
- ✅ Multiple login methods — Email/password, Google, GitHub, Facebook...
- ✅ Standard protocols — OAuth2 / OpenID Connect
- ✅ Enterprise features — Role management, multi-tenancy, MFA, etc.
Integration flow overview
Keycloak Client config
Create a Client in the Keycloak admin console:
Client ID: chrome-extension
Client Protocol: openid-connect
Access Type: public (extensions can't keep client_secret confidential)
Valid Redirect URIs: https://<extension-id>.chromiumapp.org/*
Web Origins: *
PKCE security (important!)
Because a Chrome Extension is a "public client" (it can't safely store client_secret), you must use PKCE for additional security:
// 1. Generate a random code_verifier
function generateRandomString(length = 64) {
  const charset = 'ABCDEFGHIJKLMNOPQRSTUVWXYZabcdefghijklmnopqrstuvwxyz0123456789-._~';
  const array = new Uint8Array(length);
  crypto.getRandomValues(array);
  return Array.from(array, (byte) => charset[byte % charset.length]).join('');
}

// 2. Derive code_challenge from code_verifier
async function generateCodeChallenge(codeVerifier) {
  const encoder = new TextEncoder();
  const data = encoder.encode(codeVerifier);
  const hash = await crypto.subtle.digest('SHA-256', data);

  // Base64 URL encoding
  const bytes = new Uint8Array(hash);
  let binary = '';
  bytes.forEach(byte => binary += String.fromCharCode(byte));
  return btoa(binary)
    .replace(/\+/g, '-')
    .replace(/\//g, '_')
    .replace(/=+$/, '');
}
Initiating the login request
async function loginWithKeycloak() {
  // 1. Generate PKCE parameters
  const codeVerifier = generateRandomString(64);
  const codeChallenge = await generateCodeChallenge(codeVerifier);
  const state = generateRandomString(32);

  // 2. Store the verifier (needed later when exchanging for token)
  await chrome.storage.local.set({ codeVerifier, state });

  // 3. Build the login URL
  const authUrl = new URL('https://sso.example.com/realms/myrealm/protocol/openid-connect/auth');
  authUrl.searchParams.set('client_id', 'chrome-extension');
  authUrl.searchParams.set('redirect_uri', chrome.identity.getRedirectURL());
  authUrl.searchParams.set('response_type', 'code');
  authUrl.searchParams.set('scope', 'openid profile email');
  authUrl.searchParams.set('code_challenge', codeChallenge);
  authUrl.searchParams.set('code_challenge_method', 'S256');
  authUrl.searchParams.set('state', state);

  // 4. Open the login window
  chrome.identity.launchWebAuthFlow(
    { url: authUrl.toString(), interactive: true },
    handleAuthCallback
  );
}
Exchanging code for access token
async function exchangeCodeForToken(code) {
  const { codeVerifier } = await chrome.storage.local.get('codeVerifier');

  const response = await fetch(
    'https://sso.example.com/realms/myrealm/protocol/openid-connect/token',
    {
      method: 'POST',
      headers: { 'Content-Type': 'application/x-www-form-urlencoded' },
      body: new URLSearchParams({
        grant_type: 'authorization_code',
        client_id: 'chrome-extension',
        code: code,
        redirect_uri: chrome.identity.getRedirectURL(),
        code_verifier: codeVerifier  // PKCE verification
      })
    }
  );

  const tokens = await response.json();

  // Store tokens
  await chrome.storage.local.set({
    accessToken: tokens.access_token,
    refreshToken: tokens.refresh_token,
    expiresAt: Date.now() + (tokens.expires_in * 1000)
  });

  return tokens;
}
Auto-refreshing tokens
Access tokens usually expire within minutes — you'll need to refresh them automatically:
async function getValidToken() {
  const { accessToken, refreshToken, expiresAt } =
    await chrome.storage.local.get(['accessToken', 'refreshToken', 'expiresAt']);

  // Token still valid — use it
  if (expiresAt && Date.now() < expiresAt - 60000) {
    return accessToken;
  }

  // Token about to expire — refresh
  if (refreshToken) {
    const newTokens = await refreshAccessToken(refreshToken);
    return newTokens.access_token;
  }

  // No token — must log in again
  return null;
}
Lead-generation strategy
This is the most interesting part of the project — converting free-tool users into qualified leads.
Funnel design
The value of waiting time
When a user submits a check request, they need to wait for the AI to respond (usually 3-5 seconds). This is a perfect window for ad exposure!
// config.js — carousel settings
CAROUSEL_IMAGES: [
  'images/banner_square-1.png',
  'images/banner_square-2.png'
],
CAROUSEL_INTERVAL_MS: 3000,
We embed an image carousel in the loading screen to show product ads or promo messages.
Result-page funnel design
The check result shows:
- ✅ Whether it's compliant
- ⚠️ Number of violations
- 🔒 Some details shown blurred
Key design: Violation explanations and suggested edits show only the first 15 characters; the rest is masked with "..." — guiding users to click and unlock.
// Explanation (violation reason) — locked state
if (violation.explanations && violation.explanations.length > 0) {
  const expPreview = escapeHtml(violation.explanations[0]).substring(0, 15) + '...';
  html += `
    <a href="${ctaLink}" target="_blank" class="compliance-result__locked-block">
      <div class="compliance-result__locked-header">
        <p class="compliance-result__locked-label">📋 Violation explanation</p>
        <span class="compliance-result__locked-icon">🔒</span>
      </div>
      <p class="compliance-result__locked-text compliance-result__locked-text--blur">${expPreview}</p>
      <p class="compliance-result__locked-cta">Try the full feature now</p>
    </a>
  `;
}
CTA button design
At the bottom of the result panel, we place a prominent CTA button:
// CTA button
html += `
  <div class="compliance-result__footer">
    <a href="${ctaLink}" target="_blank" class="compliance-result__cta-btn">
      🚀 Use the product to get full recommendations
    </a>
  </div>
`;
Lead generation mechanism
When users click the "Get full recommendations" button, they're taken to an unlock page:
Unlock flow
- User submits an email
- Email validity is checked
- Full report is unlocked
- Each email can only unlock one report
The clever part of this design:
- ✅ Users get a valuable, complete analysis report
- ✅ We get a qualified lead
- ✅ Sales can follow up and convert
Installation and usage
Install from the Chrome Web Store
Users can search and install this extension directly from the Chrome Web Store.
Developer-mode install
If you want to deploy a similar project yourself:
- Open Chrome →
chrome://extensions/ - Enable "Developer mode"
- Click "Load unpacked"
- Select the
chrome-extensionfolder
How to use
- Select text on any webpage
- Right-click
- Choose "🛡️ Ad compliance check"
- Pick a check type
- Wait for results
Lessons learned and recommendations
Manifest V3 challenges
Chrome now requires new extensions to use Manifest V3, which brings some development changes:
- Service Worker replaces Background Page
- Permissions need to be declared more explicitly
- Content Script injection works differently
Modular design
Recommend splitting features into independent modules:
core/— Core logichandlers/— Various check handlersui/— UI components
This makes the code easier to maintain and extend.
API design considerations
// Centralized config
const CONFIG = {
  DEFAULT_API_ENDPOINT: 'https://your-api-endpoint.com',
  IMAGE_OCR_PATH: '/api/image/ocr',
  CREATE_AND_CHECK_PATH: '/api/TextContent/CreateAndCheck',
  MAX_RETRIES: 3,
  RETRY_DELAY: 1000,
};
Recommend designing API endpoints to be configurable, so it's easy to switch environments or update services later.
Expected results
The extension hasn't officially launched yet. The targets below are early-stage planning numbers that we'll adjust based on real data after launch:
| Metric | Initial target |
|---|---|
| Extension installs | 500+ (track post-launch) |
| Monthly active users | 200+ |
| Lead conversion rate | 5–10% |
| Qualified leads | 10–50 per month |
Summary
A Chrome Extension is more than a tool — it's an excellent product distribution channel. By offering a free, useful feature, we can:
- Build brand awareness — Daily use means users naturally remember the product
- Capture qualified leads — The unlock mechanism collects valid prospects
- Lower customer acquisition cost — Compared to ad spend, an extension's CAC is lower
- Provide value exchange — Users get a tool, we get leads
If you're also thinking about how to create new exposure channels for your product, a Chrome Extension is well worth a try!


Comments