

Context
For work, I needed to integrate Apple Pay into e-commerce websites for the US and German markets.
How Apple Pay Works
How Many People in the US Use Apple Pay
Differences Between Apple Pay / Google Pay and Third-Party Payments
The biggest difference between Apple Pay/Google Pay and third-party payment providers is that third-party gateways help handle accounting issues with banks, whereas Apple Pay/Google Pay do not.
From Apple's official success stories, you can see that the companies that integrate directly with Apple Pay and banks are quite large. Most others go through a Payment Provider. My guess is that most banks don't have standardized processes, and regulations differ by country. If data exchange with a bank fails, it creates a lot of accounting problems to resolve, and handling these issues is beyond the means of a typical company.
How to Initiate Payments on the Web
In the early days, each browser had its own JS library for implementation. Later, the W3C defined a standard specification for browser payments, which is now implemented in Safari and Chrome as the PaymentRequest API.
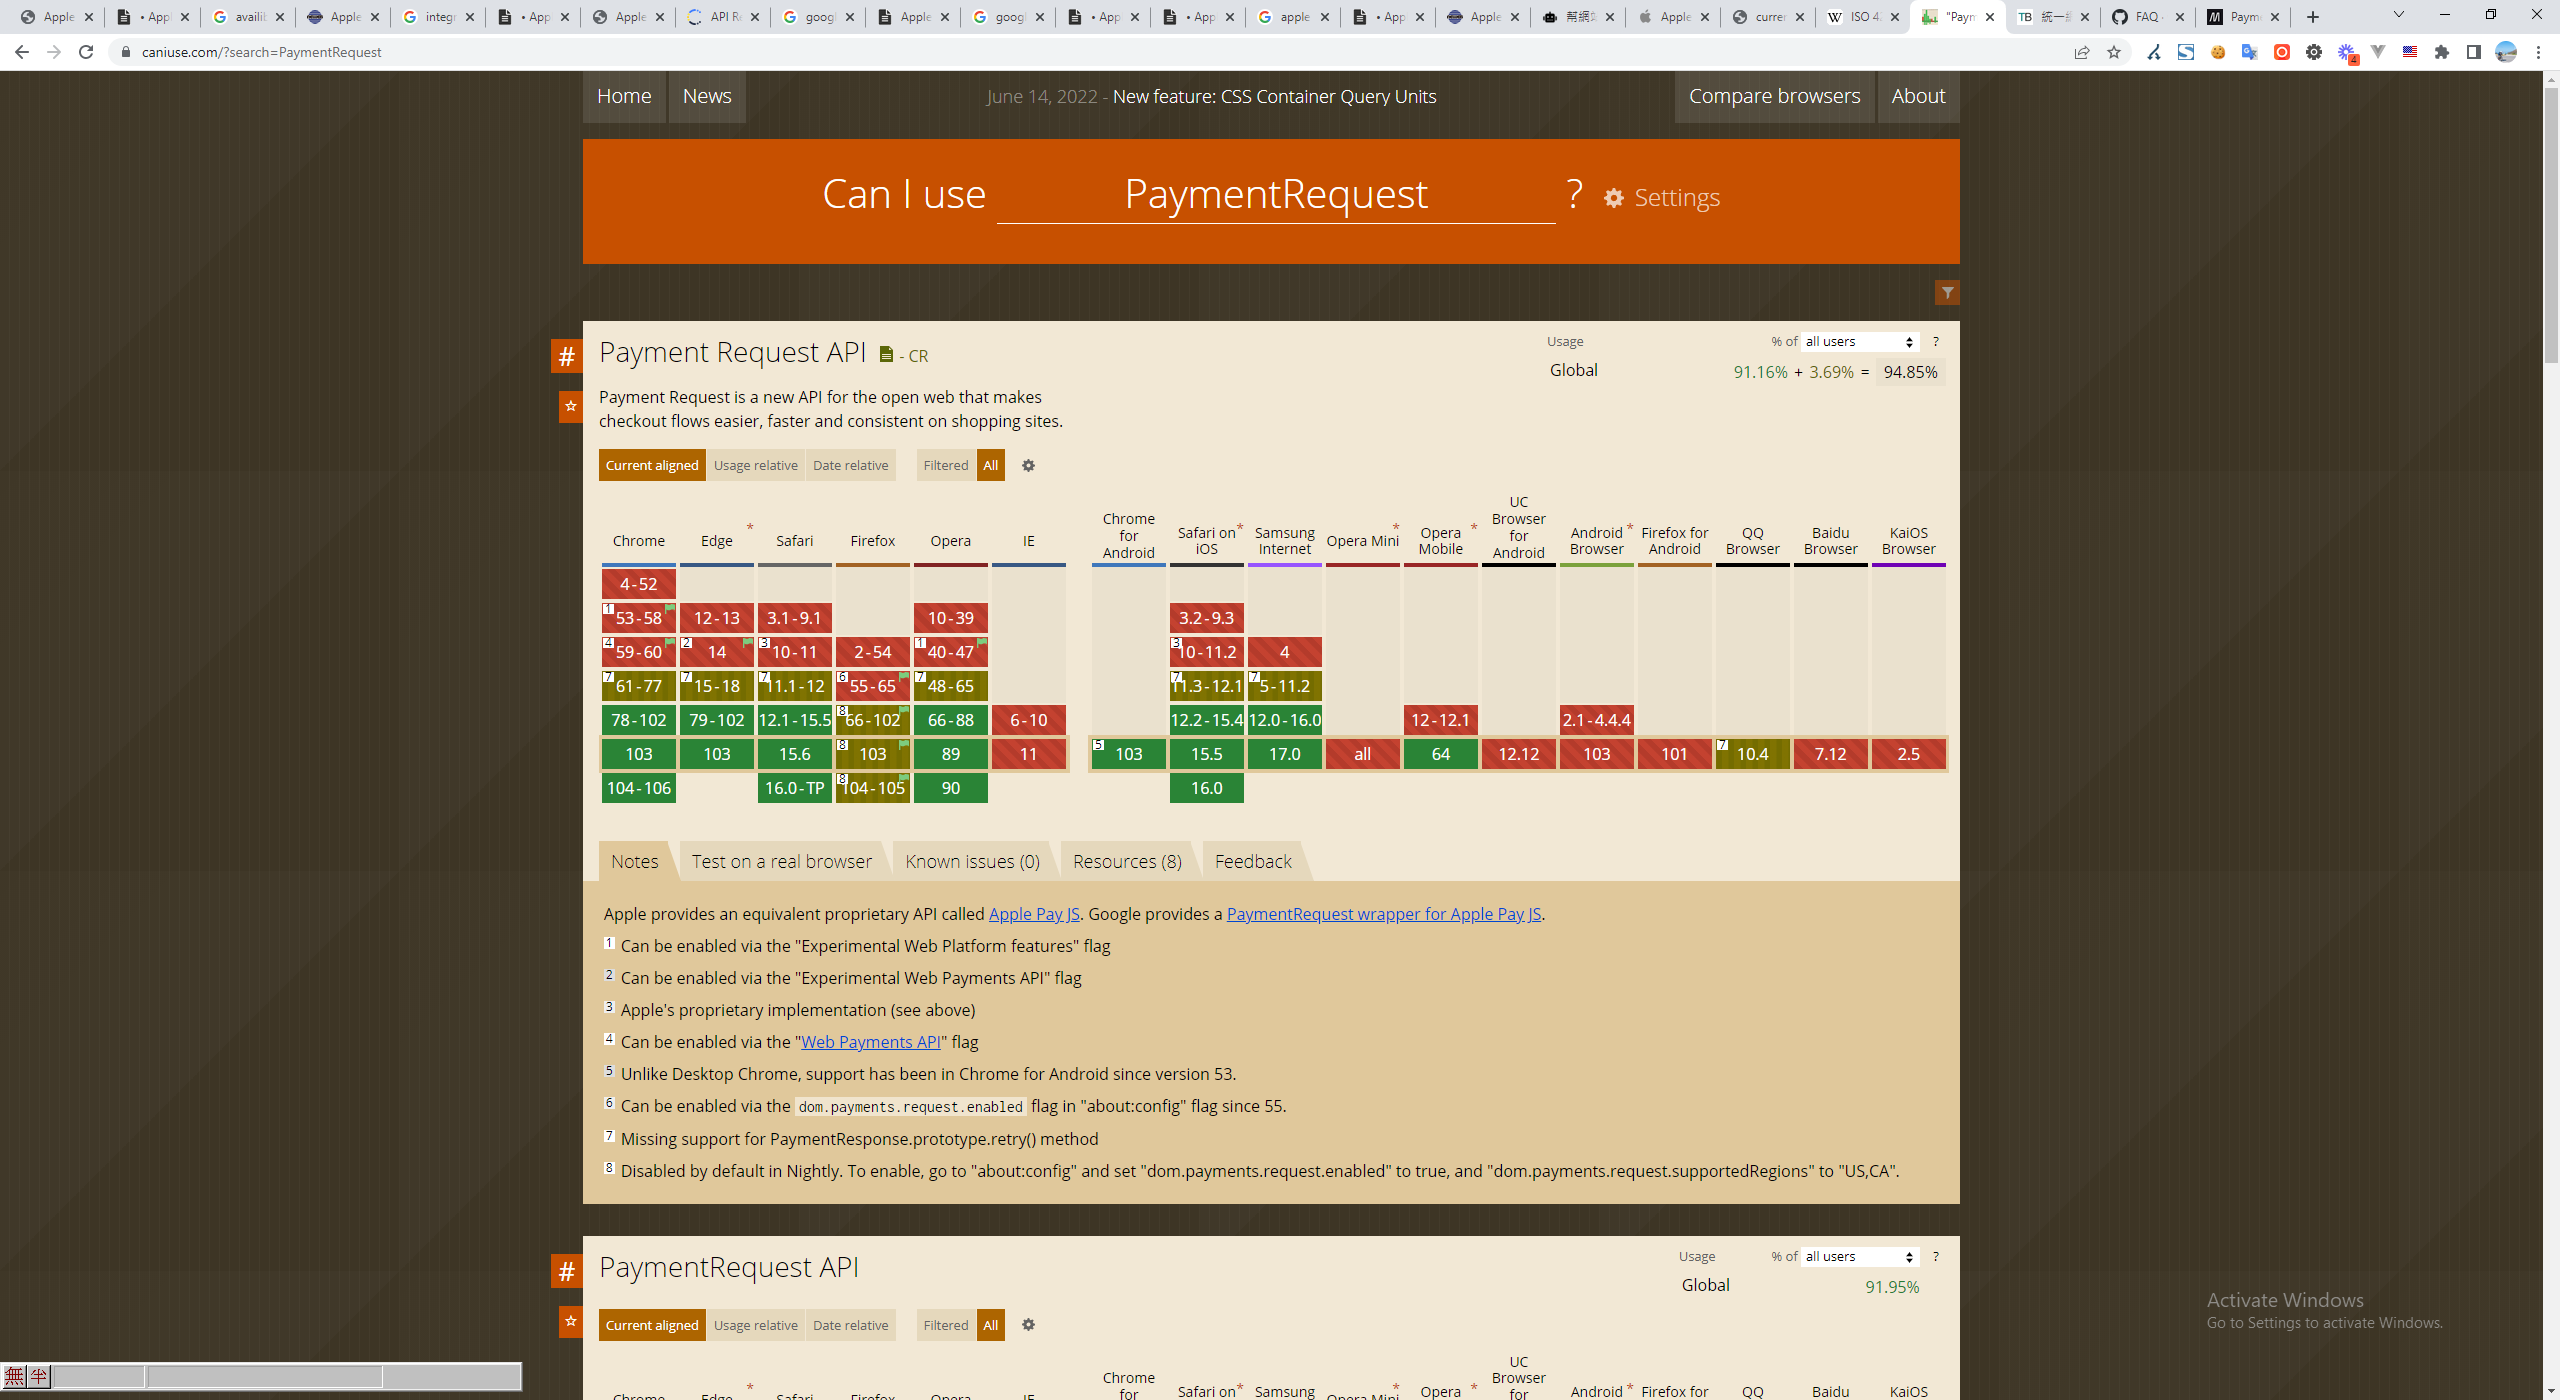 (Compatibility)
- Based on testing,
window.PaymentRequestrequires HTTPS. Otherwise, the object cannot be found in the browser. - Apple Pay only works on Safari (desktop and mobile).
Prerequisites Before Starting Integration
- The payment page needs an HTTPS environment (dev, prod).
- An Apple computer and an iPhone.
- The merchant must have an Apple Developer account ($99 USD / Year).
- The merchant domain must be verified in the developer portal.
- Upload the payment processor's CSR and the developer's CSR to the Apple developer portal.
- The Apple Pay button and related logos must comply with Apple's UI guidelines.
Apple Pay Payment Flow
User presses the payment button > Frontend calls a backend API to validate the merchant with Apple and create a transaction session, obtaining a client-side token > The iPhone then prompts the user for Face ID or Touch ID verification > Frontend calls your own backend API to request order creation with the payment processor.
First, Configure and Obtain Certificates from the Apple Developer Portal Before Coding
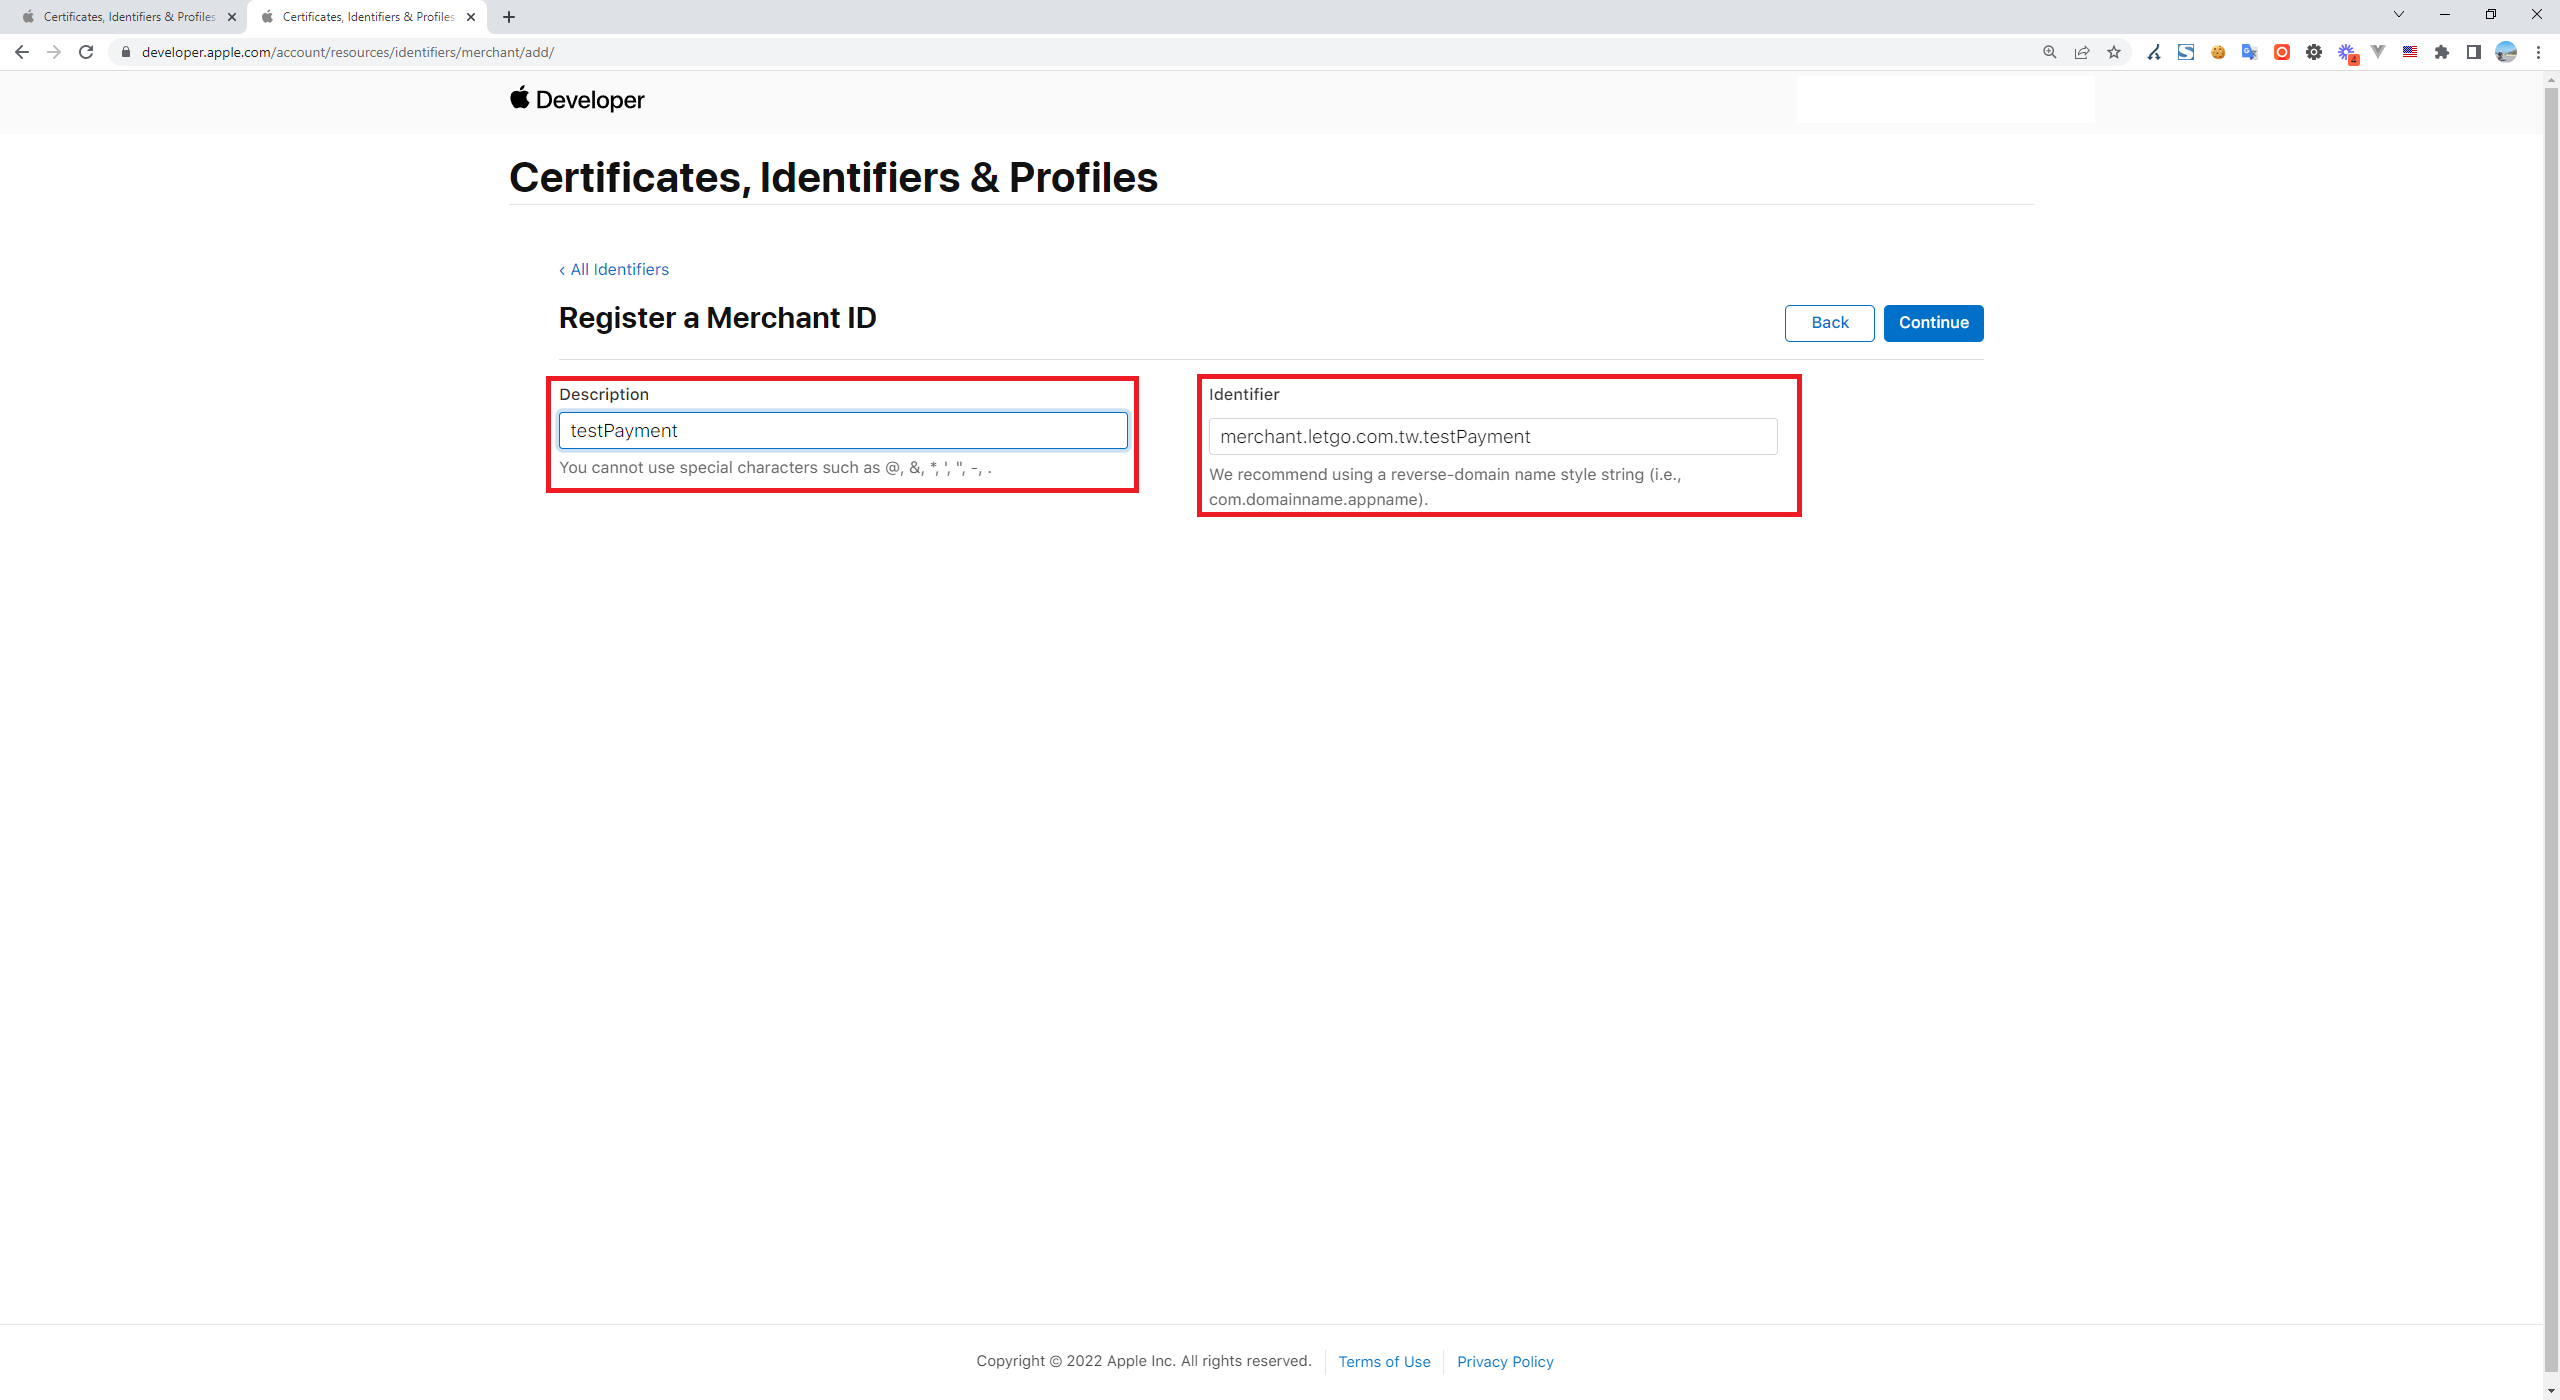
Create a Merchant ID
Go to the Apple Developer Portal > Certificates, Identifiers & Profiles
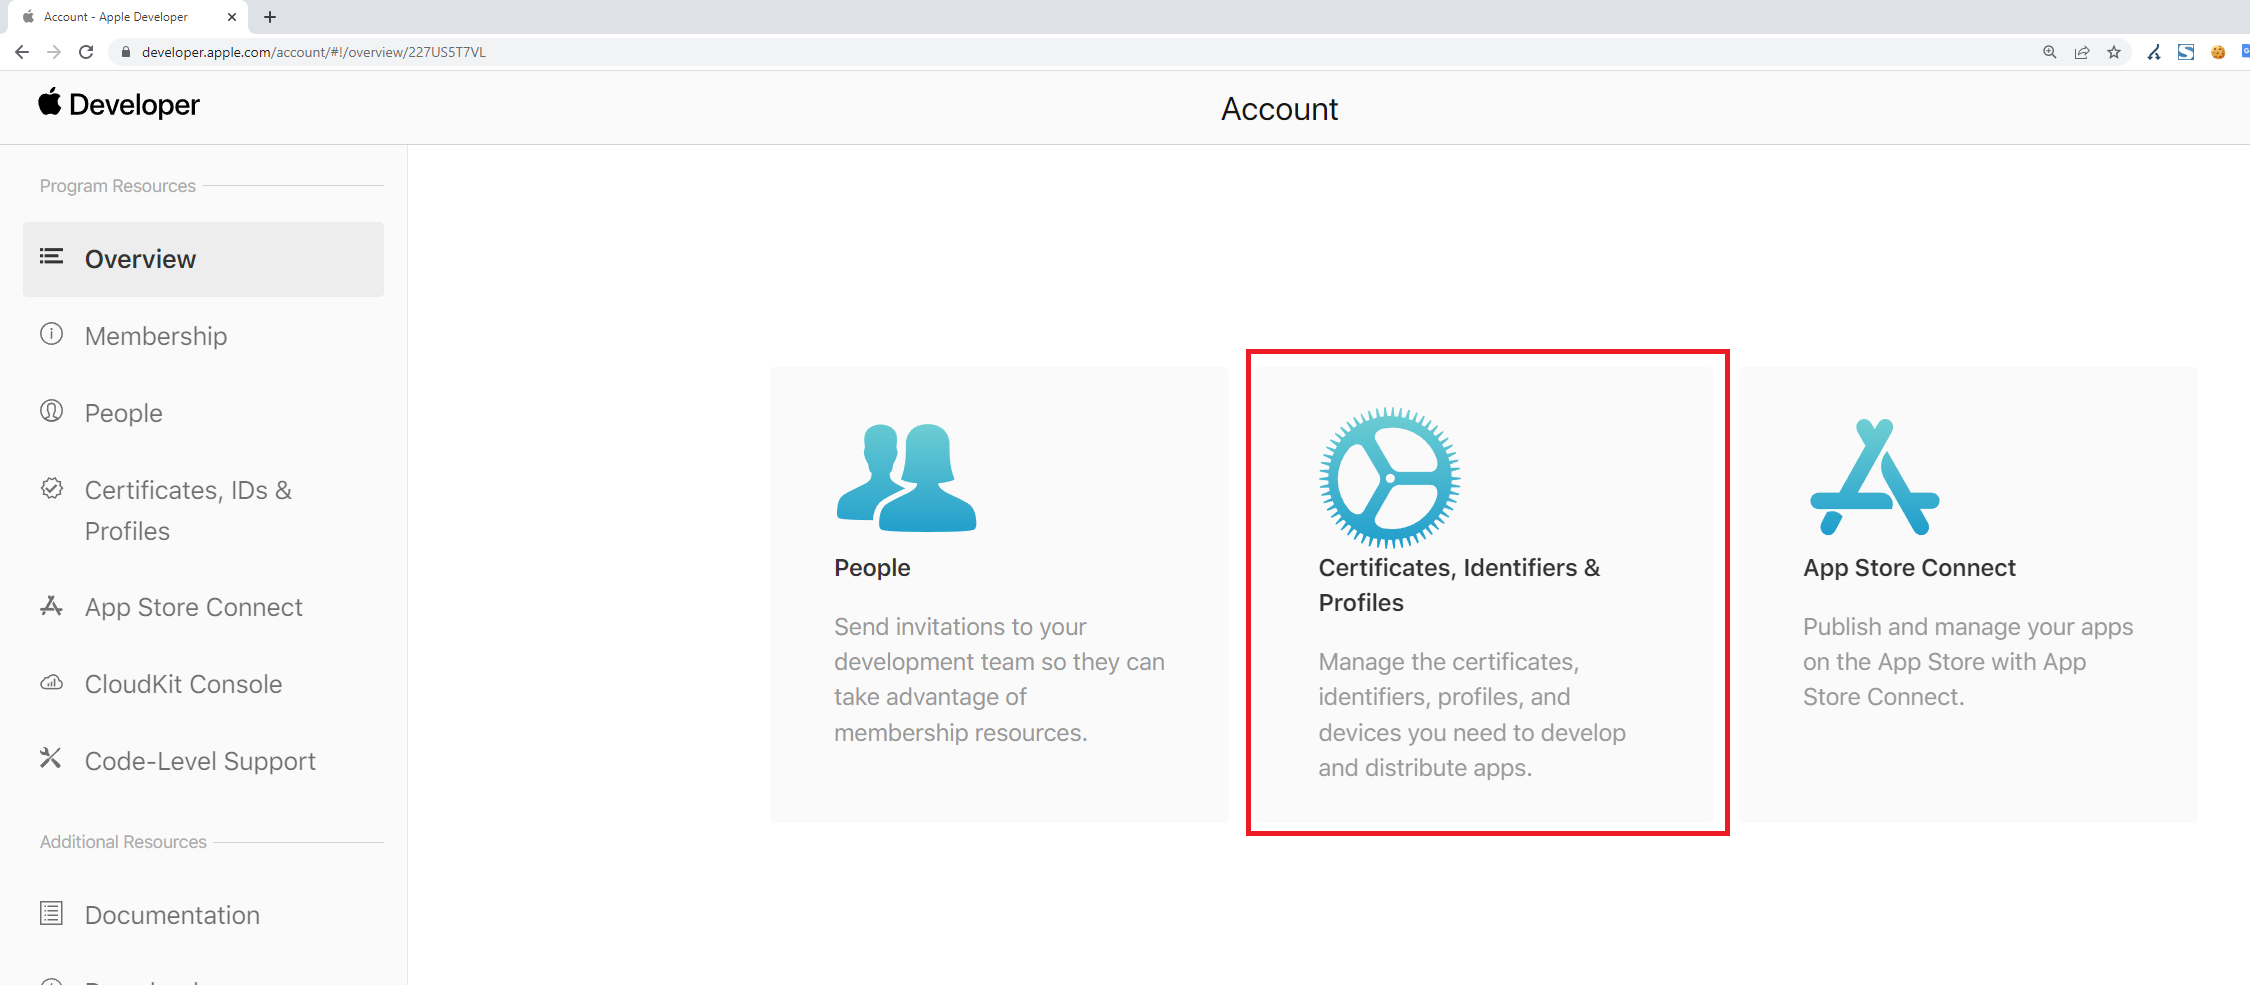
Identifiers > App IDs > Merchant IDs > Identifiers +
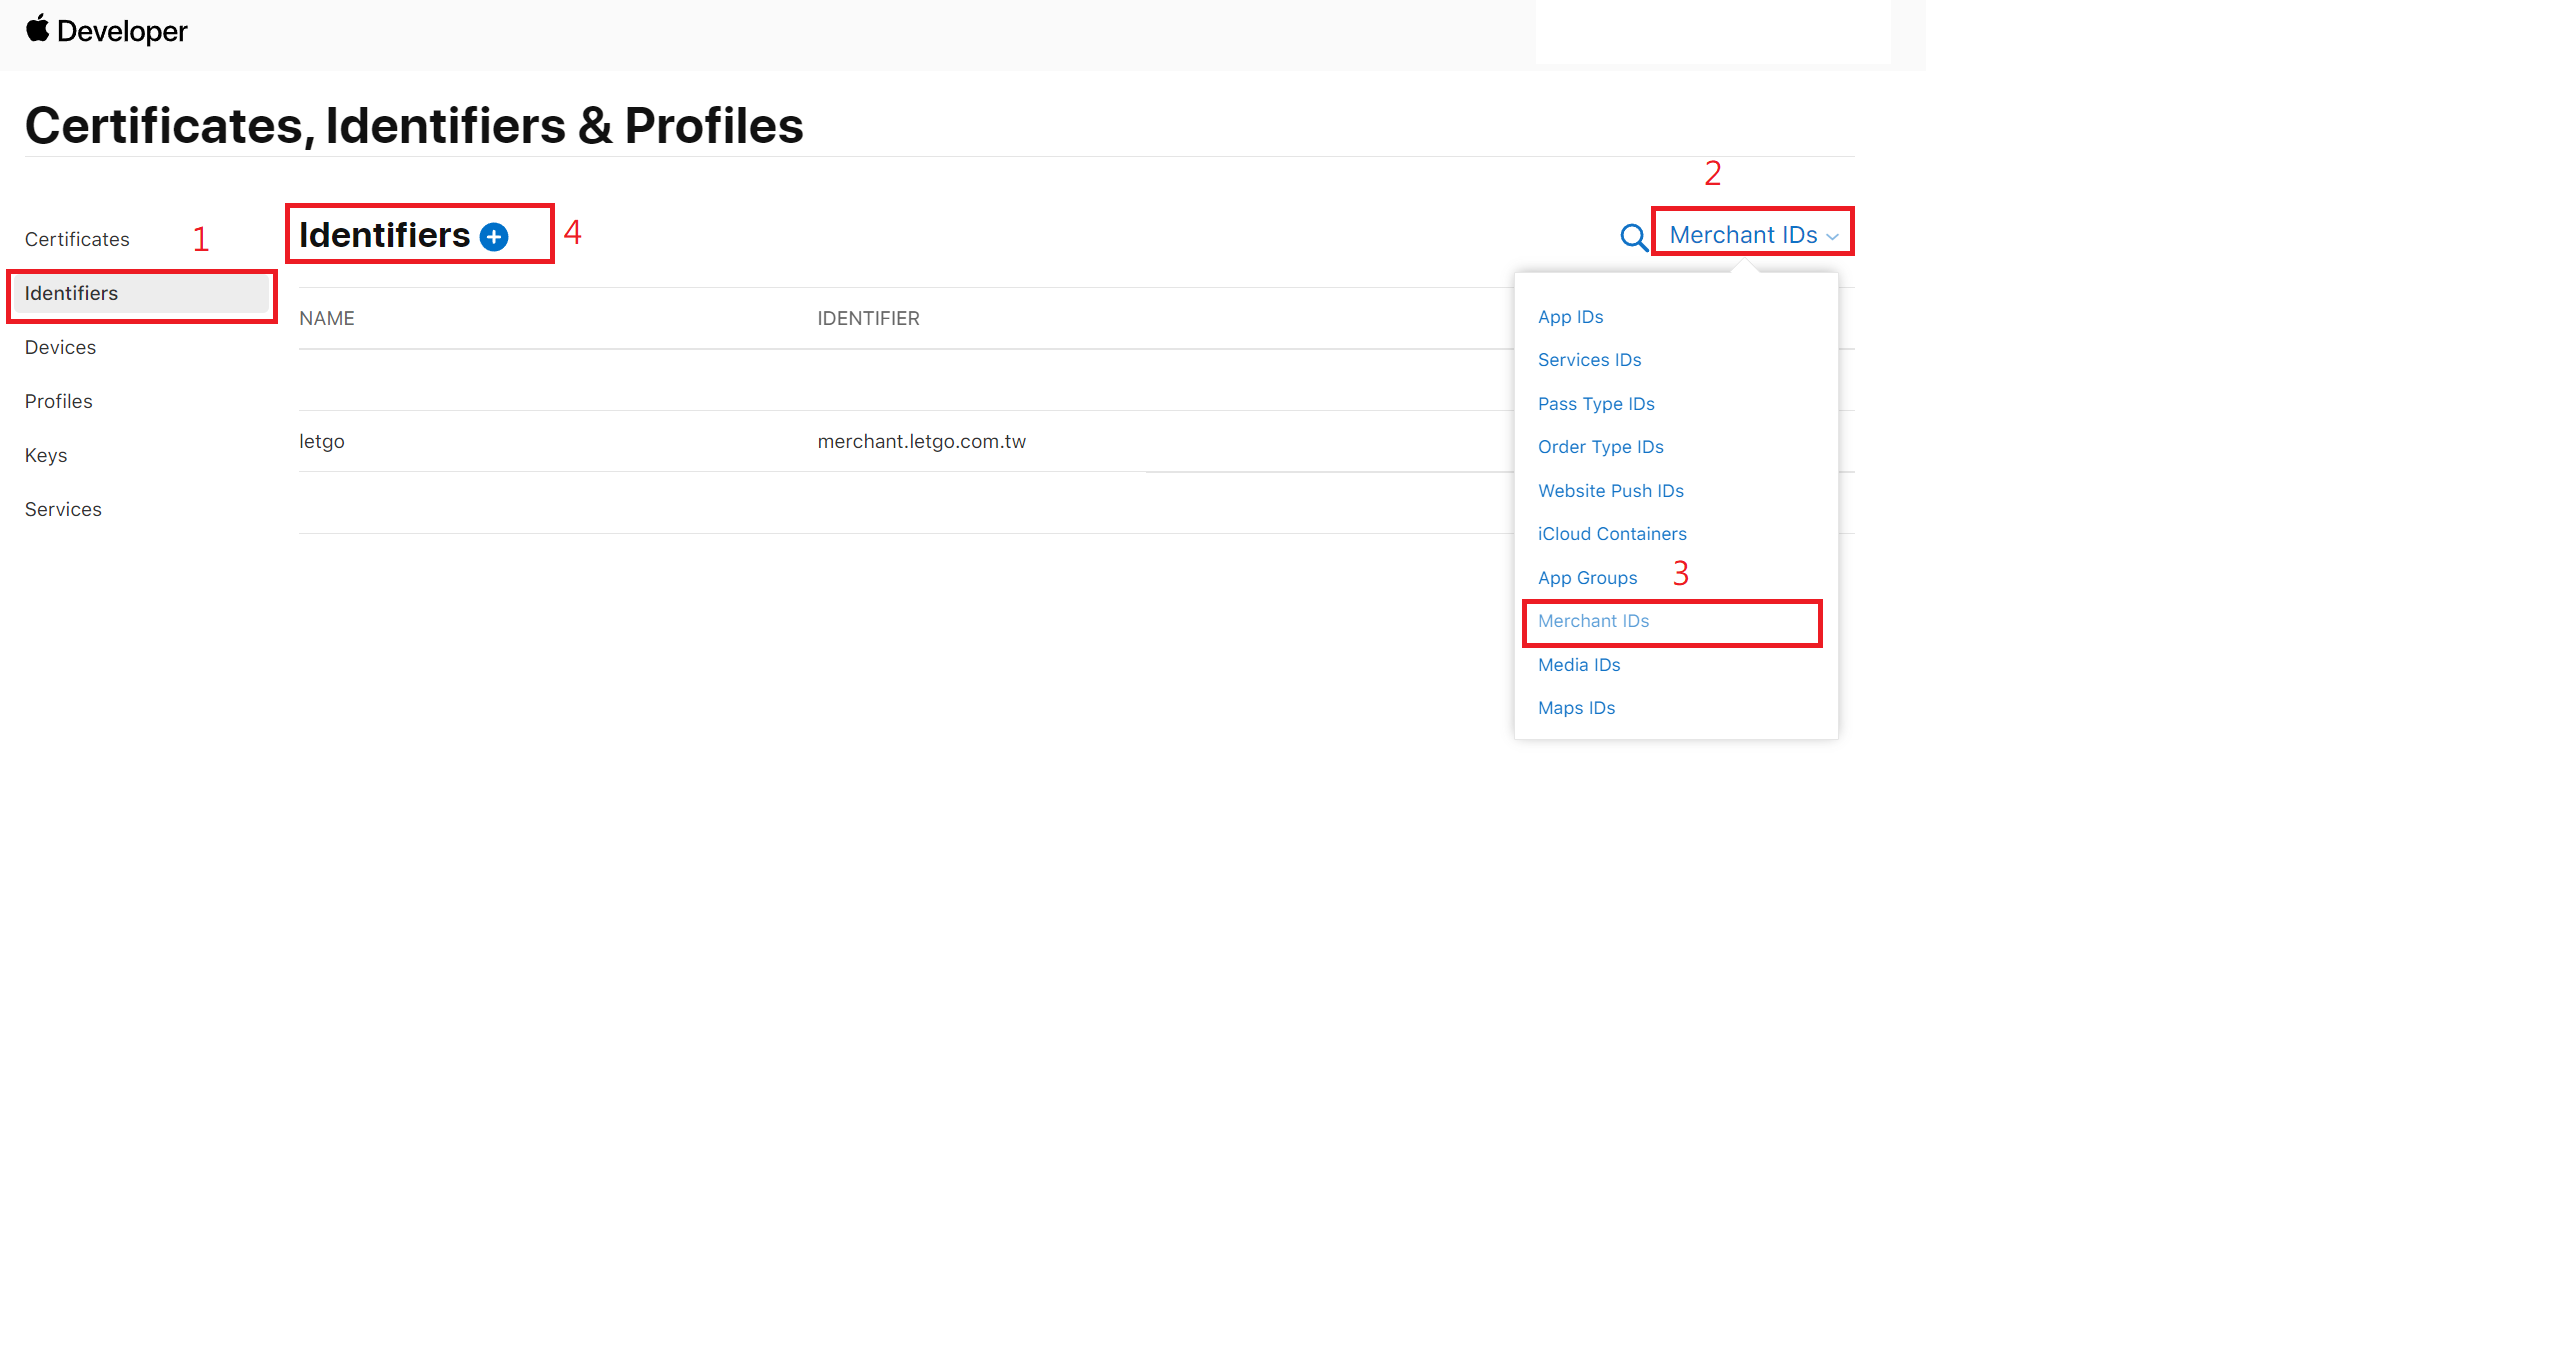
Merchant IDs > Continue
The Name can be anything. Enter the merchant identifier (official recommendation: {domainName} + {appName}). Make sure to save this, as it will be needed for the integration.
Next, from this screen, we can see that we need to prepare the following three items before writing the payment code
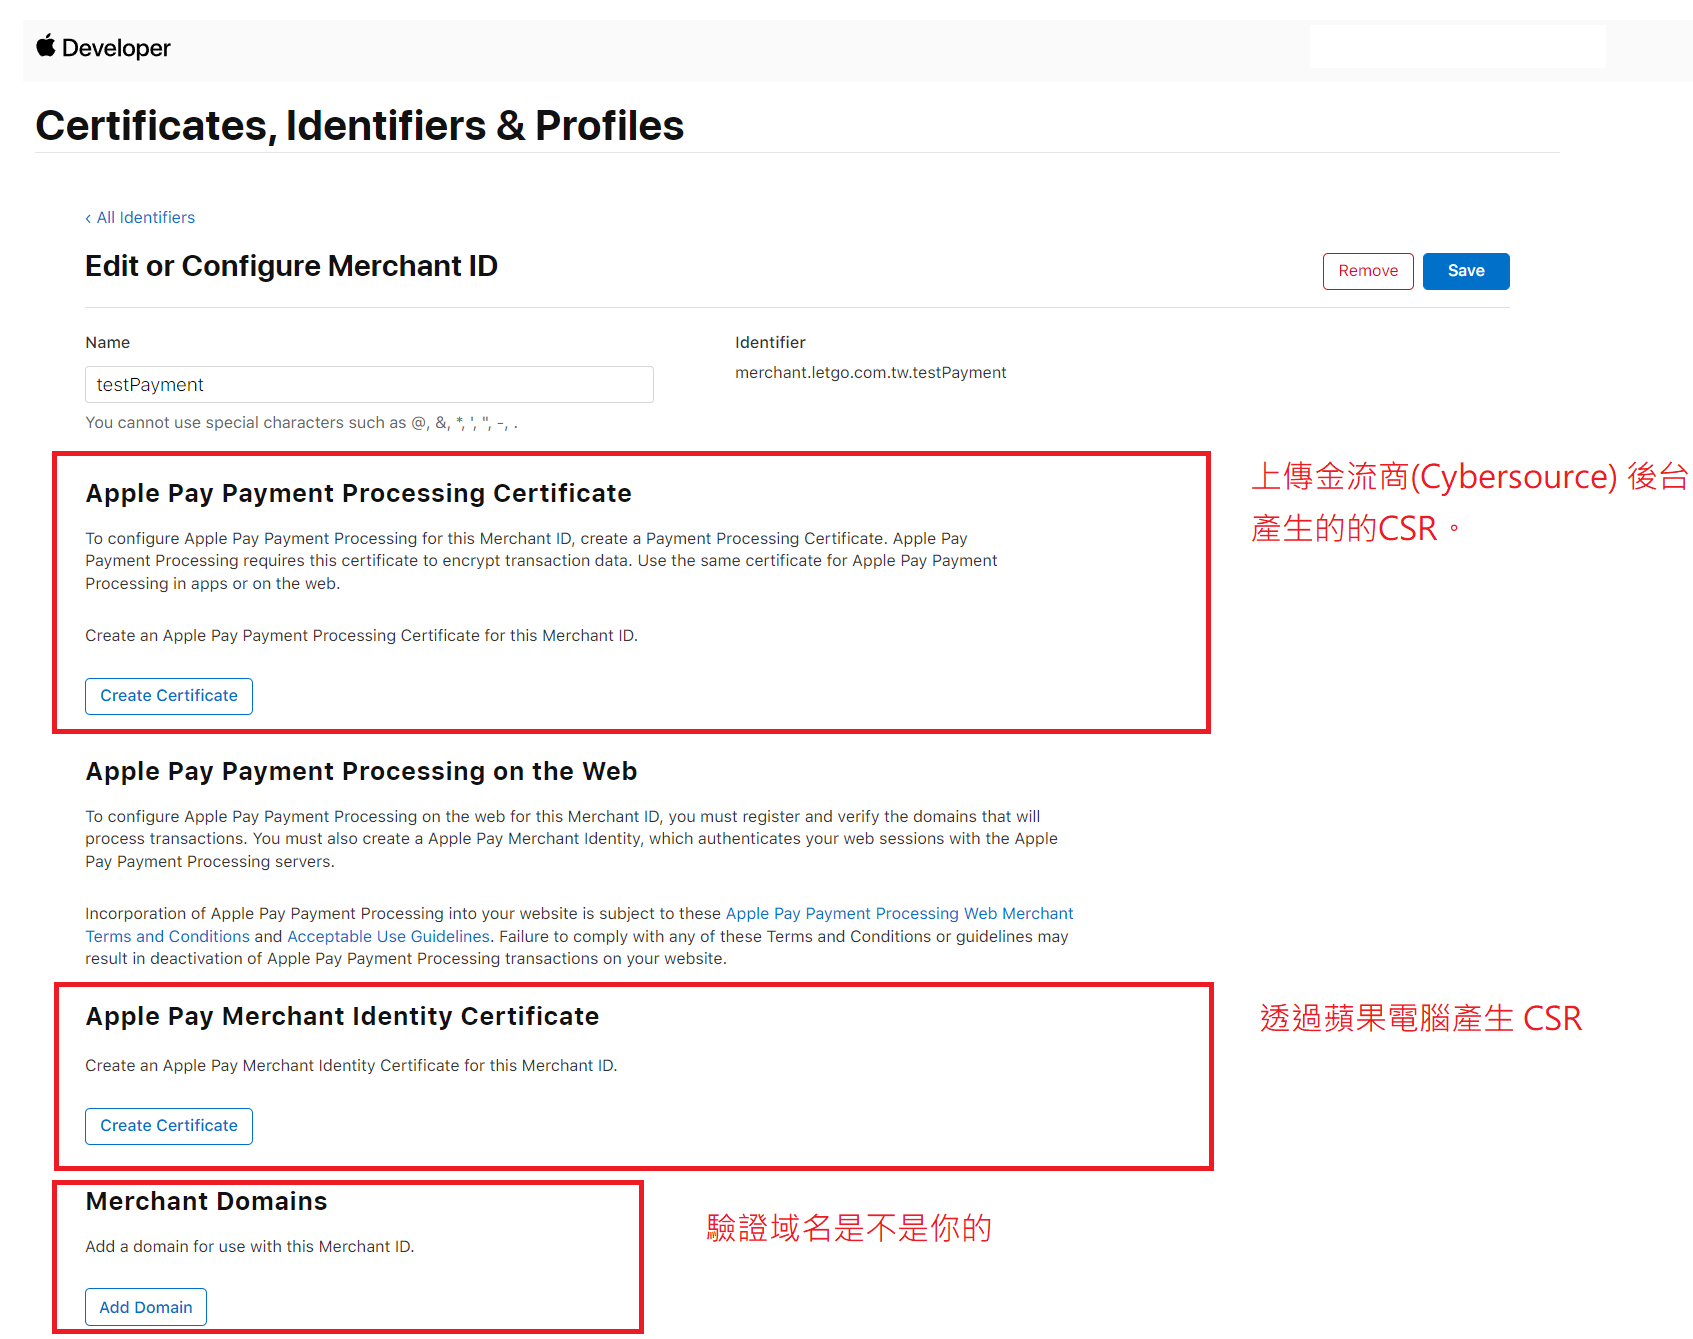
1. Upload the Payment Processor's CSR (Cybersource)
Cybersource's BackOffice > Payment Configuration > Apple Pay > Configure > Enter Apple Merchant ID > Generate New Certificate Signing Request > Download the certificate > Upload it to the Apple developer portal under "Apple Pay Payment Processing on the Web".
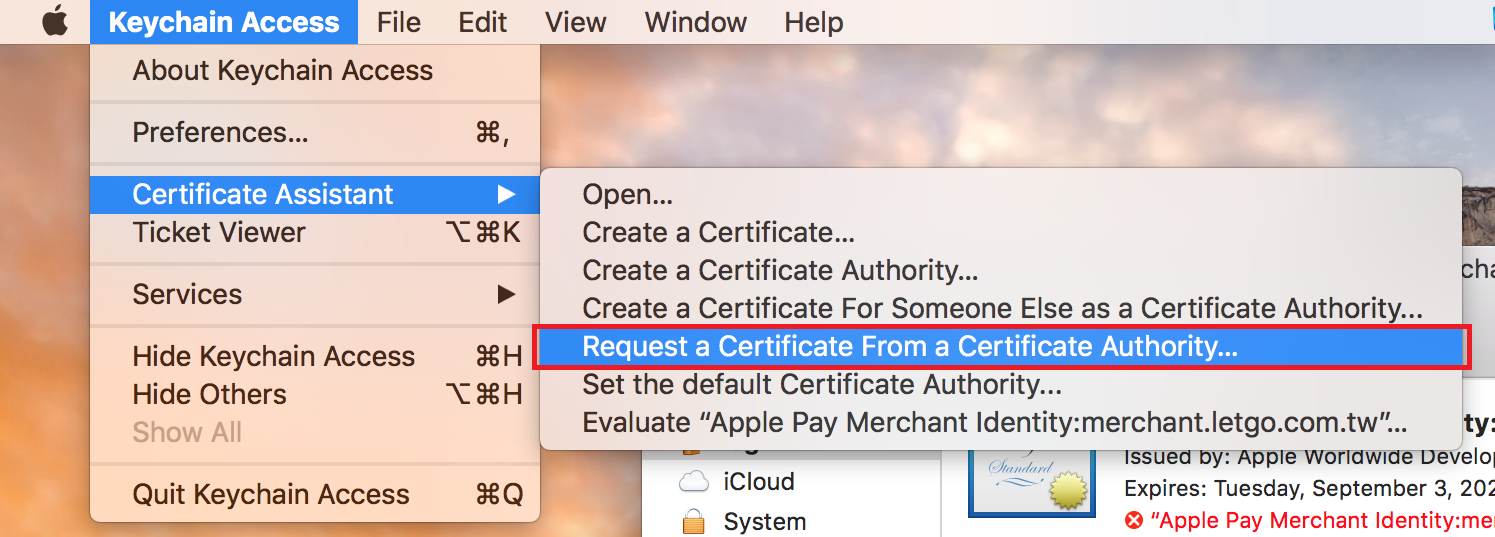
2. Generate a CSR on your Mac and create a certificate in the Apple developer portal
Keychain Access > Request a Certificate from a Certificate Authority...
2. Enter CA-related information
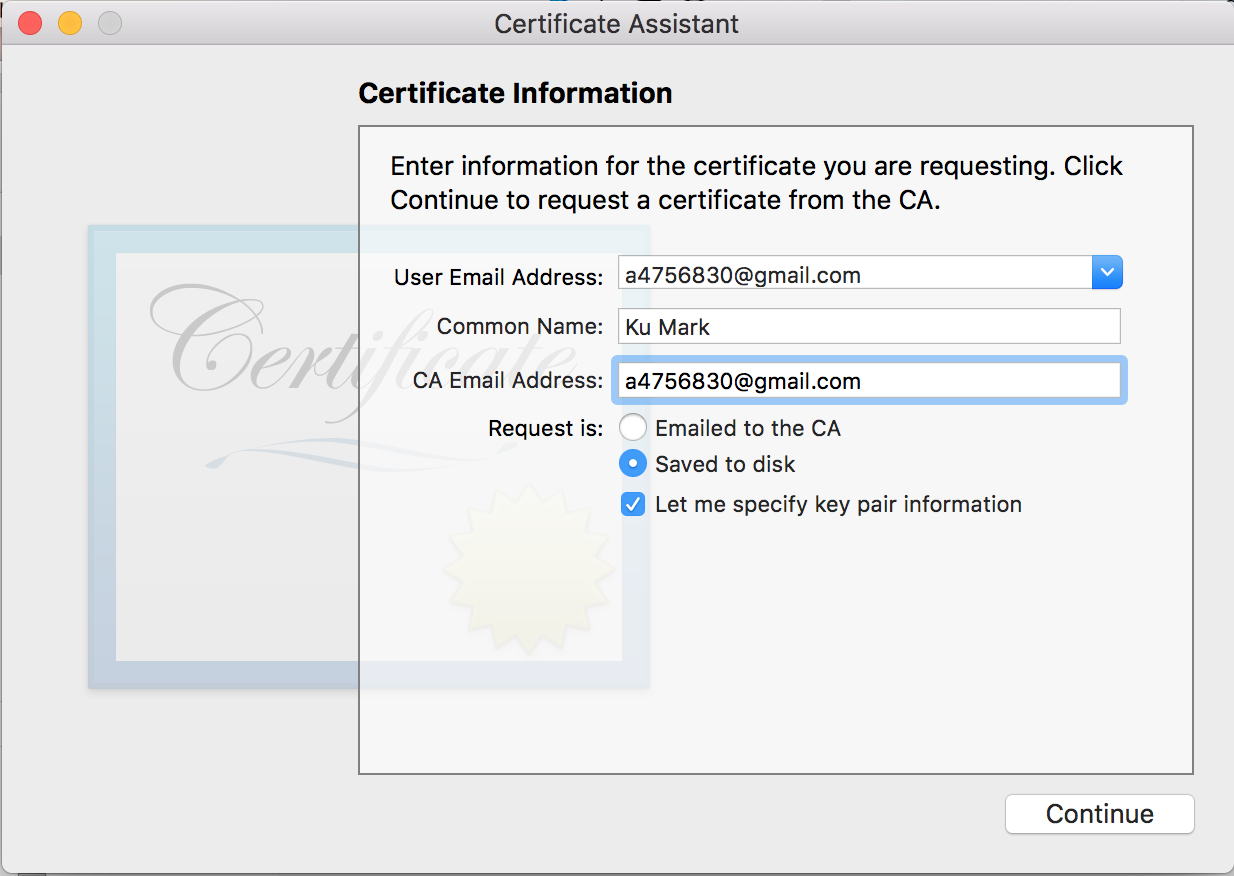
3. Choose the certificate format (the default, RSA, is fine)
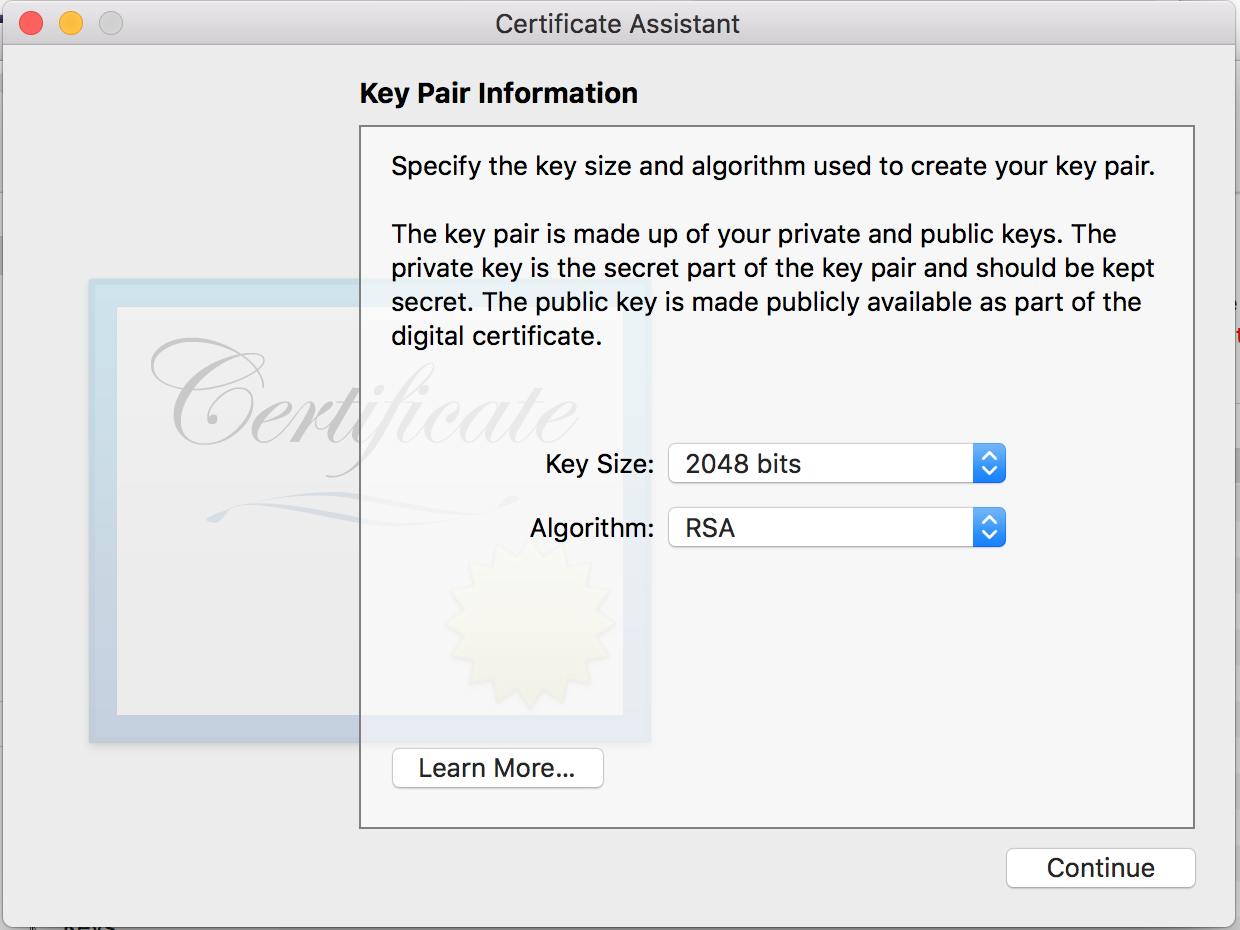
4. Go to the developer portal > Apple Pay Merchant Identity Certificate > Upload the CSR you just generated
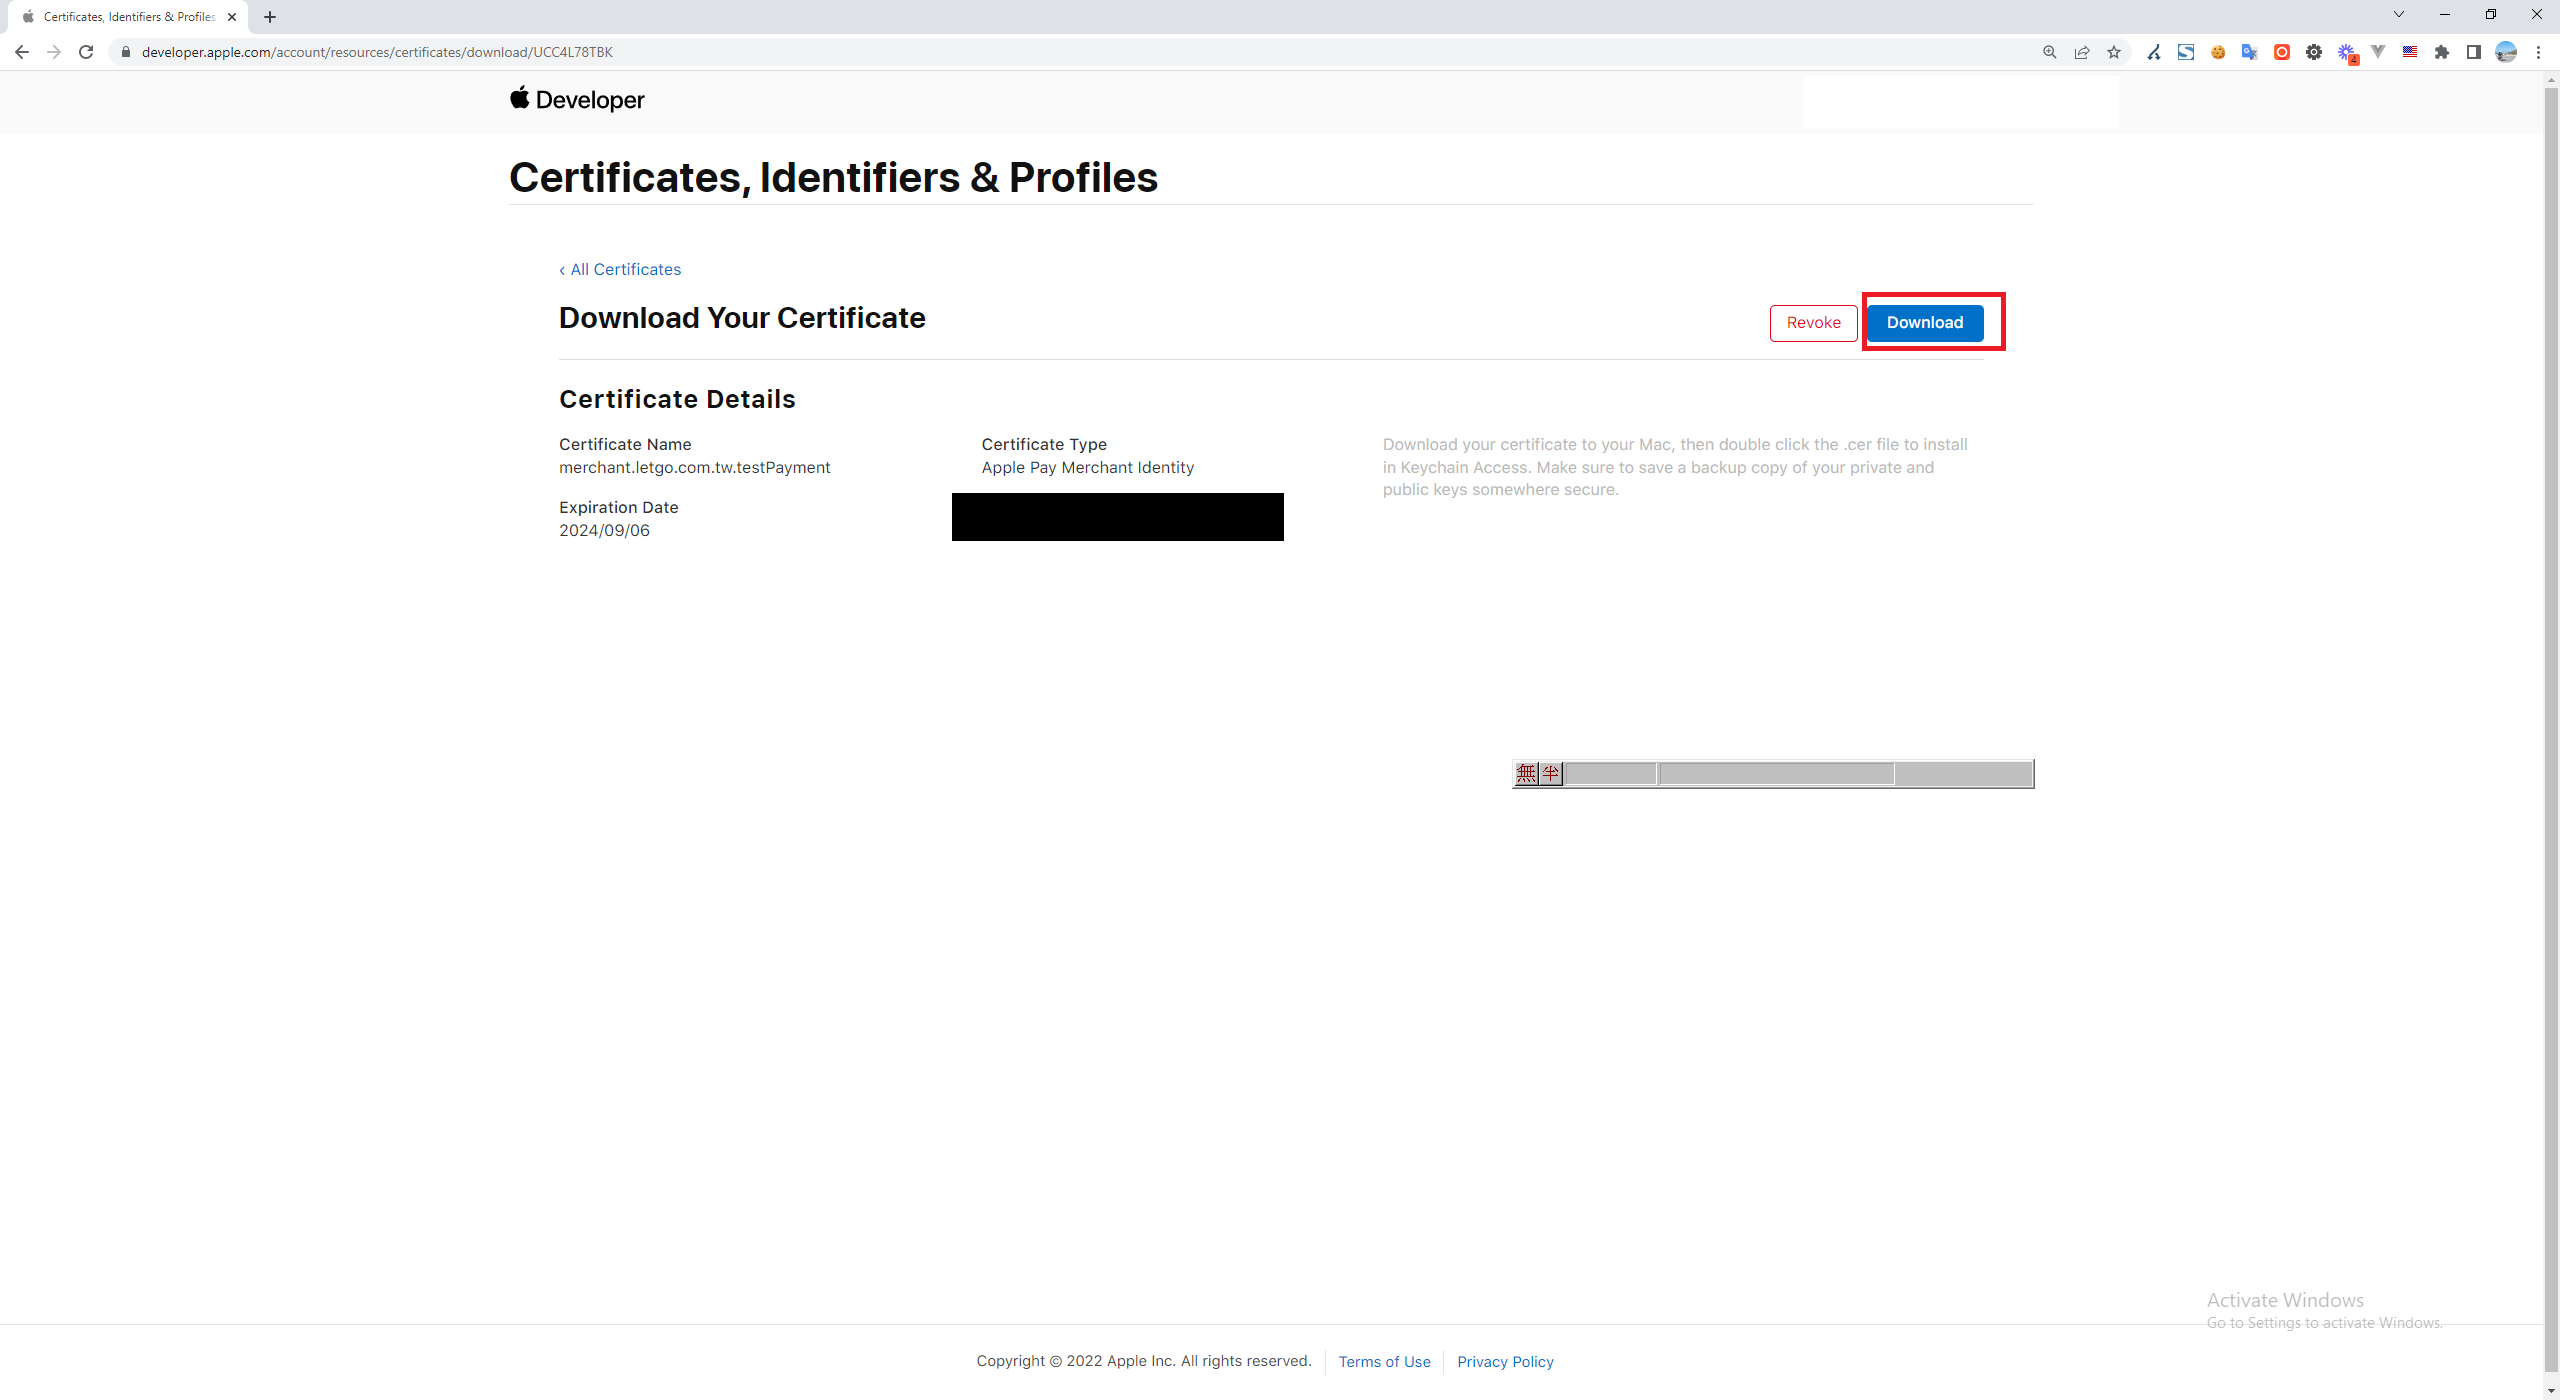
5. After uploading, a "Download" button will appear. Click it to download the certificate to your computer. This certificate is needed to make requests to Apple for merchant validation. However, the .NET X509 component cannot use .cer files, so you need to convert it to a .p12 file using a Mac.
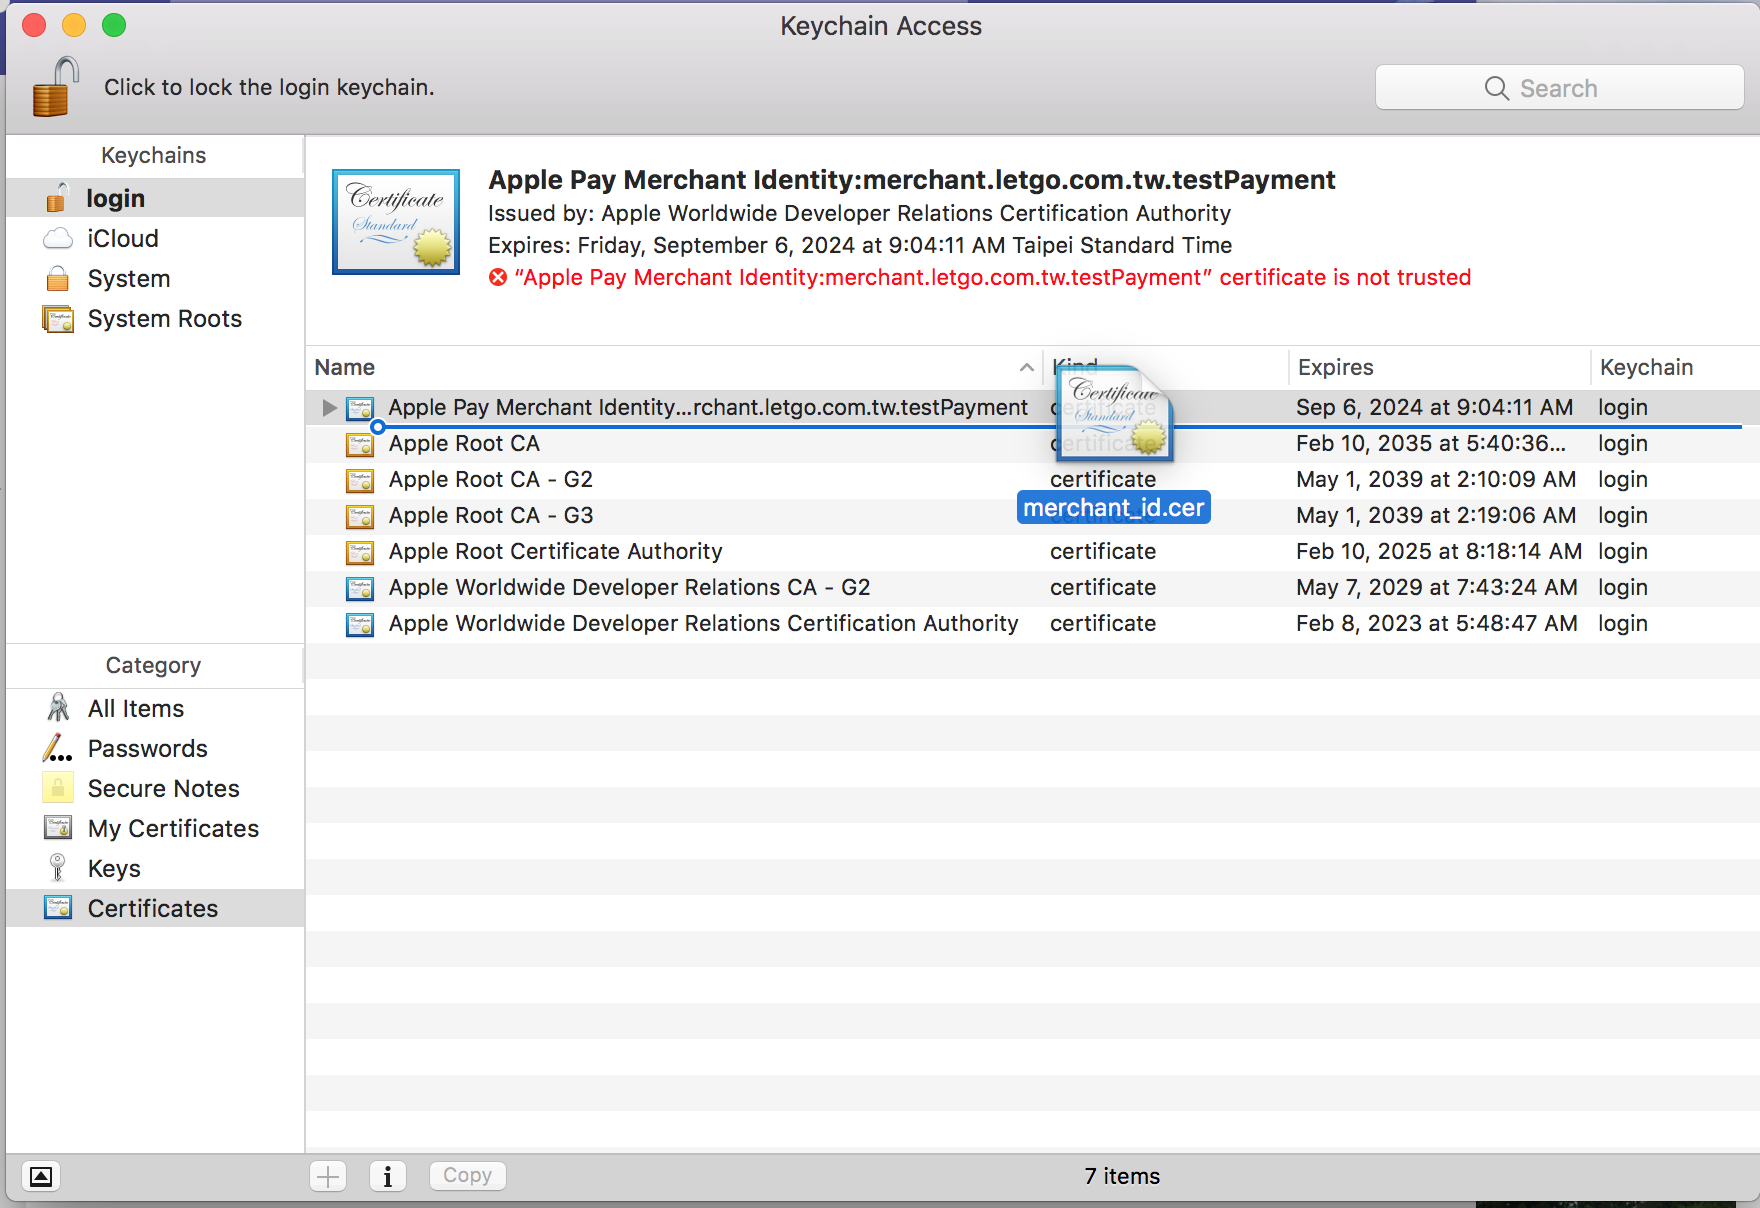
6. Generate a .p12 file for the backend merchant validation API
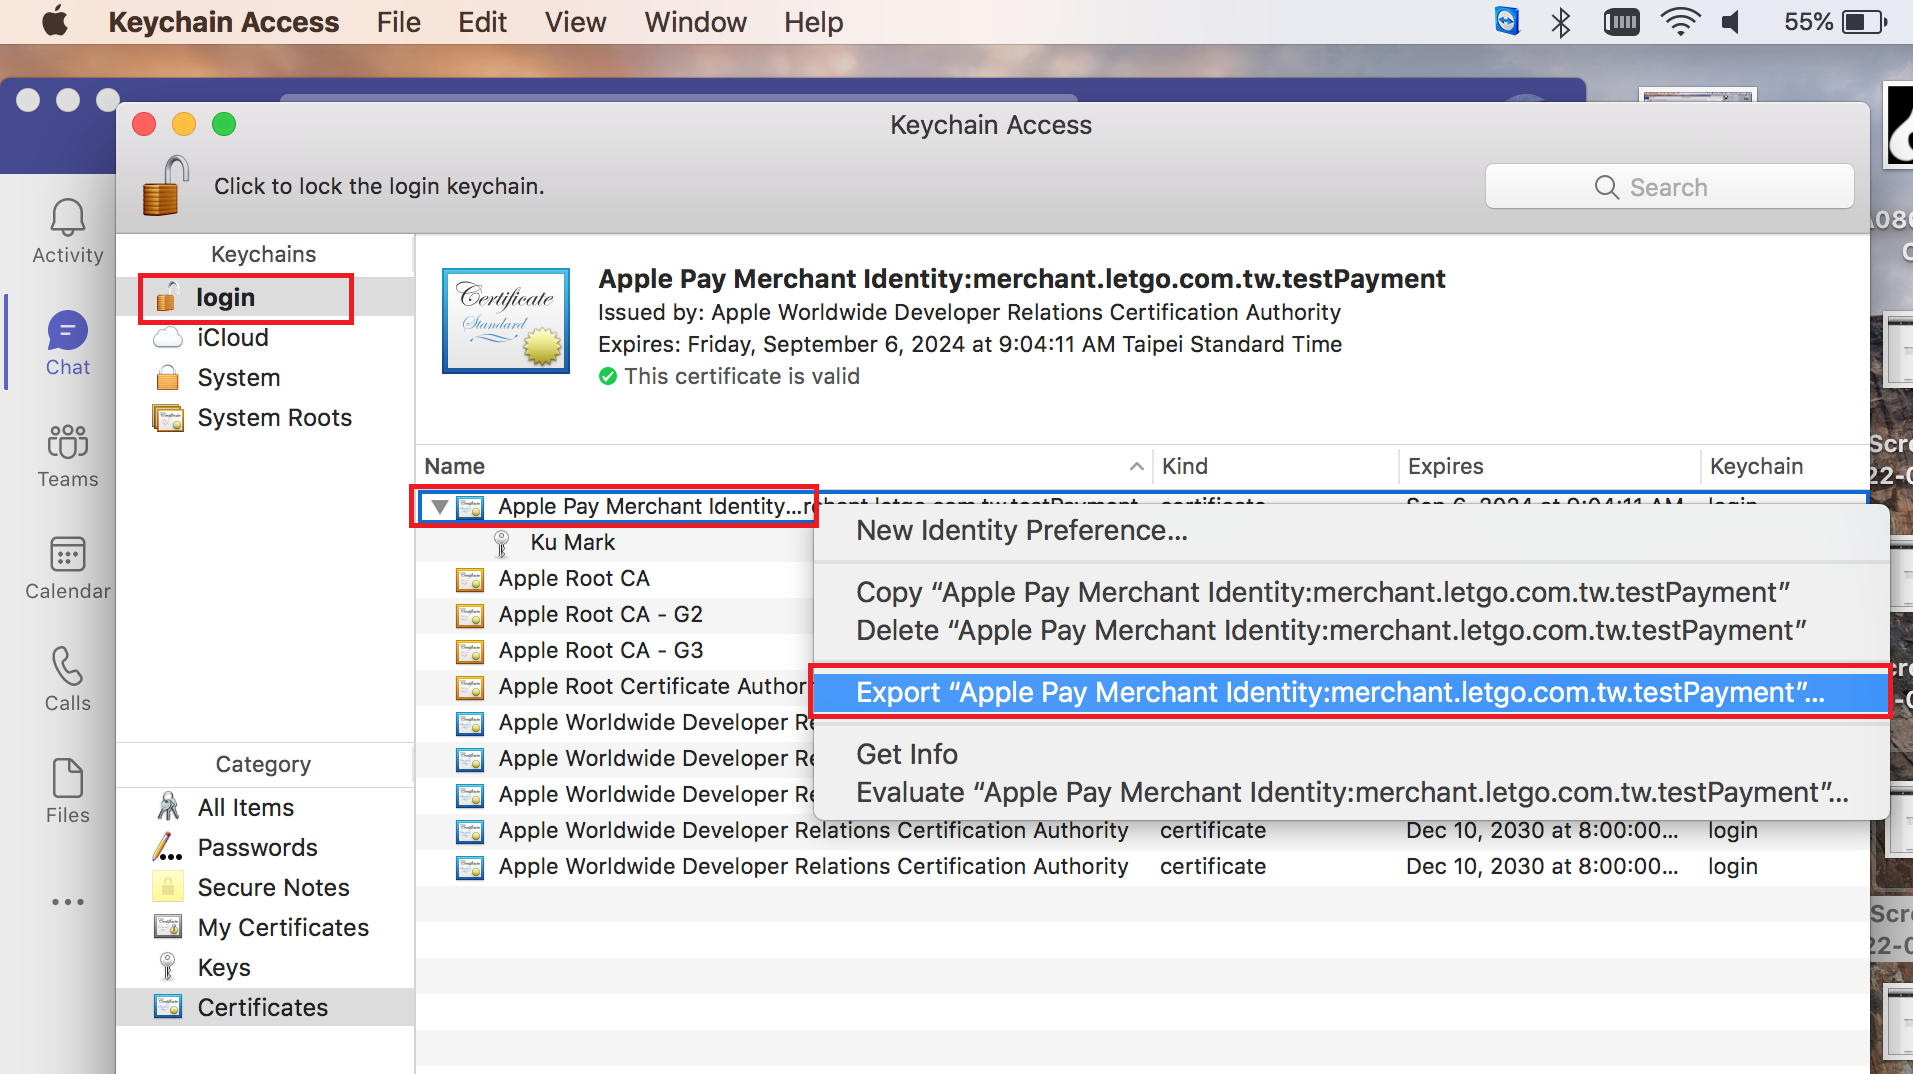
Drag the downloaded .cer file into the "login" keychain in Keychain Access. You will notice that the certificate is "not trusted".
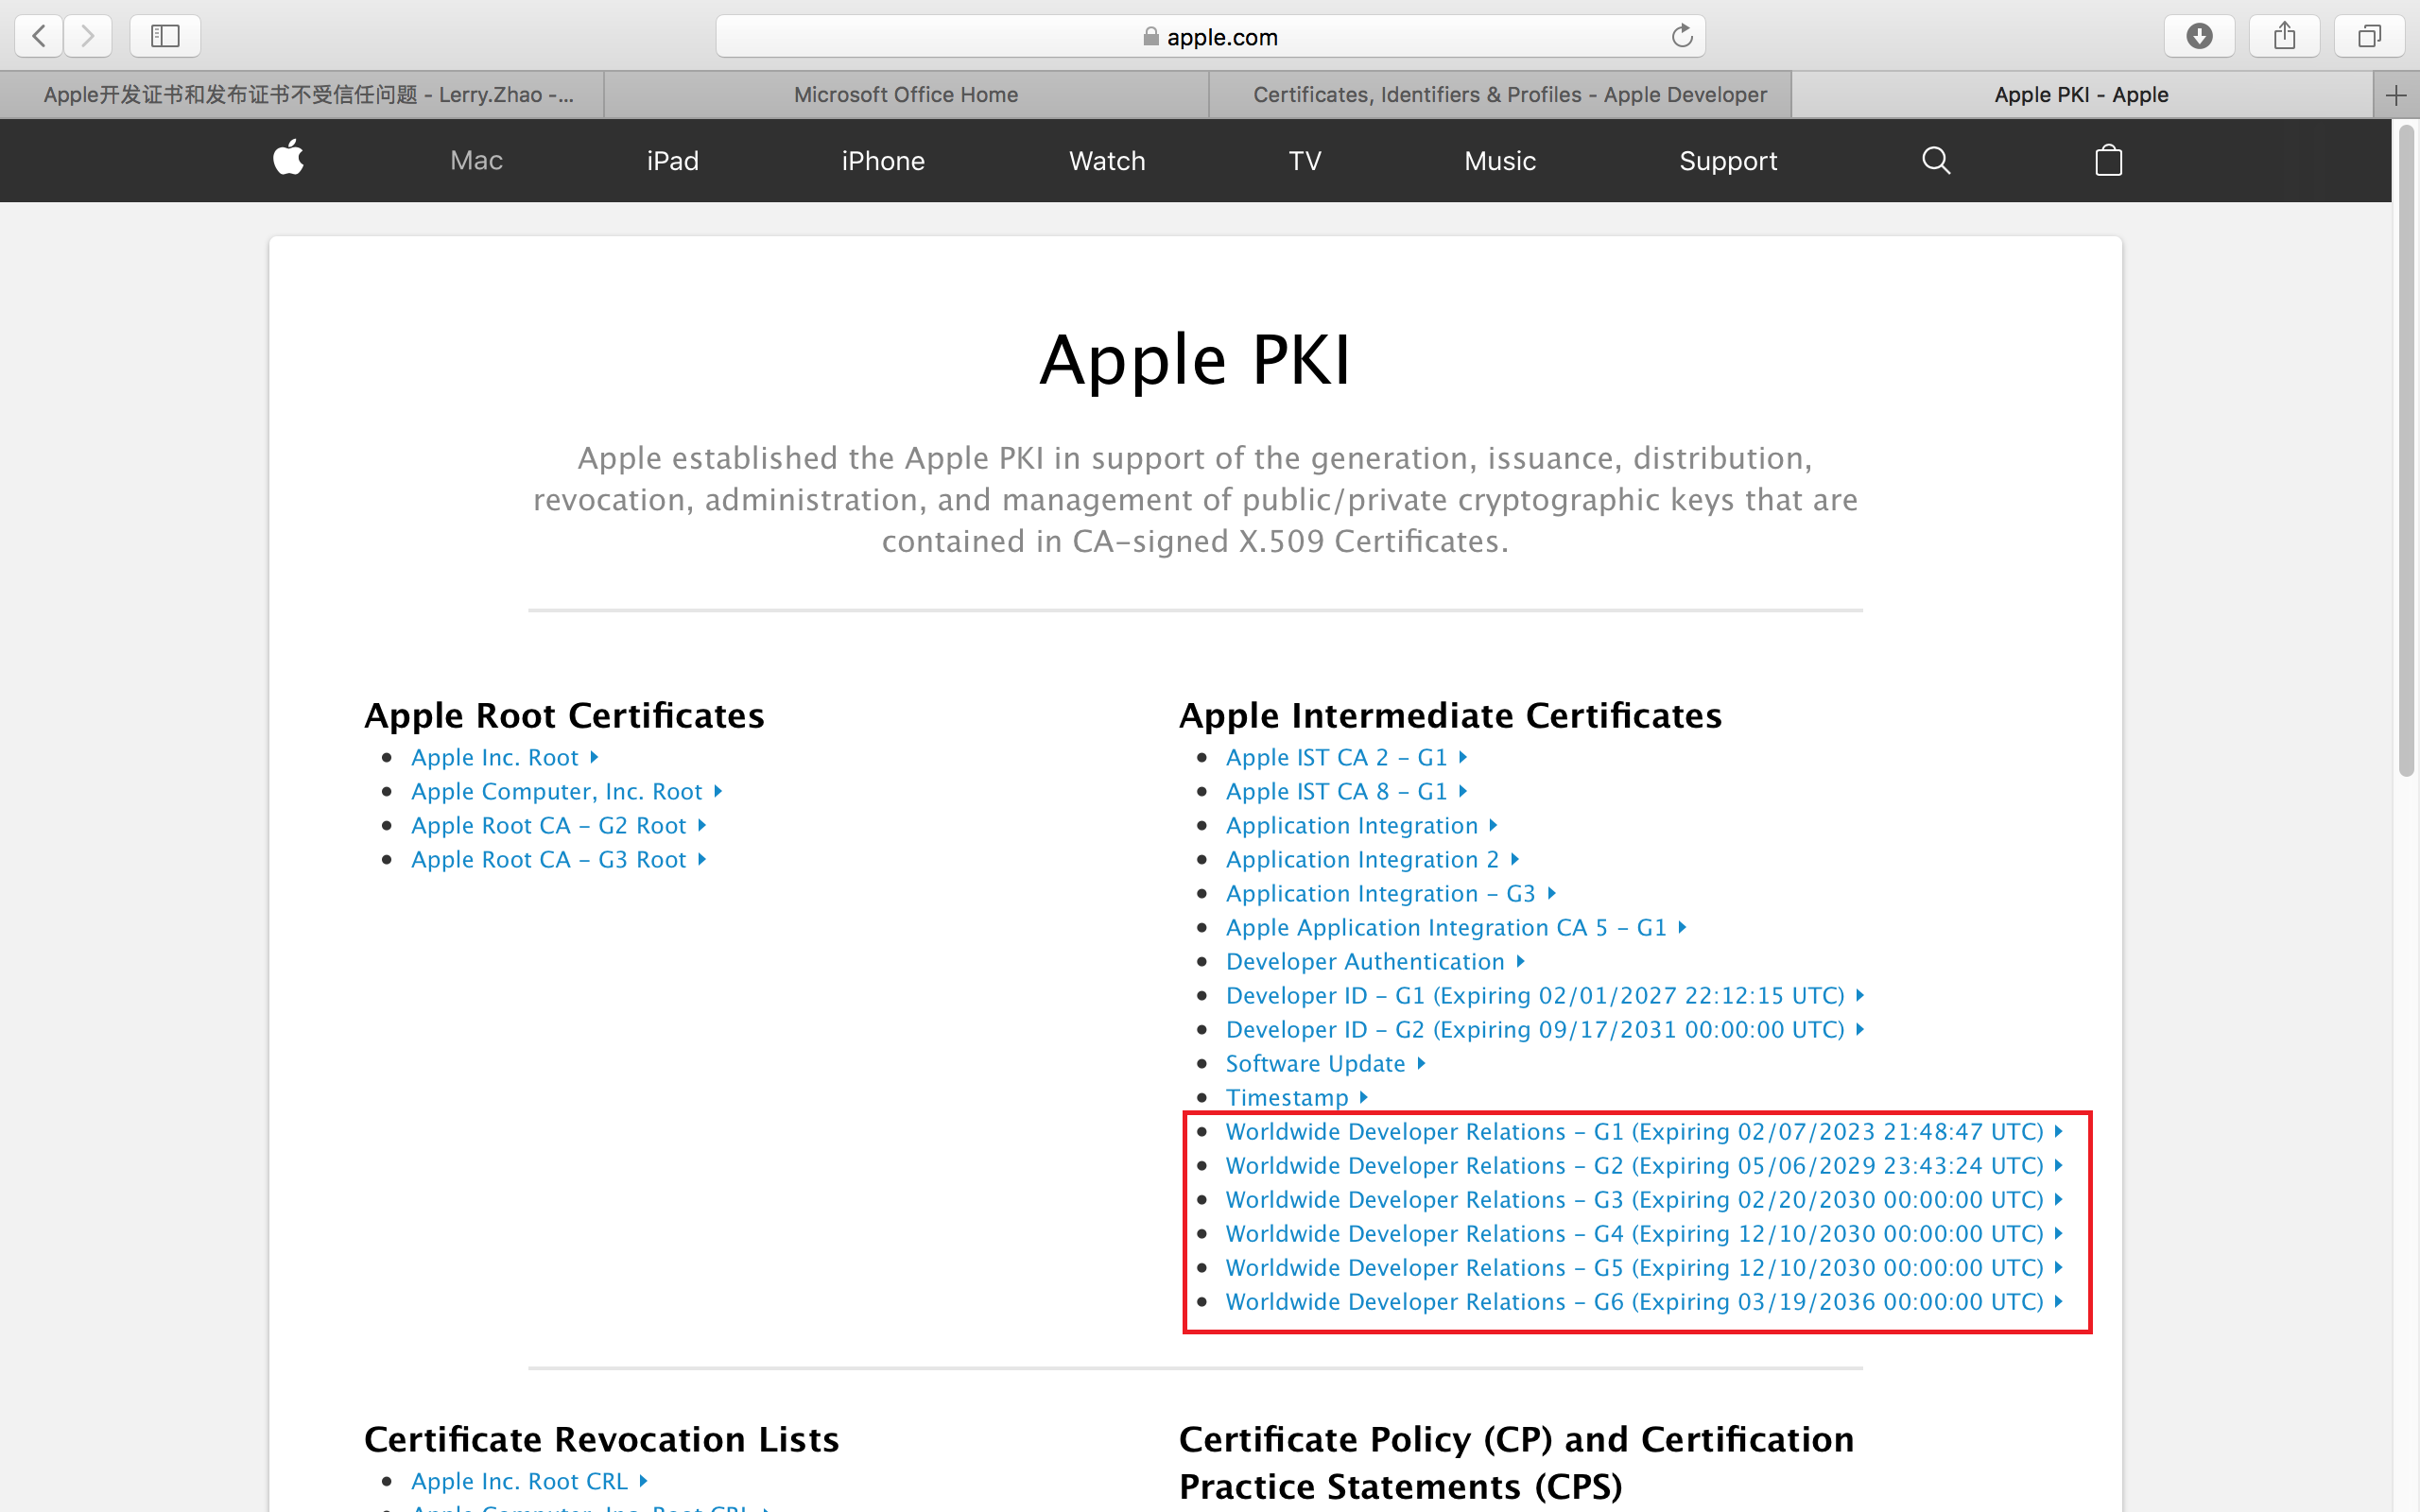
At this point, go to the Apple PKI website
and install the certificate highlighted in the red box. After installation, the certificate status will change to "This certificate is valid."
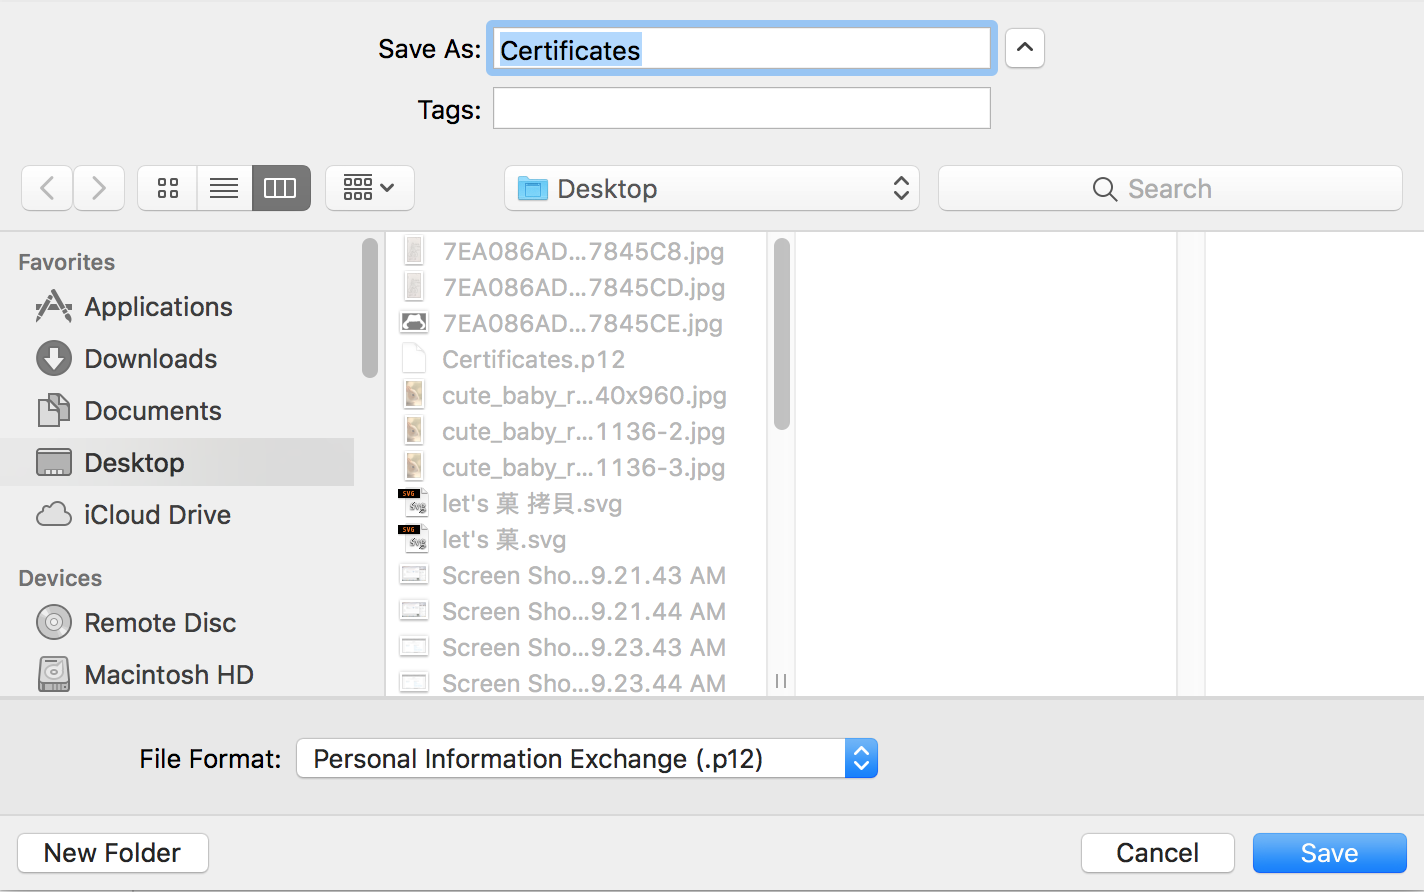
Right-click > Export (you can enter any password)
3. Verify your domain
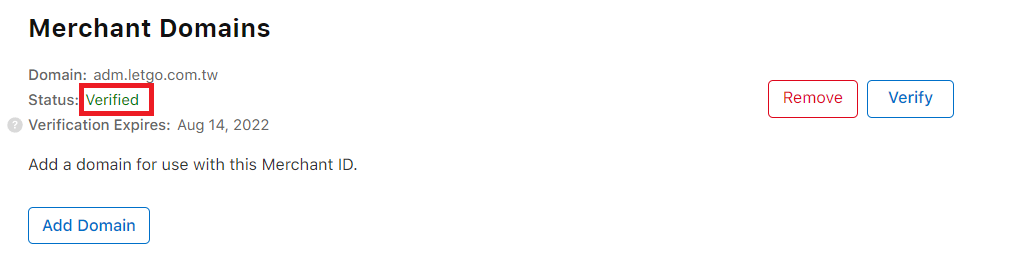
Enter the domain to verify > Download the verification file > Place it on your web server > Click the "Verify" button
Writing the Code
By referencing Apple's official Apple Pay Live Demo, we can see that the main frontend event flow for Apple Pay includes:
onvalidatemerchant(When the user clicks the button, validate the merchant via your backend)onpaymentauthorized(After successful merchant validation, this triggers the transaction)onpaymentmethodselected(When a payment method is selected)onshippingcontactselected(Triggered when shipping contact is selected)onshippingmethodselected(When a shipping method is selected)
Frontend Code Example
<script src="https://applepay.cdn-apple.com/jsApi/v1/apple-pay-sdk.js"></script>

<style>
    apple-pay-button {
        --apple-pay-button-width: 150px;
        --apple-pay-button-height: 30px;
        --apple-pay-button-border-radius: 3px;
        --apple-pay-button-padding: 0px 0px;
        --apple-pay-button-box-sizing: border-box;
    }
</style>

<h1>Apple Pay Welcome</h1>
<h2>Apple Pay button is only show in safari!!! </h2>

<apple-pay-button buttonstyle="black" type="plain" locale="en" onclick="onApplePayButtonClicked()">123</apple-pay-button>

<script>
    function onApplePayButtonClicked() {

        if (!ApplePaySession) {
            return;
        }

        // Define ApplePayPaymentRequest
        const request = {
            "countryCode": "US",
            "currencyCode": "USD",
            "merchantCapabilities": [
                "supports3DS"
            ],
            "supportedNetworks": [
                "visa",
                "masterCard",
                "amex",
                "discover"
            ],
            "total": {
                "label": "付給 xxx 公司",
                "type": "final",
                "amount": "0.1"
            }
        };

        // Create ApplePaySession
        const session = new ApplePaySession(3, request);
        const failObject = {
            'status': ApplePaySession.STATUS_FAILURE
        }

        session.onvalidatemerchant = event => {
            const validationURL = event.validationURL;

            const failObject = {
                'status': ApplePaySession.STATUS_FAILURE
            }

            getApplePaySession(validationURL).then(function (response) {
                debugger

                let result = JSON.parse(response)
                session.completeMerchantValidation(result);
            }).then(function (response) {
                session.completeMerchantValidation(failObject)
            }).catch(err => {
                session.completeMerchantValidation(failObject)
            })
        };

session.onpaymentauthorized = event => {

            /*alert('onpaymentauthorized' + JSON.stringify(event.payment.token.paymentData))*/

            var paymentDataString =
                JSON.stringify(event.payment.token.paymentData);
            var paymentDataBase64 = btoa(paymentDataString);

            debugger
            let data = {
                amount: request.total.amount,
                paymentTokenObject: paymentDataBase64
            }

            paymentProcess(data).then(function (response) {

                if (response === true) {
                    /*alert('true')*/
                    const result = {
                        "status": ApplePaySession.STATUS_SUCCESS
                    };
                    session.completePayment(result);
                } else {
                    session.completePayment(failObject);
                }
                //let result = JSON.parse(response)
                //session.completeMerchantValidation(result);
            }).then(function (response) {
                session.completeMerchantValidation(failObject)
            }).catch(err => {
                session.completeMerchantValidation(failObject)
            })

            // Define ApplePayPaymentAuthorizationResult

        };

        session.oncancel = event => {
            alert('oncancel')
            session.abort(); // maybe not*/
        };

        session.begin();
    }

    // 驗證商戶
    function getApplePaySession(url) {

        return new Promise(function (resolve, reject) {

            var xhr = new XMLHttpRequest();
            xhr.open('POST', '/applepay/ValidateMerchant');
            xhr.onload = function () {
                if (this.status >= 200 && this.status < 300) {
                    resolve(JSON.parse(xhr.response));
                } else {
                    reject({
                        status: this.status,
                        statusText: xhr.statusText
                    });
                }
            };

            xhr.onerror = function () {
                reject({
                    status: this.status,
                    statusText: xhr.statusText
                });
            };

            xhr.setRequestHeader("Content-Type", "application/json");
            xhr.send(JSON.stringify({ validationUrl: url }));
        });
    }

    // 付款
    function paymentProcess(data) {
        return new Promise(function (resolve, reject) {

            var xhr = new XMLHttpRequest();
            xhr.open('POST', '/applepay/paymentProcess');
            xhr.onload = function () {
                if (this.status >= 200 && this.status < 300) {
                    debugger
                    resolve(JSON.parse(xhr.response));
                } else {
                    reject({
                        status: this.status,
                        statusText: xhr.statusText
                    });
                }
            };

            xhr.onerror = function () {
                reject({
                    status: this.status,
                    statusText: xhr.statusText
                });
            };

            xhr.setRequestHeader("Content-Type", "application/json");
            xhr.send(JSON.stringify(data));
        });
    }
</script>
Backend Code (.NET MVC)
 /// <summary>
      /// 商戶驗證
      /// </summary>
      [HttpPost]
      public JsonResult ValidateMerchant(VerifyMerchantRequest request) {
         string strResult = string.Empty;
         try {

            ServicePointManager.SecurityProtocol = SecurityProtocolType.Tls12;
            ServicePointManager.Expect100Continue = false;

            System.Net.ServicePointManager.SecurityProtocol = System.Net.SecurityProtocolType.Tls12;
            /* Merchant Identity憑證 */
            string certPath = Request.MapPath(@"~/App_Data/ApplePay.p12"); //Merchant Identifier憑證路徑
            string certPwd = "123"; //Merchant Identifier憑證密碼
            X509Certificate2 cert = new X509Certificate2(certPath, certPwd, X509KeyStorageFlags.MachineKeySet);

            /* 建立PayLoad */
            var payload = new {
               displayName = "letgo",  // 名稱
               initiative = "web", // 網頁
               initiativeContext = "adm.letgo.com.tw", // 域名
               merchantIdentifier = "merchant.letgo.com.tw.testPayment", // 商戶號
            };

            string strPayLoad = JsonConvert.SerializeObject(payload);

            /* 將Payload以POST方式拋送至Apple提供的validationURL */
            /* HTTP Request需以Merchant Identity憑證送出 */
            /* 驗證成功後,Apple將會回傳Merchant Session物件*/

            #region HTTP Web Result

            HttpWebRequest httpRequest = (HttpWebRequest)HttpWebRequest.Create(request.ValidationUrl);

            httpRequest.Method = WebRequestMethods.Http.Post;
            httpRequest.ContentType = "application/json";
            httpRequest.ContentLength = strPayLoad.Length;

            httpRequest.ClientCertificates.Add(cert);

            using (StreamWriter sw = new StreamWriter(httpRequest.GetRequestStream())) {
               sw.Write(strPayLoad);
               sw.Flush();
               sw.Close();
            }

            HttpWebResponse response = httpRequest.GetResponse() as HttpWebResponse;

            using (StreamReader sr = new StreamReader(response.GetResponseStream(), Encoding.UTF8)) {
               strResult = sr.ReadToEnd();
               sr.Close();
            }

            #endregion HTTP Web Result
         }
         catch (Exception ex) {
         }
         finally {
         }

         /* 將Merchant Session物件回應至Client端*/
         return Json(strResult);
      }

      /// <summary>
      /// 付款
      /// </summary>
      /// <param name="paymentProcessRequest"></param>
      /// <returns></returns>
      [HttpPost]
      public async JsonResult PaymentProcess(PaymentProcessRequest)
      {
        // todo 和金流商串接,呼叫你的金流商付款 Api
      }
   }
Problems Encountered During Integration
Backend request for merchant validation with Apple fails with "The underlying connection was closed: An unexpected error occurred on a send"
Apple's API gateway will not respond if the certificate is incorrect. Carefully check your merchant or domain validation, the certificate sent with the request, and ensure the payload is correct.
When creating an order with Cybersource, an "Invalid_Request" error occurs, pointing to the paymentInformation.fluidData.value field
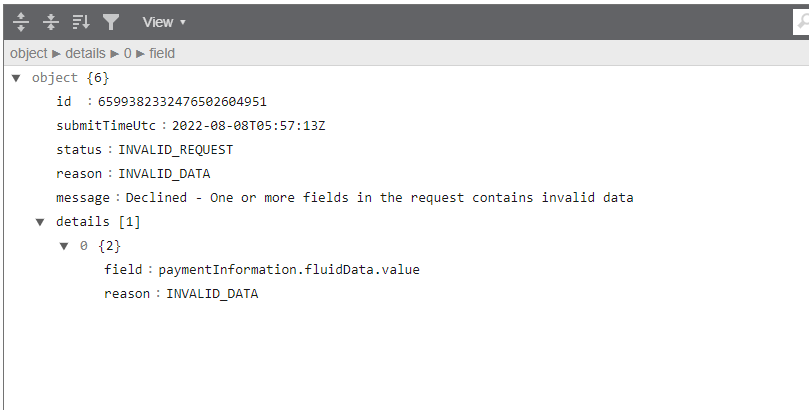 The main reason is that Cybersource does not provide a test environment for Apple Pay. You must use the production environment directly for development.
When including the Apple JS, a TypeScript error occurs in a project using TypeScript
npm install @types/applepayjs --save --dev
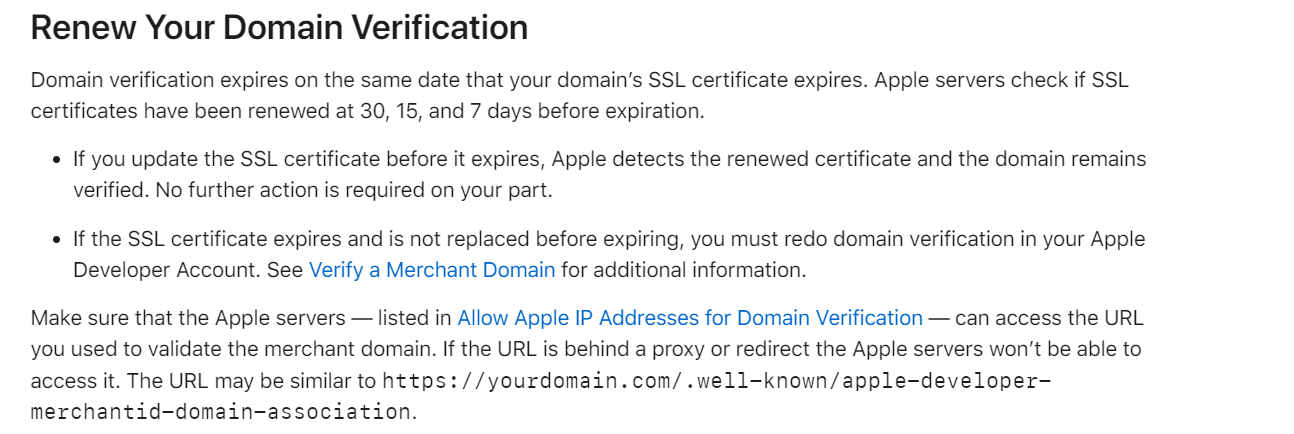
Very Important!!! Certificates are only valid for two years
According to the official documentation, Apple will notify you before a certificate expires. However, every two years, you must regenerate the .p12 file and re-upload the payment processor's CSR.
The Apple Pay button appears but is unresponsive when clicked
- The amount must have two or fewer decimal places.
- The Apple Pay JS might be doing something in the background; it must be loaded early.


Comments