
時空背景
目前公司內大部的系統都能夠容器化,但總有些舊網站,最舊也最大也最賺錢,暫時無法做技術昇級,但人數一多手動佈版,都會遇到有人漏提交 Binary,因此想把自動建置的部份自動化,優化佈版流程,同時也減少錯誤帶來的影響。
因為是舊系統及Net Mvc framework 的舊框架,無法容器化,全自動佈版,會有點風險,因此這邊佈署的部份,仍然還是採用手動。
目標
- 當有人 Push 任何code 到 Master 分支時,Jenkins 就會自動建置,並將建置完的 Binary,自動提交及推送到 Github。
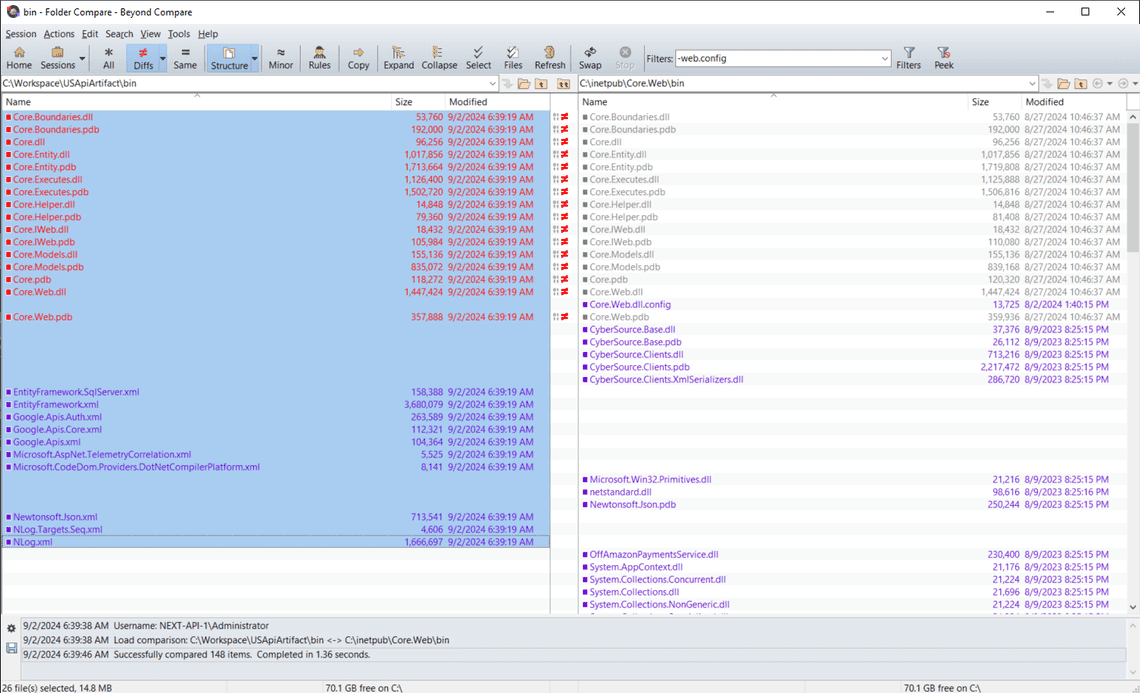
- 生產環境寫一個腳本,透過 Git 將最新的準備佈署的Binary 拉下來,接著透過 Beyond compare 比較 binary 差異,最後交由人工手動佈版。
環境說明
因為是舊系統,Jenkins 安裝在 Windows server 上。
首先,找回 MS Build
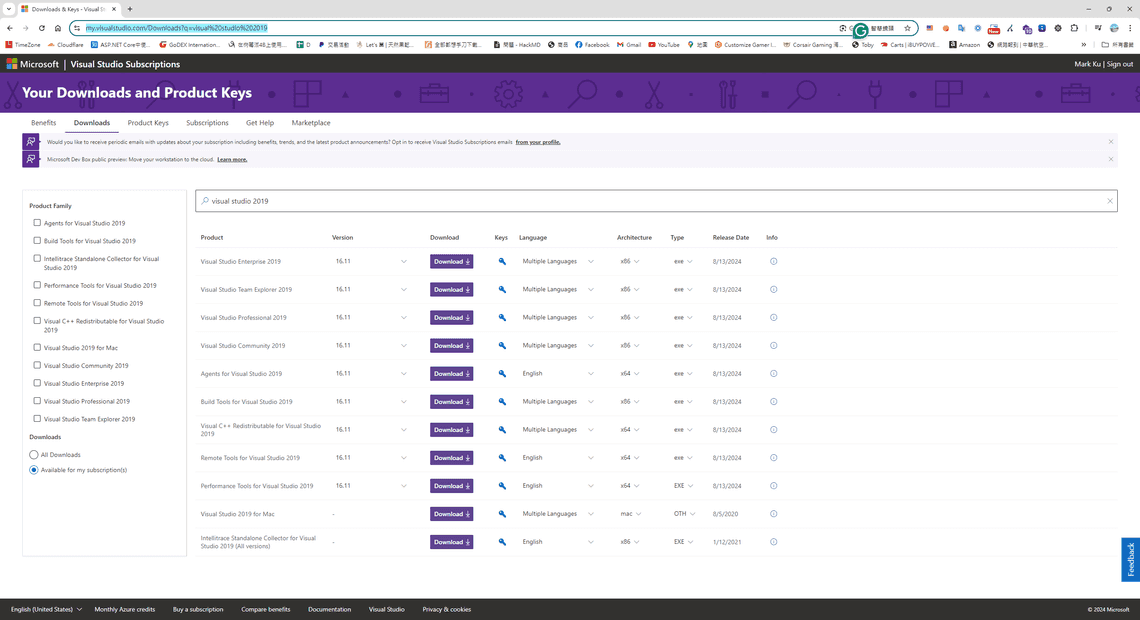
我們都知道NET MVC 的建置是透過Msbuild 這個工具,依據對照的 Visual Studio 2019 版本找到對照的版本是MSBuild 16 ,但在微軟的網頁,目前舊版 Msbuild tool 下載連結都找不太到下載連結,最後我從MSDN 訂閱帳號,裡找回舊版的 Visual stdio 2019 下載連結。

安裝記得勾選 Desktop development with c++

設定 Jenkins 的MS Build 路徑
MS Build 安裝路徑是 Visual studio 2019 一起安裝的MSBuild.exe 路徑是
C:\Program Files (x86)\Microsoft Visual Studio\2019\Community\MSBuild\Current\Bin
下載nuget.exe
下載 Nuget.exe 至
C:\Program Files (x86)\Microsoft Visual Studio\2019\Community\MSBuild\Current\Bin
下載並安裝 .NET Framework 4.8 Developer Pack
首先,至 Github repo 設定webhook 當程式commit 時通知 Jenkins 自動建置

http://jks.xxx.com/github-webhook/
接著,Jenkins 設定自動建置 pipeline
建立Job >選擇New Item > Pipeline,並設定 Github Project。

properties([pipelineTriggers([githubPush()])])

pipeline {
    agent any

    environment {
    }

    options {
        buildDiscarder logRotator(artifactDaysToKeepStr: '', artifactNumToKeepStr: '3', daysToKeepStr: '', numToKeepStr: '3')
    }

    stages {
        stage('Cleanup Directories') {
            steps {
                script {
                    // Delete the 'Api' and 'Artifact' directories
                    dir('Api') {
                        deleteDir()
                    }
                    dir('Artifact') {
                        deleteDir()
                    }

                    dir('Publish') {
                        deleteDir()
                    }
                    echo "Deleted Api and Artifact directories."
                }
            }
        }

        stage("GitHub Pull - Net mvc api") {
            steps {
                dir('Api') {
                    git(
                        branch: 'master',
                        credentialsId: 'xxxx-xxxx-xxxx',
                        url: '[email protected]:iRobot/MVC.Api.git'
                    )
                }
            }
        }

         stage("GitHub Pull - Artifact") {
            steps {
                dir('Artifact') {
                    git(
                        branch: 'main',
                        credentialsId: 'xxxx-xxxx-xxxx',
                        url: '[email protected]:iRobot/Artifact.git'
                    )
                }
            }
        }

    stage('Restore nuget') {
        steps {
        script {
            bat 'echo Current Directory: %CD%'
            bat 'echo Workspace Directory: %WORKSPACE%'
            bat '"C:\\Program Files (x86)\\Microsoft Visual Studio\\2019\\Community\\MSBuild\\Current\\Bin\\nuget.exe" restore ".\\Api\\IRobot.WebCore\\IBuyPower.WebCore.sln"'
        }
        }
    }

    stage('Build') {
            steps {
                script {
                    // Define the MSBuild path and solution file
                    def msBuildPath = '"C:\\Program Files (x86)\\Microsoft Visual Studio\\2019\\Community\\MSBuild\\Current\\Bin\\MSBuild.exe"'
                    def solutionPath = '".\\api\\IRobot.WebCore\\IRobot.WebCore.sln"'

                    // Build command with all necessary parameters
                    def buildCommand = "${msBuildPath} ${solutionPath} /t:Clean,Build /p:Configuration=enUSLive /p:DeployOnBuild=True /p:DeployDefaultTarget=WebPublish /p:WebPublishMethod=FileSystem /p:DeleteExistingFiles=True /p:OutDir=\"%WORKSPACE%\\Publish\" /p:ExcludeGeneratedDebugSymbol=True -verbosity:minimal"

                    // Execute the build command
                    bat script: buildCommand, returnStatus: true
                }
            }
    }

     stage("Copy to Artifact") {
            steps {
                script {

                    def buildCommand =  "robocopy \"%WORKSPACE%\\Publish\\_PublishedWebsites\\Core.Web\" \"%WORKSPACE%\\Artifact\" /E /COPY:DAT /MT:100"

                    // Execute the build command
                    bat script: buildCommand, returnStatus: true
                }
            }

    }

    stage('Check for Changes and Commit') {
    steps {
        dir('Artifact') {
            script {
                // Set local git configuration for user identity
                bat "git config user.email \"[email protected]\""
                bat "git config user.name \"Jenkins CI\""

                // Stage all changes
                bat "git add ."

                // Commit with a timestamp
                bat "git commit -m \"Automated commit at ${new Date().format('HH:mm:ss')} by Jenkins\""

                // Attempt to push changes to remote repository
                def pushResult = bat(script: "git push --set-upstream origin main", returnStdout: true, returnStatus: true)
                if (pushResult != 0) {
                    echo "Failed to push changes. Error Code: ${pushResult}"
                }
            }
        }
    }
}
}
}
手動佈版
因為是舊系統及Net Mvc的舊框架,無法容器化,全自動佈版,會有點風險,因此這邊佈署的部份,仍然還是採用手動。
再安裝 Beyond Compare
撰寫powerhsell deploy.ps1
git pull

$LOCAL = "C:\Workspace\USApiArtifact\bin"
$REMOTE = "C:\inetpub\Core.Web\bin"

$env:Path = "C:\Program Files\Beyond Compare 4\"
$filters = "/filters=-web.config"
BCompare.exe /excludefilter="web.config"  "$LOCAL" "$REMOTE" $filters
最後,執行後就能透過,Beyond compare 去比較此次佈版的dll 是不是和所想的一樣,最後透過右鍵 Copy to Right 來佈署新版應用程式。


