---
title: "用微軟 playwright 輕易搭建 End to End Testing 自動化測試環境,保護公司的核心商業網站,並整合 Teams 通知及外部觸發"
description: "說明如何用 Microsoft Playwright 搭配 GitHub Actions 快速建立 E2E 自動化測試,整合 Teams 通知與 Jenkins Pipeline,保護電商結帳流程。"
canonical_url: "https://blog.markkulab.net/post/playwright-end-to-end-test"
author: "Mark Ku"
author_url: "https://blog.markkulab.net/author/mark-ku"
site: "Mark Ku's Blog"
date_published: "2023-01-09 01:01:01 +0800"
category: "Testing"
tags: ["playwright", "vscode", "github actions", "e2e test", "jenkins", "testing", "frontend"]
language: "zh-TW"
license: "CC BY 4.0"
license_url: "https://creativecommons.org/licenses/by/4.0/"
attribution: "轉載或引用請註明作者並附上原文連結"
---
# 用微軟 playwright 輕易搭建 End to End Testing 自動化測試環境,保護公司的核心商業網站,並整合 Teams 通知及外部觸發
## 解決問題
我目前任職流量不小的 B2C 電子商務公司,為避免不小心將結帳畫面改壞了,而沒被發現,而我著手研究 UI TEST,用於保護我們的結帳流程,之前就有用 playwright 來做 SEO 的預渲染,在評估了幾套 UI 測試後,發現 playwright 這幾年生態變得很完整及簡單,非常適合我們,其優點如下
* 微軟推出的開源 UI-Test 框架
* 整合 Jest
* 支援 vs code 開發及除錯
* 預設整合 Github
* 提供完整的 Report
* 支援 node js
## 我預期的運作流程

## 步驟
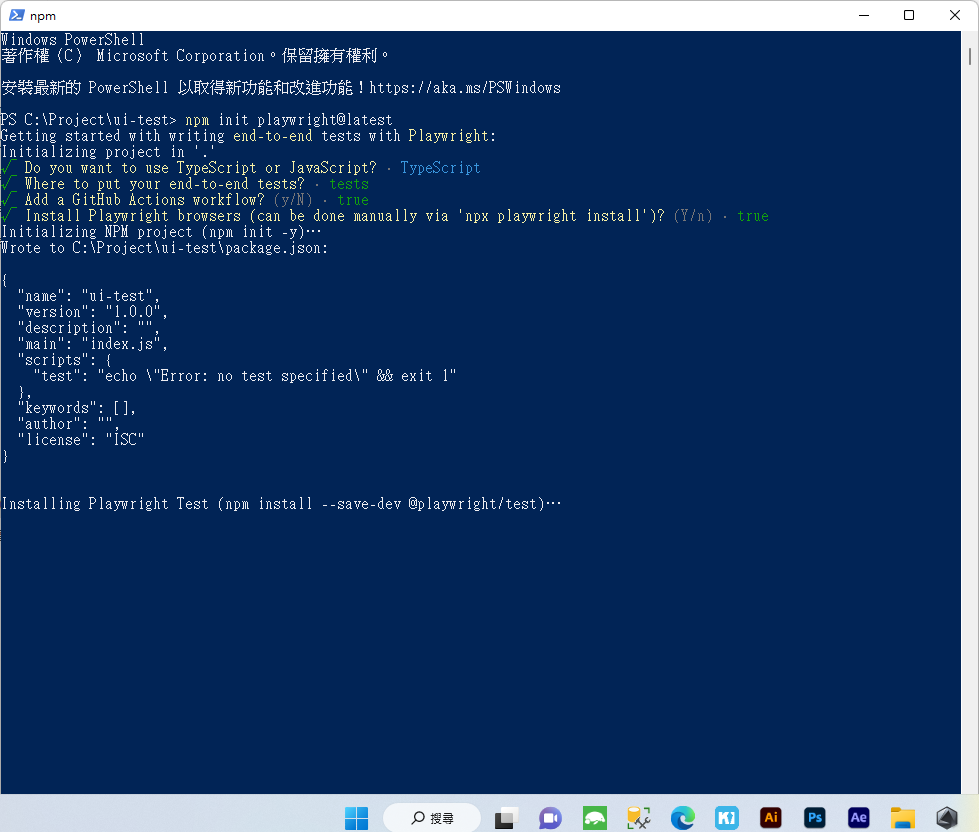
### 首先,我們先建立 playwright 測試專案 [官方文件](https://playwright.dev/docs/release-notes)
```
npm init playwright@latest
```
### 選擇 Typescript 及 github action flow 整合
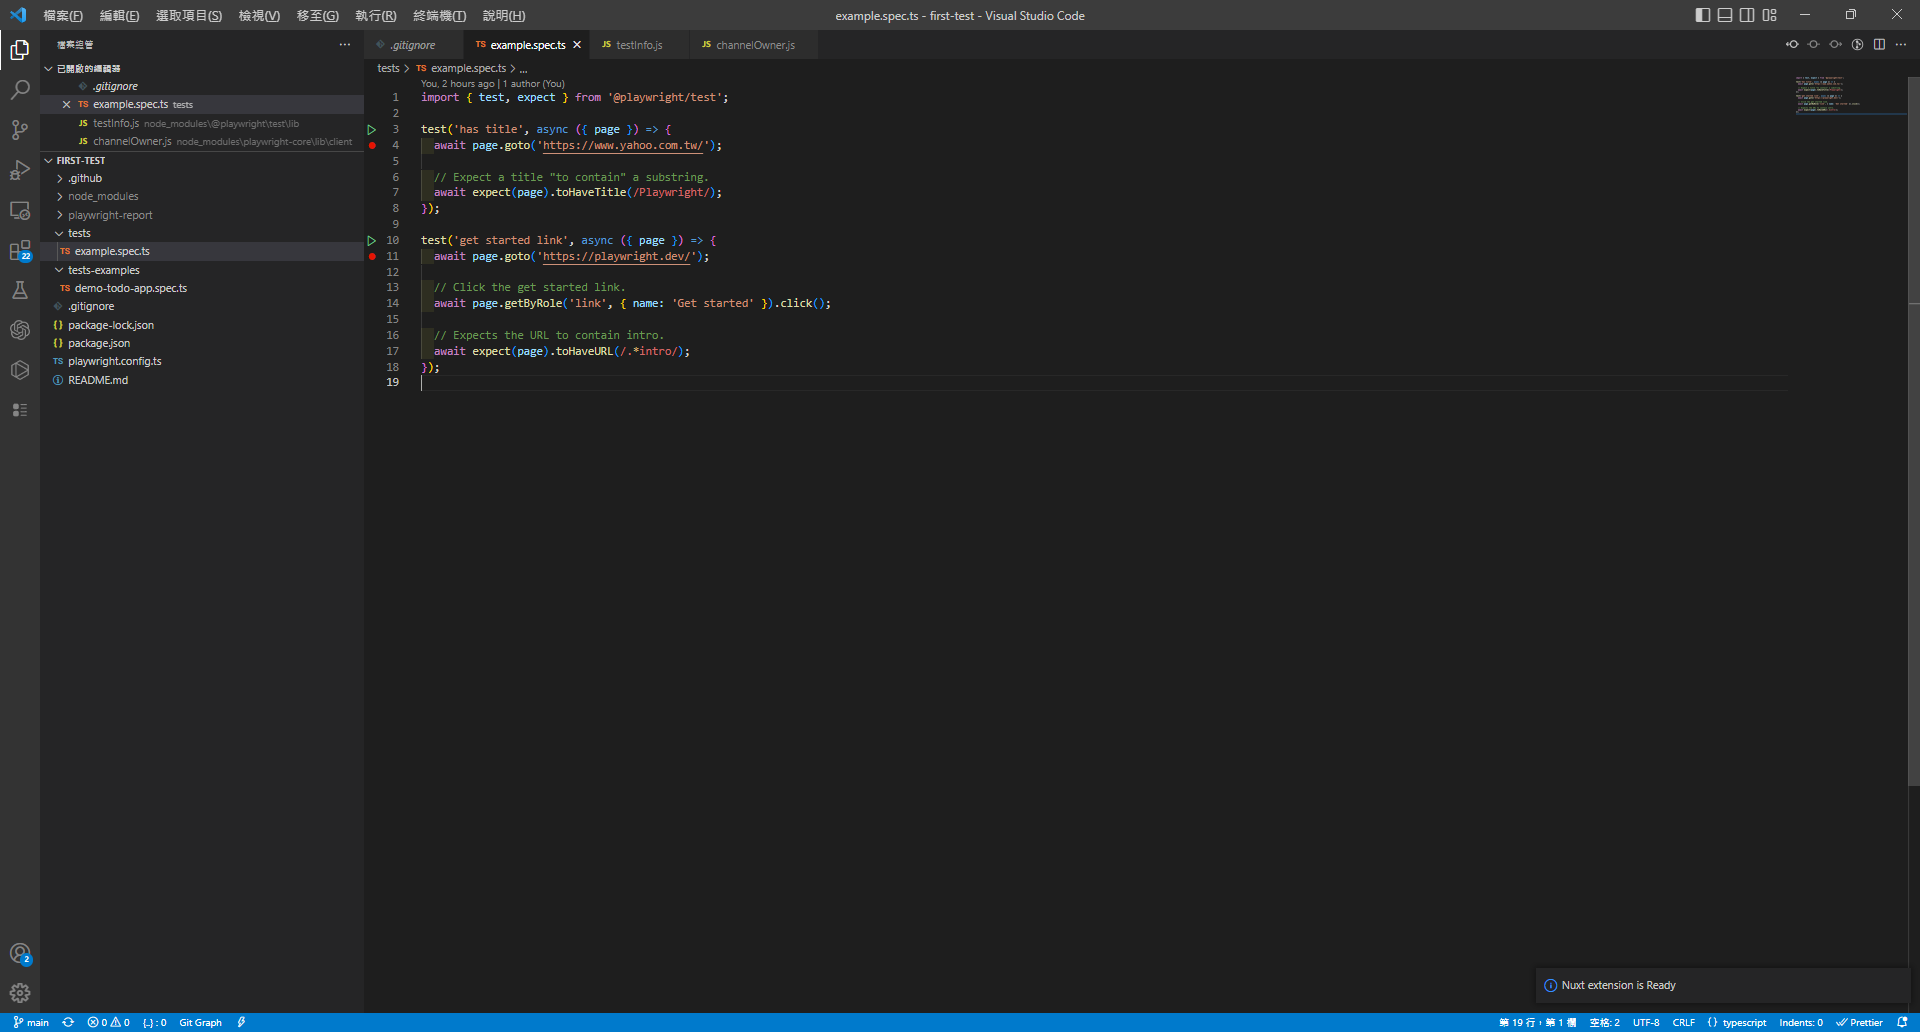
### 打開剛剛建立的測試專案,在資料夾裡其實己寫好基本的測試範例
### 請先在 vscode 安裝 [jest 套件](https://marketplace.visualstudio.com/items?itemName=Orta.vscode-jest) 及 [Playwright Test for VSCode 套件](https://marketplace.visualstudio.com/items?itemName=ms-playwright.playwright)
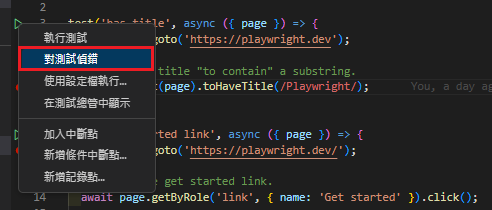
### 並加入中斷點,並對綠色的啟動箭頭 >右鍵 > 對測試偵錯
### 此時就會跳出瀏覽器,並可以逐行除錯
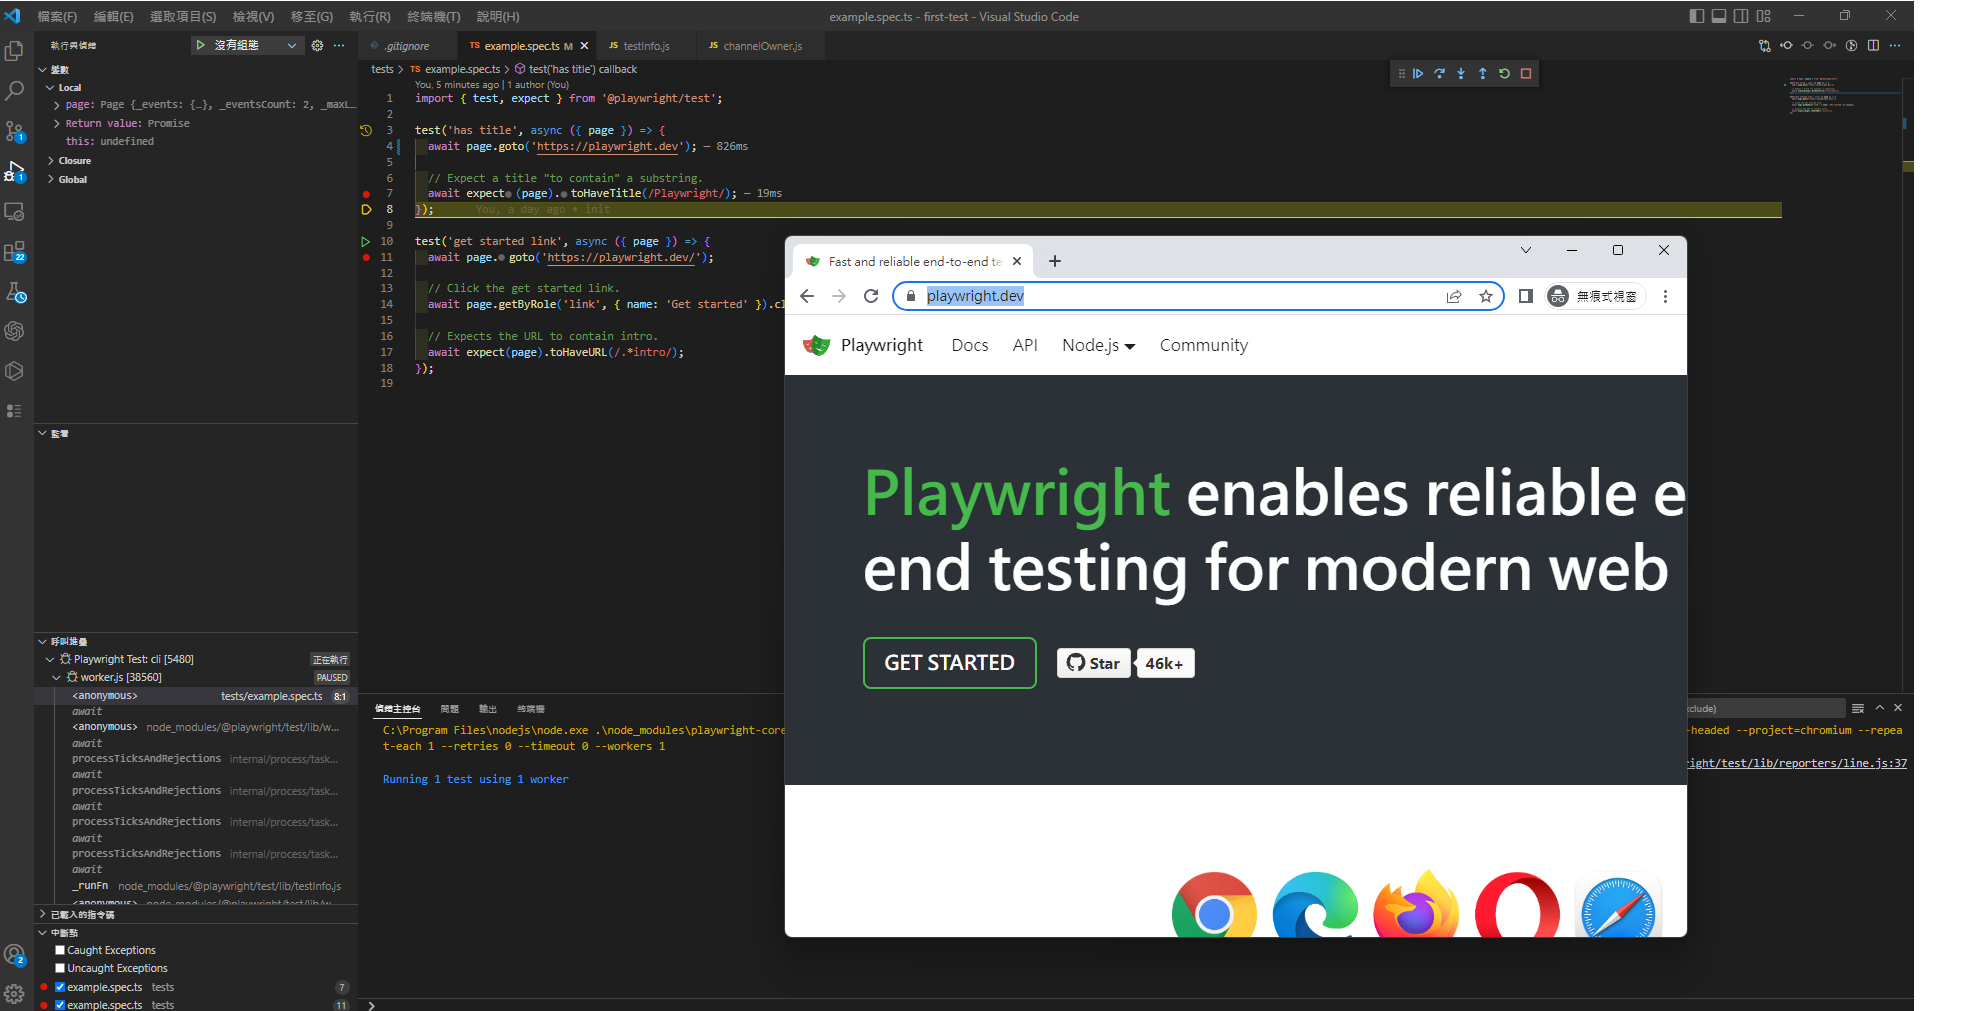
### 看到這邊爽度就爽度超高,過去寫過 python selenium 都還要花很多時間配置系統環境。
### 接著,將你的專案推上 github,此時就會自動建置( 測試 ),點開工作記錄
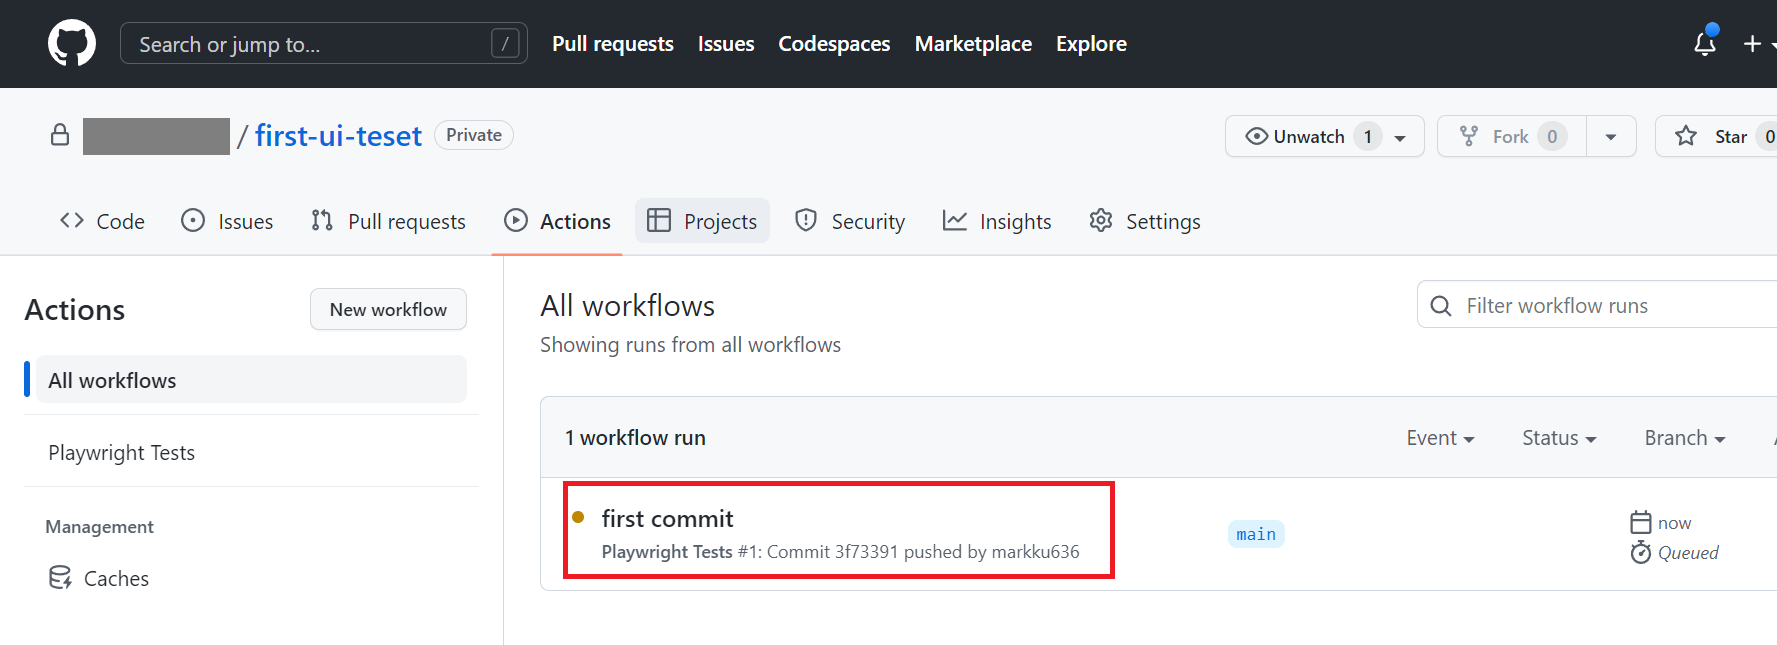
### 隨後我們可以發現測試己成功完成建置,並發現主控台入口及報表的入口
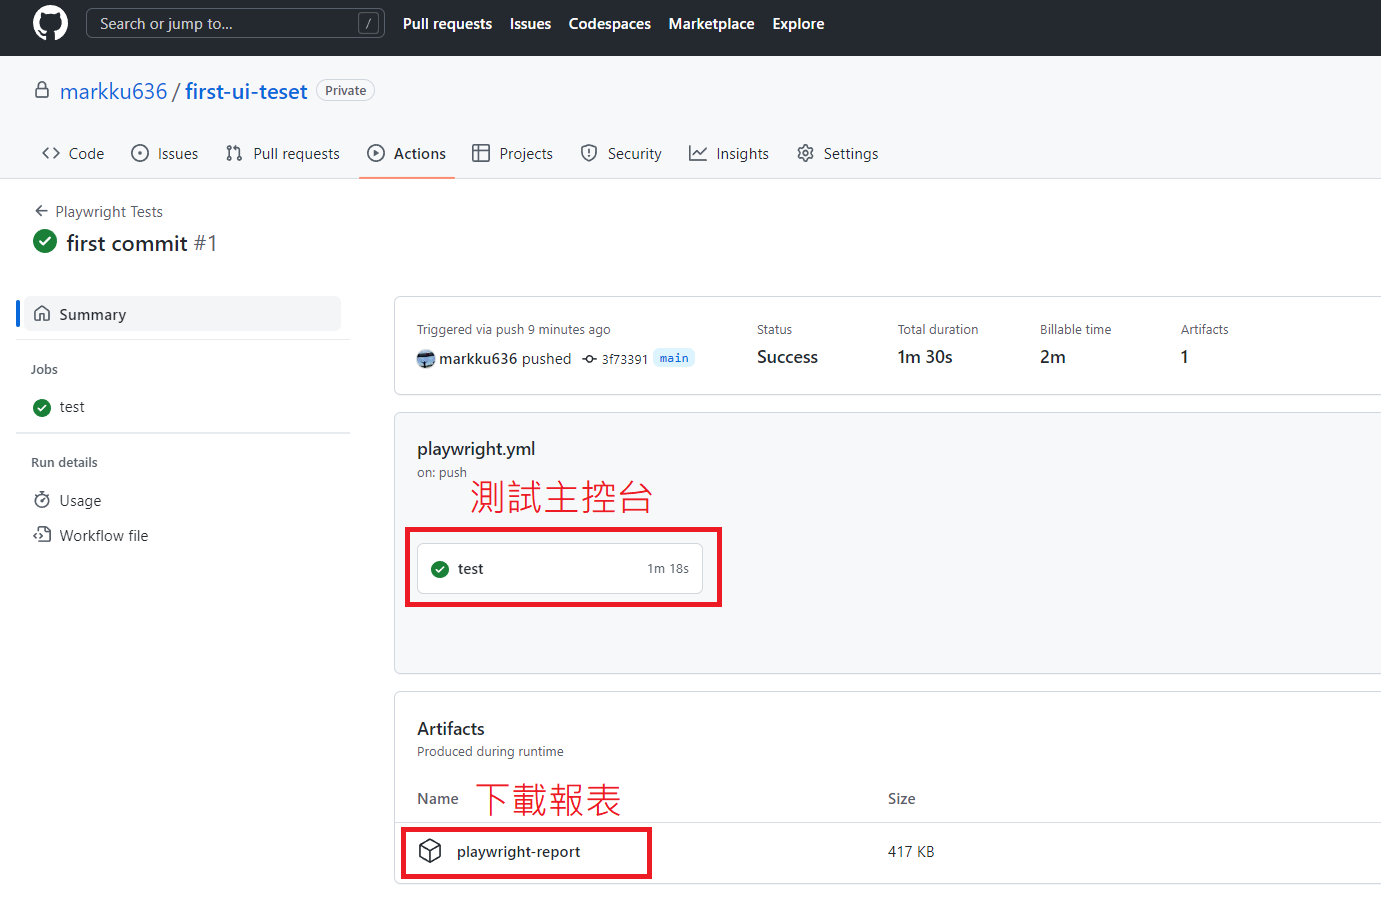
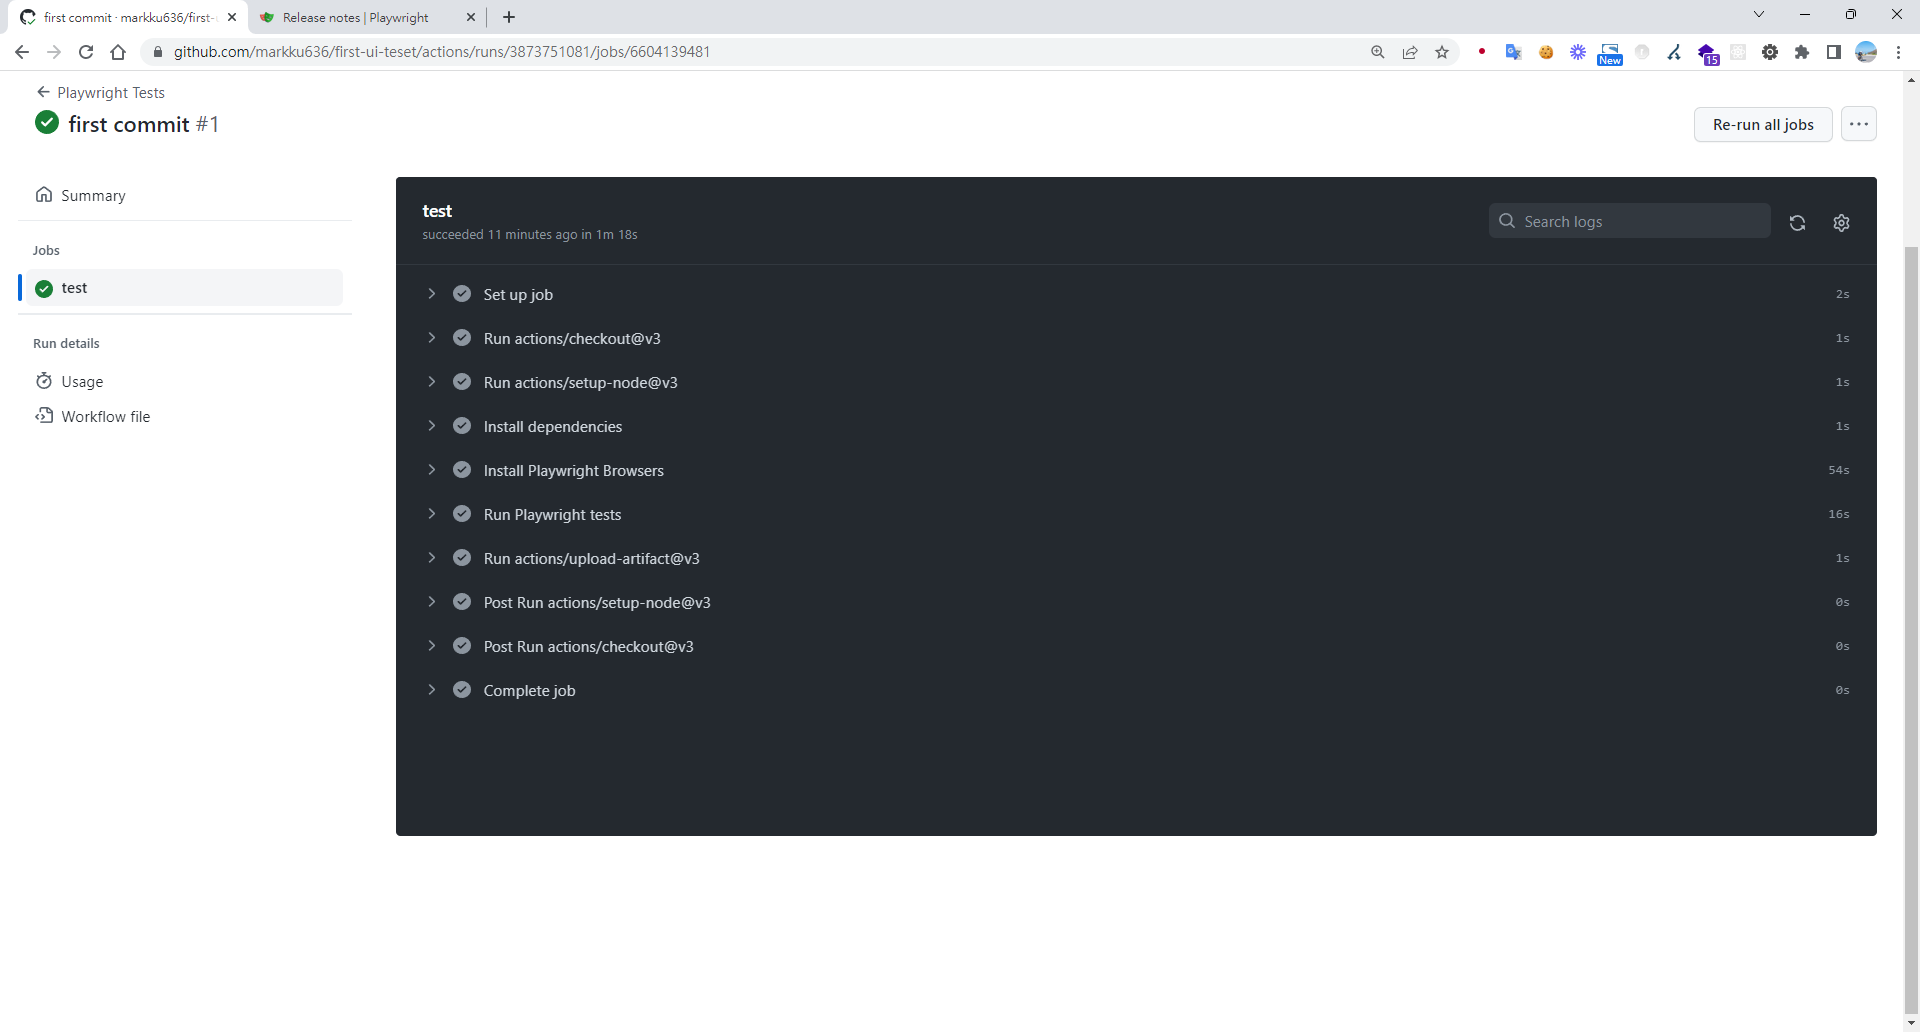
### 點擊進入測試主控台,可以看 job 執行了些什麼
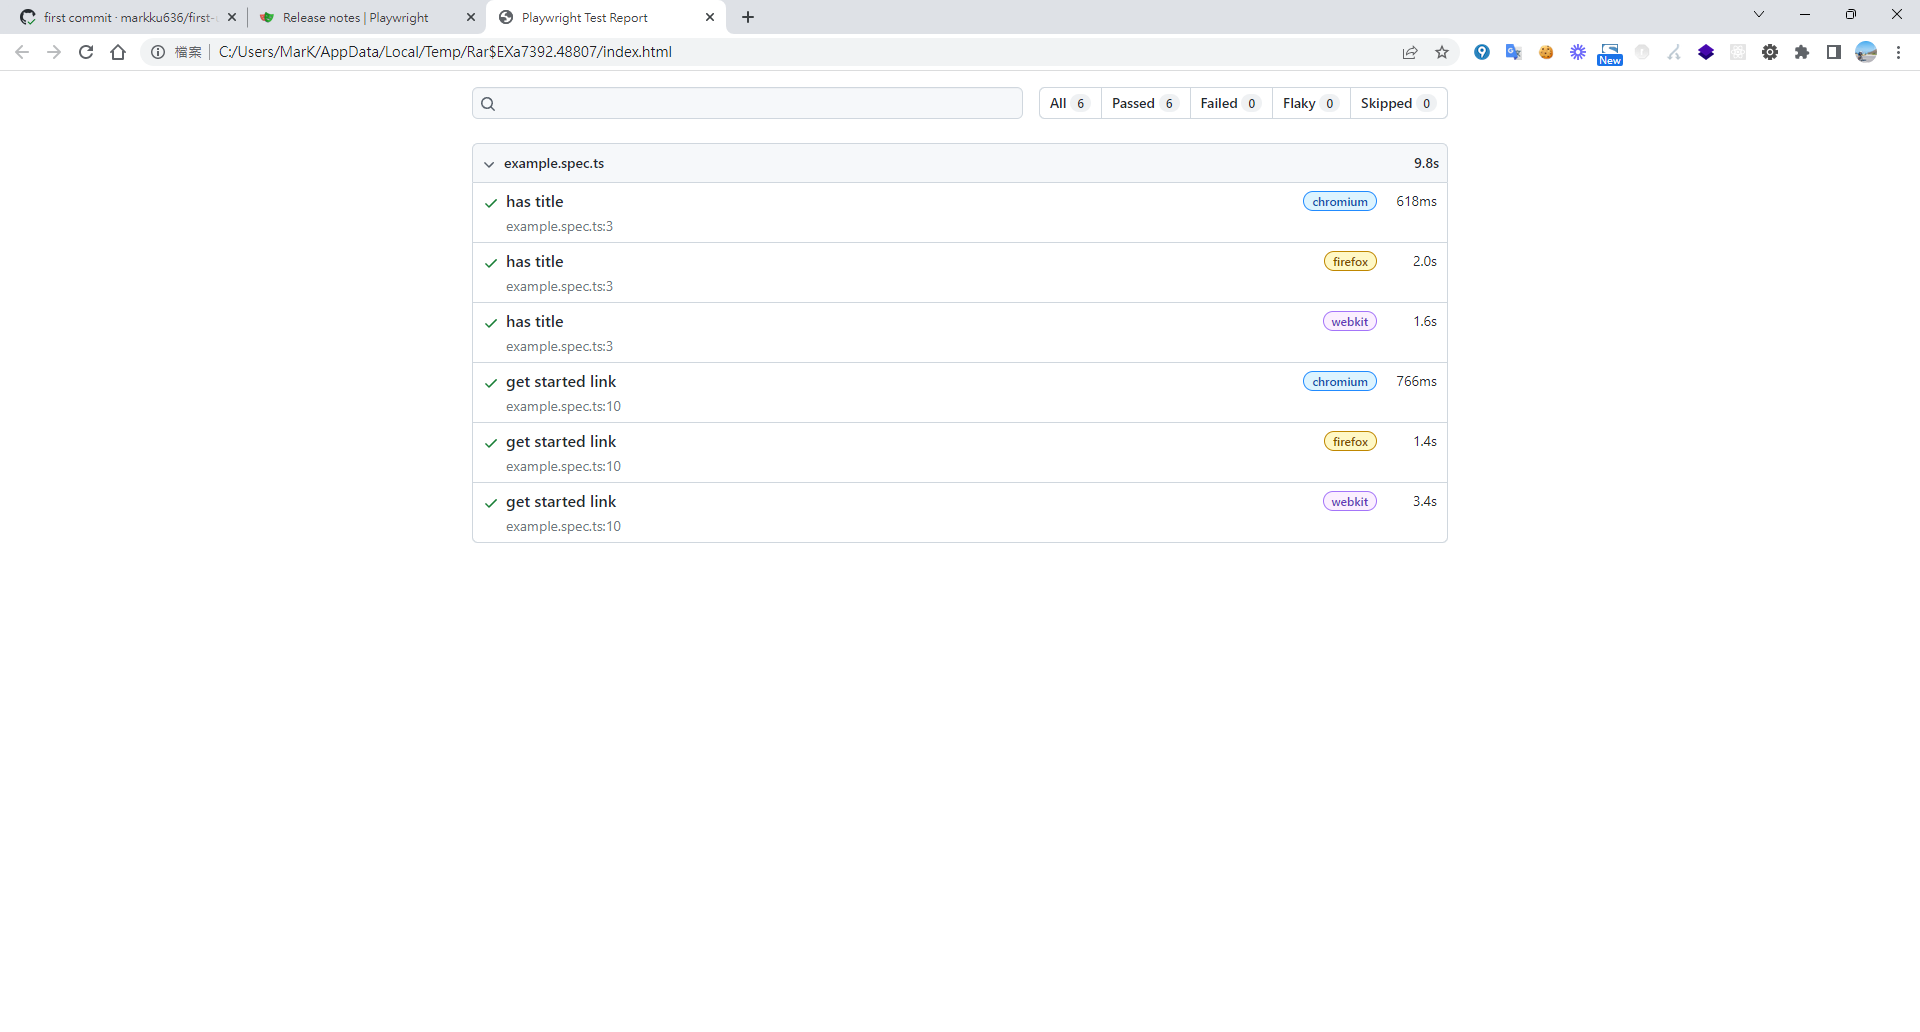
### 打開下載的報表
### 接著,因我們預期將測試的結果及報表推送到 Teams
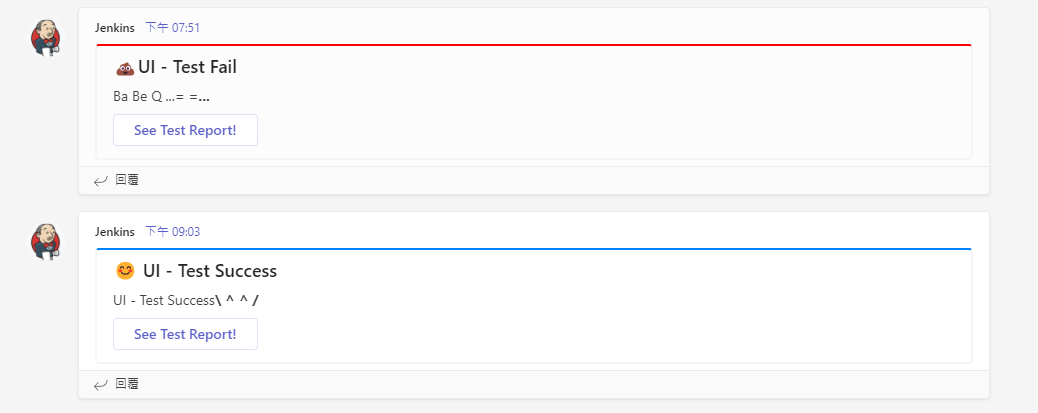
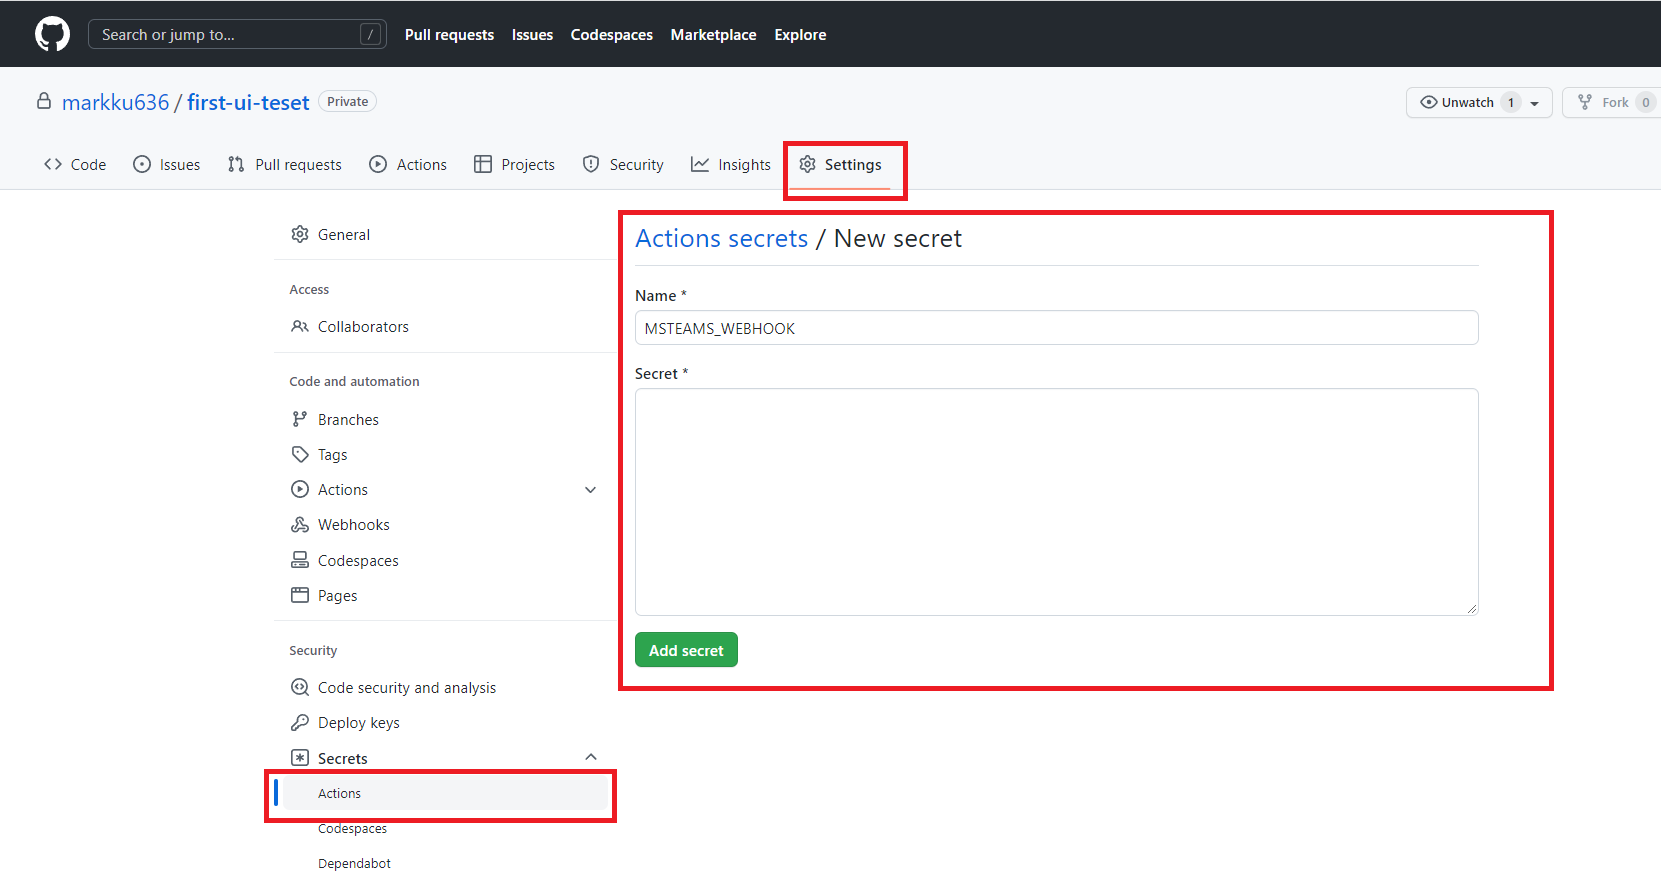
### 請先至 github repo 的 Settings > Secrets > 建立 Actions secrets 參數。
### 修改 .github/workflows/playwright.yml 參考以下程式碼,加入通知
```
name: Playwright Tests
on:
repository_dispatch:
types: remote-trigger-ui-test
push:
branches: [ main, master ]
pull_request:
branches: [ main, master ]
jobs:
test:
timeout-minutes: 60
runs-on: ubuntu-latest
steps:
- uses: actions/checkout@v3
- uses: actions/setup-node@v3
with:
node-version: 16
- name: Install dependencies
run: npm ci
- name: Install Playwright Browsers
run: npx playwright install --with-deps
- name: Run Playwright tests
run: npx playwright test
- uses: actions/upload-artifact@v3
if: always()
with:
name: playwright-report
path: playwright-report/
retention-days: 30
success_notify:
needs: test
name: notify
runs-on: ubuntu-18.04
steps:
- name: 📣 Send teams notification
uses: simbo/msteams-message-card-action@v1
with:
webhook: ${{ secrets.MSTEAMS_WEBHOOK }}
title: 😊 UI - Test Success
message: UI - Test Success\ ^ ^ /
color: 007FFF
buttons: |
See Test Report! ${{ github.server_url }}/${{ github.repository }}/actions/runs/${{ github.run_id }}
error_notify:
needs: test
name: error_notify
if: ${{ always() && needs.test.result == 'failure' }}
runs-on: ubuntu-18.04
steps:
- name: Send fail notification
uses: simbo/msteams-message-card-action@v1
with:
webhook: ${{ secrets.MSTEAMS_WEBHOOK }}
title: 💩UI - Test Fail
message: Ba Be Q ...= =...
color: FF0000
buttons: |
See Test Report! ${{ github.server_url }}/${{ github.repository }}/actions/runs/${{ github.run_id }}
```
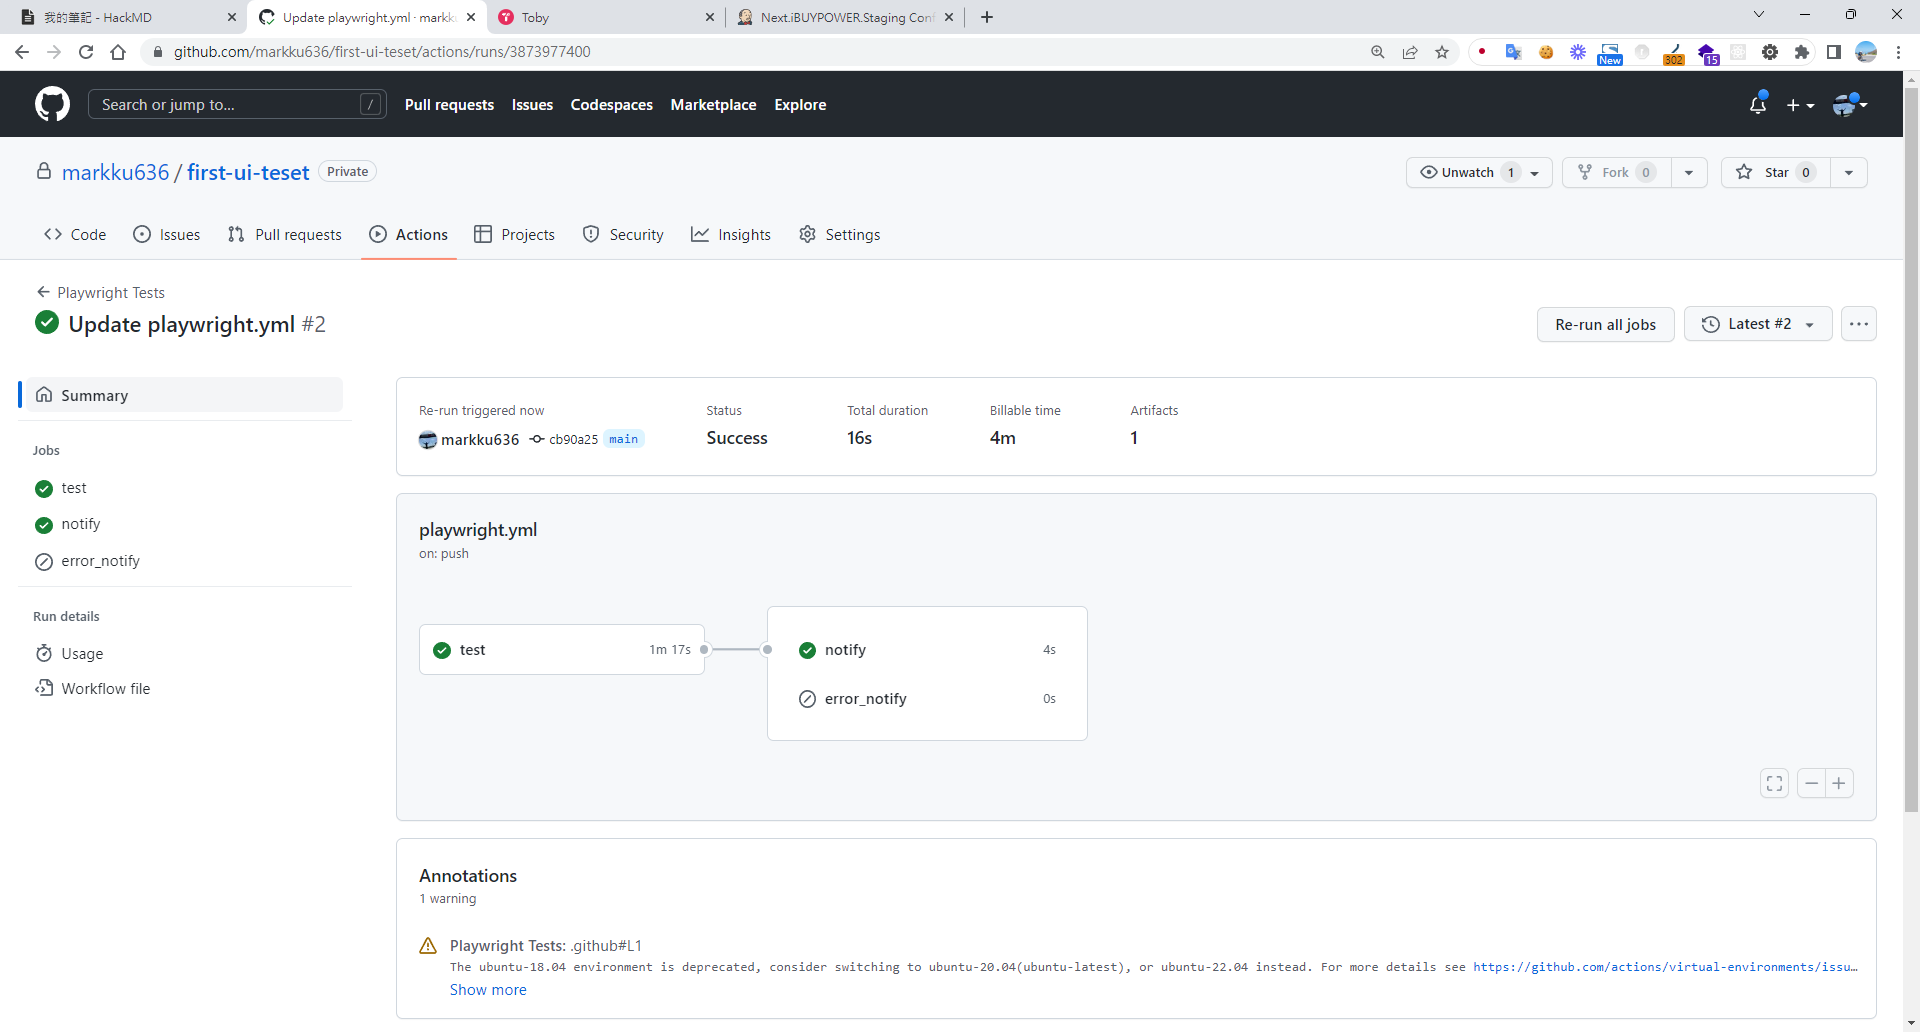
### 測試執行完的圖表
### 在欲應用程式,新增外部觸發 wrokflows,[可參考此篇設定遠程觸發 git action](https://www.chenshaowen.com/blog/how-to-trigger-github-action-remotely.html),並將下面的程式碼參數換掉
:owner/:repo => markku636/first-ui-teset
:token => [Github token 點我申請](https://github.com/settings/tokens/new)
```
on: push
jobs:
test-curl-action:
name: "Call Test CICD"
runs-on: ubuntu-latest
steps:
- name: "Call Github API"
uses: indiesdev/curl@v1.1
id: api2
with:
url: https://api.github.com/repos/:owner/:repo/dispatches
method: "POST"
accept: 200,201,204
headers: '{ "authorization": "token :token", "accept": "application/vnd.github.everest-preview+json","content-type":"application/x-www-form-urlencoded" }'
# you can use multiline format to construct json data object, the content should be yml format.
# this format apply to inputs: body, headers and params
"body": '{ "event_type": "remote-trigger-ui-test" }'
log-response: true
- name: "Use response"
run: echo ${{ steps.api.outputs.response }}
```
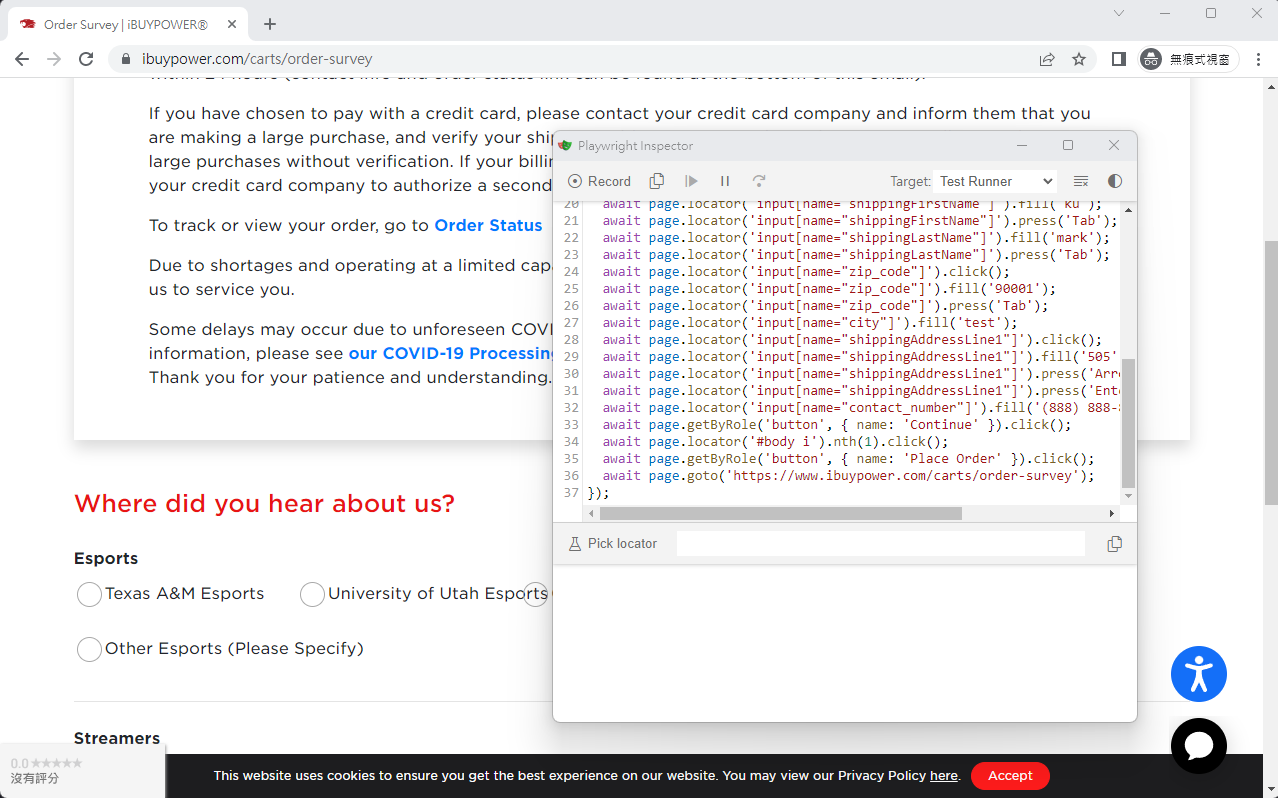
### 錄製腳本
超酷的,什麼環境也沒特別配置,居然能夠跳出瀏覽器錄製,真的是太好用了
```
npx playwright codegen www.ibuypower.com --output ./tests/ibuypower.spec.ts
```
## 結論
使用 playwright 最大的好處,微軟挾著完整的生態,把整個工作流程都整合起來,我僅用很短的時間,就能將 vscode + github + teams 整合完成,爽度超級高。
## 補充
如果無法在 vscode 中使用 jest 偵錯測試檔,請執行以下指令
```
npm i -D @playwright/test
npx playwright install
npm install -D jest jest-playwright-preset playwright
code --install-extension Orta.vscode-jest
code --install-extension ms-playwright.playwright
```
## 參考資料
* [如何远程触发 GitHub Action](https://www.chenshaowen.com/blog/how-to-trigger-github-action-remotely.html)
* [MS Teams Message Card](https://github.com/marketplace/actions/ms-teams-message-card)
## Github Action 上線後覺得太慢了,後來搬到自己家的 jenkins pipeline 中運行
```
pipeline {
agent any
tools {nodejs "Node Core"}
options {
buildDiscarder logRotator(artifactDaysToKeepStr: '', artifactNumToKeepStr: '20', daysToKeepStr: '', numToKeepStr: '20')
timeout(time: 10, unit: 'MINUTES')
}
stages {
stage("GitHub Pull") {
steps {
git branch: "main", url: "https://ghp_xxx@github.com/iBuypowerUS/iBuypower.UI.Test.git"
}
}
stage("Test and Report") {
steps {
script {
def errorEncountered = false
try {
bat "npm install"
bat "npm run testCase"
} catch(Exception e) {
errorEncountered = true
echo "Error during testing: ${e.getMessage()}"
} finally {
publishHTML([
alwaysLinkToLastBuild: true,
allowMissing: false,
keepAll: true,
reportDir: 'playwright-html-report',
reportFiles: 'index.html',
reportName: 'HTML Report',
reportTitles: 'HTML Report'
])
if (errorEncountered) {
error "npm run testCase encountered an error."
}
}
}
}
}
}
}
```
P.S. Jenkins 顯示報表需要安裝 『 HTML Publisher plugin』,若報表的 html 顯示不出內容則需要在 Jenkins Script Console 執行
```
System.setProperty("hudson.model.DirectoryBrowserSupport.CSP", "")
```
---
## 關於本文與作者
本文出自 [Mark Ku's Blog](https://blog.markkulab.net/post/playwright-end-to-end-test)
授權條款: [CC BY 4.0](https://creativecommons.org/licenses/by/4.0/) — 轉載或引用請註明作者並附上原文連結
### 關於作者
**[Mark Ku](https://blog.markkulab.net/author/mark-ku)** — Software Solution Provider
- 10+ 年資深軟體工程師,現為 AI 應用 Builder
- 專注大型平台架構設計,從北美電商到AI SaaS訂閱收費系統
- 結合 AI Agent 與自動化,打造高效可演進的產品技術基礎
### 作者開發的免費工具
以下工具皆可免費使用:
- [免費 PDF 簽名工具](https://blog.markkulab.net/tools/pdf-sign): 線上 PDF 簽名工具,瀏覽器內完成手繪、打字、上傳簽名,可拖曳放置、縮放、下載。所有處理都在你的裝置完成,檔案不會上傳。
- [VS Code Refactory](https://blog.markkulab.net/tools/refactory): Refactory 是一款 VS Code 重構擴充套件:34 個重構動作、37 條 code smell 檢查、Code Health 儀表板、18 種語言、534 支測試。懂你的專案慣例:介面放哪、DI 註冊寫在哪、'use client' 該不該加;還會用 git 修改頻率 × 複雜度排出「該先修哪個檔案」,並一鍵把壞味道交給你自己電腦上的 Claude Code 修。免費使用,原始碼不離開你的機器。
- [DB-Kit 資料庫管理工具](https://blog.markkulab.net/tools/db-kit): DB-Kit 是一個用 Tauri + Rust + React 打造的輕量跨平台資料庫管理工具,用單一一致的介面同時管理 MySQL、MariaDB、PostgreSQL、SQL Server、Oracle、SQLite、MongoDB、Redis、Kafka、Elasticsearch 與 RabbitMQ 十一種資料來源:連線密碼以 OS keychain 加密、SSH Tunnel、完整 CRUD、視覺化查詢建構器、多結果集同時顯示、跨連線資料傳輸與比對同步、Excel / CSV 匯入匯出、執行計畫視覺化、ER 圖、排程備份、SQL 壓力測試(p50~p99 延遲百分位)、15 條規則的 SQL 審查、Kafka 訊息瀏覽與監控告警;繁中 / 英文雙語介面,內建 AI 助手(自然語言生成 SQL、AI 審查與調校建議)與命令列工具 dbk。免費開源(MIT),提供 Windows / macOS / Linux 安裝檔。
- [VS Code Super Mermaid](https://blog.markkulab.net/tools/super-mermaid): Super Mermaid 是一款 VS Code 擴充套件:開箱即用的漂亮 Mermaid 圖表,自動上色、即時預覽、滑鼠平移縮放、PNG / SVG 高解析匯出,內建 21 種範本與多種主題。免費開源(MIT)。
- [React Super Mermaid](https://blog.markkulab.net/tools/react-super-mermaid): react-super-mermaid 是一個開源 React 元件庫:一行 即可渲染漂亮的 Mermaid 圖表,內建 colorful / sketch 主題、平移縮放、圖內搜尋、SVG / PNG 高解析匯出。輕量、SSR 安全、完整 TypeScript 型別。免費開源(MIT)。
- [Jira / Confluence Super Mermaid](https://blog.markkulab.net/tools/jira-super-mermaid): Atlassian Forge app:在 Jira issue 與 Confluence 內文直接寫 Mermaid 語法,畫流程圖、時序圖、狀態機與甘特圖。11 種圖表、SVG / PNG 匯出、明暗主題、完整中日韓文字支援。取得 Runs on Atlassian 資格:圖表存在你自己的站台,app 不呼叫任何第三方服務。免費,即將上架 Atlassian Marketplace。
- [Mermaid 線上預覽](https://blog.markkulab.net/tools/mermaid-preview): 在瀏覽器裡寫 Mermaid、即時看圖,整張圖表壓進網址就能分享。免註冊、不上傳伺服器,相容 mermaid.live 的分享連結。
- [React Intl Phone Number](https://blog.markkulab.net/tools/react-intl-phone-number): react-intl-phone-number 是一個開源 React 元件:framework-agnostic、不依賴 antd,提供 E.164 進出、可搜尋國旗 / 國碼下拉、可配置驗證等級(strict / mobile-strict / loose)、可主題化 CSS 與 i18n,電話邏輯由 google-libphonenumber 驅動。輕量、完整 TypeScript 型別。免費開源(MIT)。
- [Uptime Kuma Cluster](https://blog.markkulab.net/tools/uptime-kuma-cluster): 把單機版 Uptime Kuma 改造成高可用叢集:OpenResty + Lua 智慧負載平衡、MariaDB 共享狀態、健康檢查與自動 Failover,附叢集管理 REST API,一行 Docker Compose 啟動。免費開源(MIT)。
- [特教專案](https://blog.markkulab.net/education): 為特殊教育學生製作的學習教材
### 每日 Podcast
- [科技新鮮事](https://blog.markkulab.net/category/tech-news): 每日精選 AI 與科技趨勢,透過語音摘要快速掌握最新技術動態,涵蓋 AI 應用、軟體架構、DevOps 與工程實戰。 — RSS: https://blog.markkulab.net/feed.xml
- [AI股市蝦聊](https://blog.markkulab.net/category/ai-stock-chat): 每個交易日用 AI 分析台股盤勢,以雙人對話聊當天的盤中觀察與隔日預測。 — RSS: https://blog.markkulab.net/ai-stock-chat/feed.xml
### 電子報
[訂閱電子報](https://blog.markkulab.net/subscribe) — 第一時間收到新文章通知,無垃圾信、隨時可取消訂閱。