---
title: "Apple Pay on Web + Cybersource 串接筆記"
description: "詳細說明在 Web 上串接 Apple Pay + Cybersource 的完整流程,包含 Apple Developer 後台設定、P12 憑證產生、前端 PaymentRequest API 及 .NET MVC 後端商戶驗證。"
canonical_url: "https://blog.markkulab.net/post/apple-pay-on-web-cybersource-integration"
author: "Mark Ku"
author_url: "https://blog.markkulab.net/author/mark-ku"
site: "Mark Ku's Blog"
date_published: "2022-08-11 01:01:01 +0800"
category: "Payment"
tags: ["apple-pay", "cybersource", "payment", "dotnet", "javascript"]
language: "zh-TW"
license: "CC BY 4.0"
license_url: "https://creativecommons.org/licenses/by/4.0/"
attribution: "轉載或引用請註明作者並附上原文連結"
---
# Apple Pay on Web + Cybersource 串接筆記
## 時空背景
因工作需要美國及德國電商網站,需要界接 Apple Pay。
## Apple Pay 原理
[參考 啾啾鞋影片](https://www.youtube.com/watch?v=ksFXEY6P_ec)
## 美國有多少人口使用 Apple Pay
[參考 oberlo 網站](https://www.oberlo.com/statistics/how-many-people-use-apple-pay)
## Apple Pay / Google Pay 和第三方支付的差異
Apple Pay / Google Pay 和第三方支付最大的不同是,第三方金流公司會協助處理和銀行帳務問題,但 Apple Pay / Google Pay 並不會。
在 Apple 官方的[成功案例中](https://developer.apple.com/apple-pay/payment-platforms/) 得知自己對接 Apple Pay 及銀行的公司規模都相當的大,其他大多數都是透過 Payment Provider,我猜可能大部分的銀行並沒有這麼標準及各國法規都不太一樣,各家銀行如果資料交換失敗,要處理的帳務問題就會很多,處理這段的問題是一般公司無法負擔的。
## 網頁如何發起支付
早期各家瀏覽器都是各自載入 JS Lib 去實作,後面 W3C 網站對瀏覽器的對支付訂義標準規格,現今Safari 及 Chrome 都己實作,PaymentRequest Api。
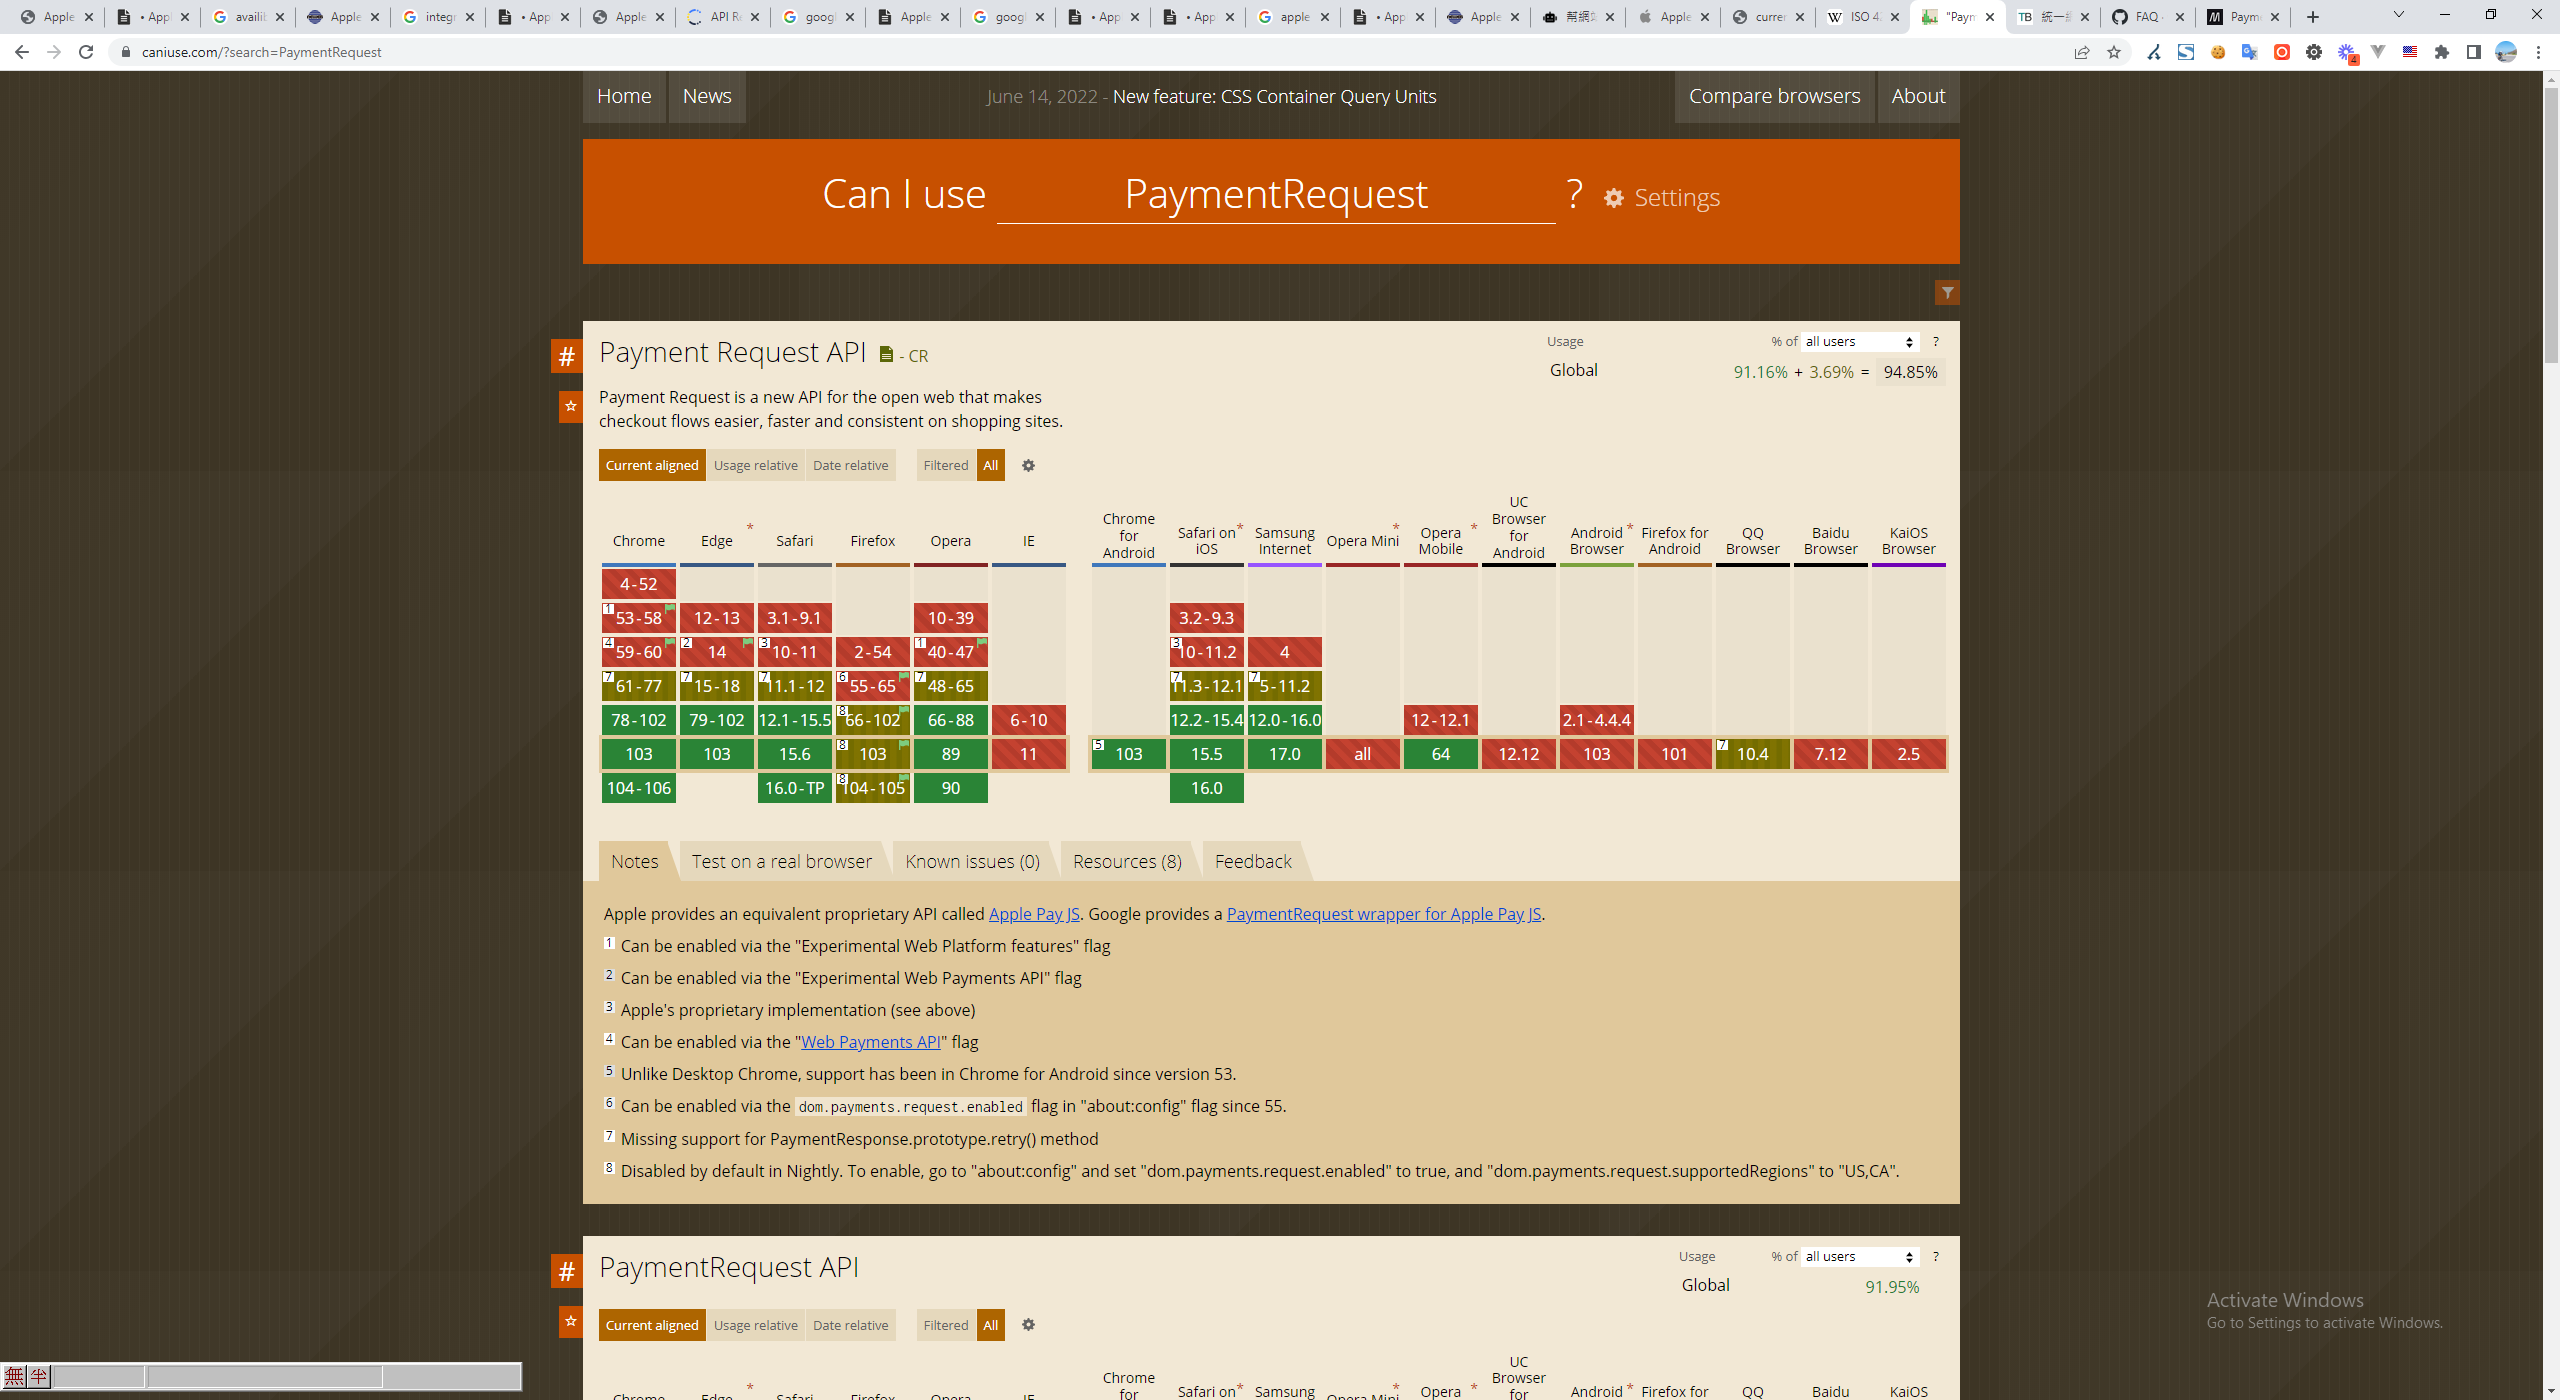
(相容性)
* 實測 window.PaymentRequest,一定要 Https ,否則會在瀏覽器中,找不到這物件。
* Apple Pay 只能在 Safari 上使用 ( desktop and mobile )
## 程式串接前需提前準備的項目
* 付款頁需要 Https 環境 ( dev、prod )
* 蘋果電腦及 iPhone
* 商店需自行申辦 Apple Developer 開發者帳號 ( 99 USD / Year )
* 在開發者後台商戶域名通過驗證
* 在開發者後台上傳 金流商 CSR 及開發者 CSR 至蘋果後台
* Apple Pay Button 及 相關 logo 需符合 [Apple UI 規範 ](https://developer.apple.com/apple-pay/marketing/)
## Apple Pay 付款流程
當使用者按下付款按鈕 > 前端 Call 後端 Api 去和蘋果驗證金流商戶,並建立交易的 session,取得用戶端 token > 此時 iphone 會請求使用者刷臉或指紋驗證 > Call 自己的後端 Api,向金流商請求建立訂單。
## 首先,在程式開發前,至 Apple 開發者後台設定並取得憑證
### 建立金流商戶 ( Merchant )
#### 至[蘋果開發者後台](https://developer.apple.com/account)> Certificates, Identifiers & Profiles
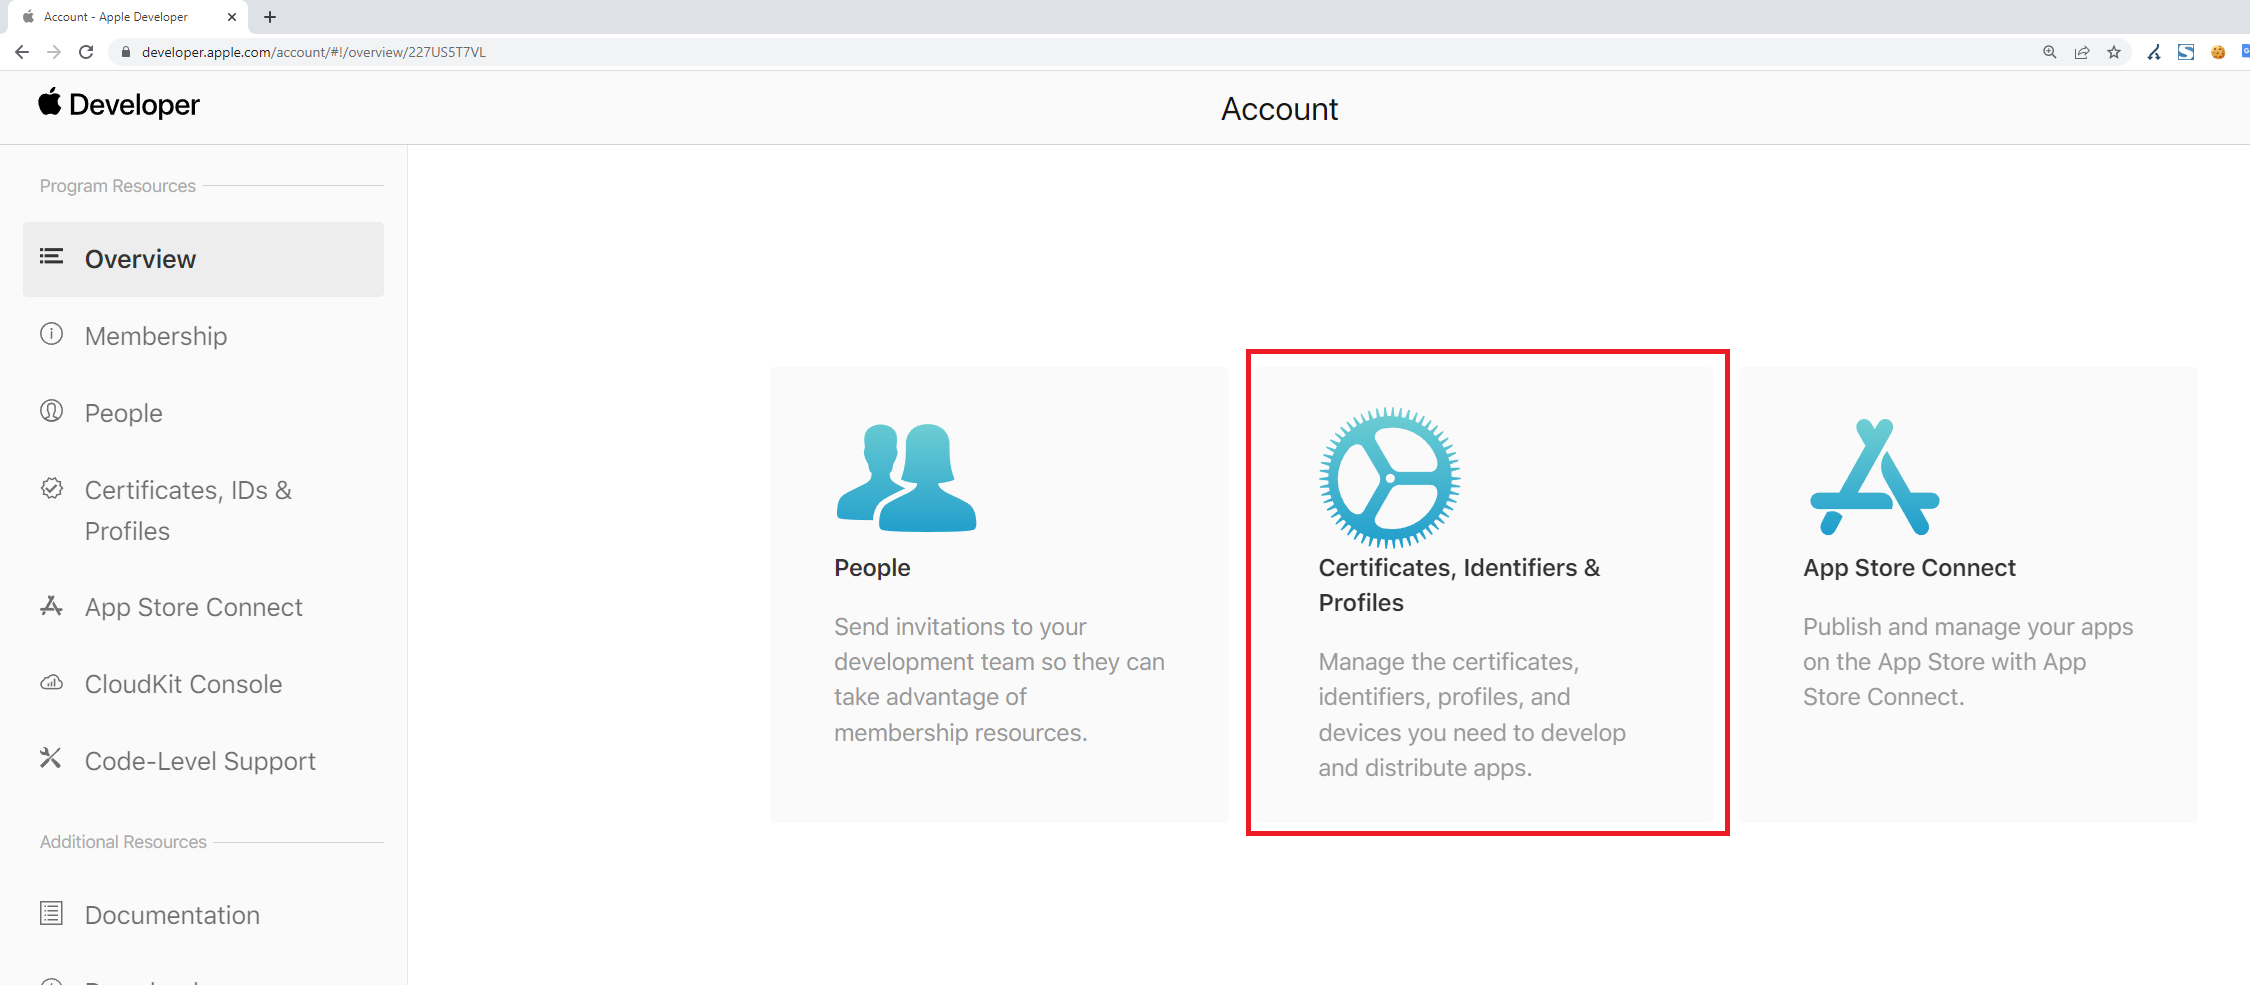
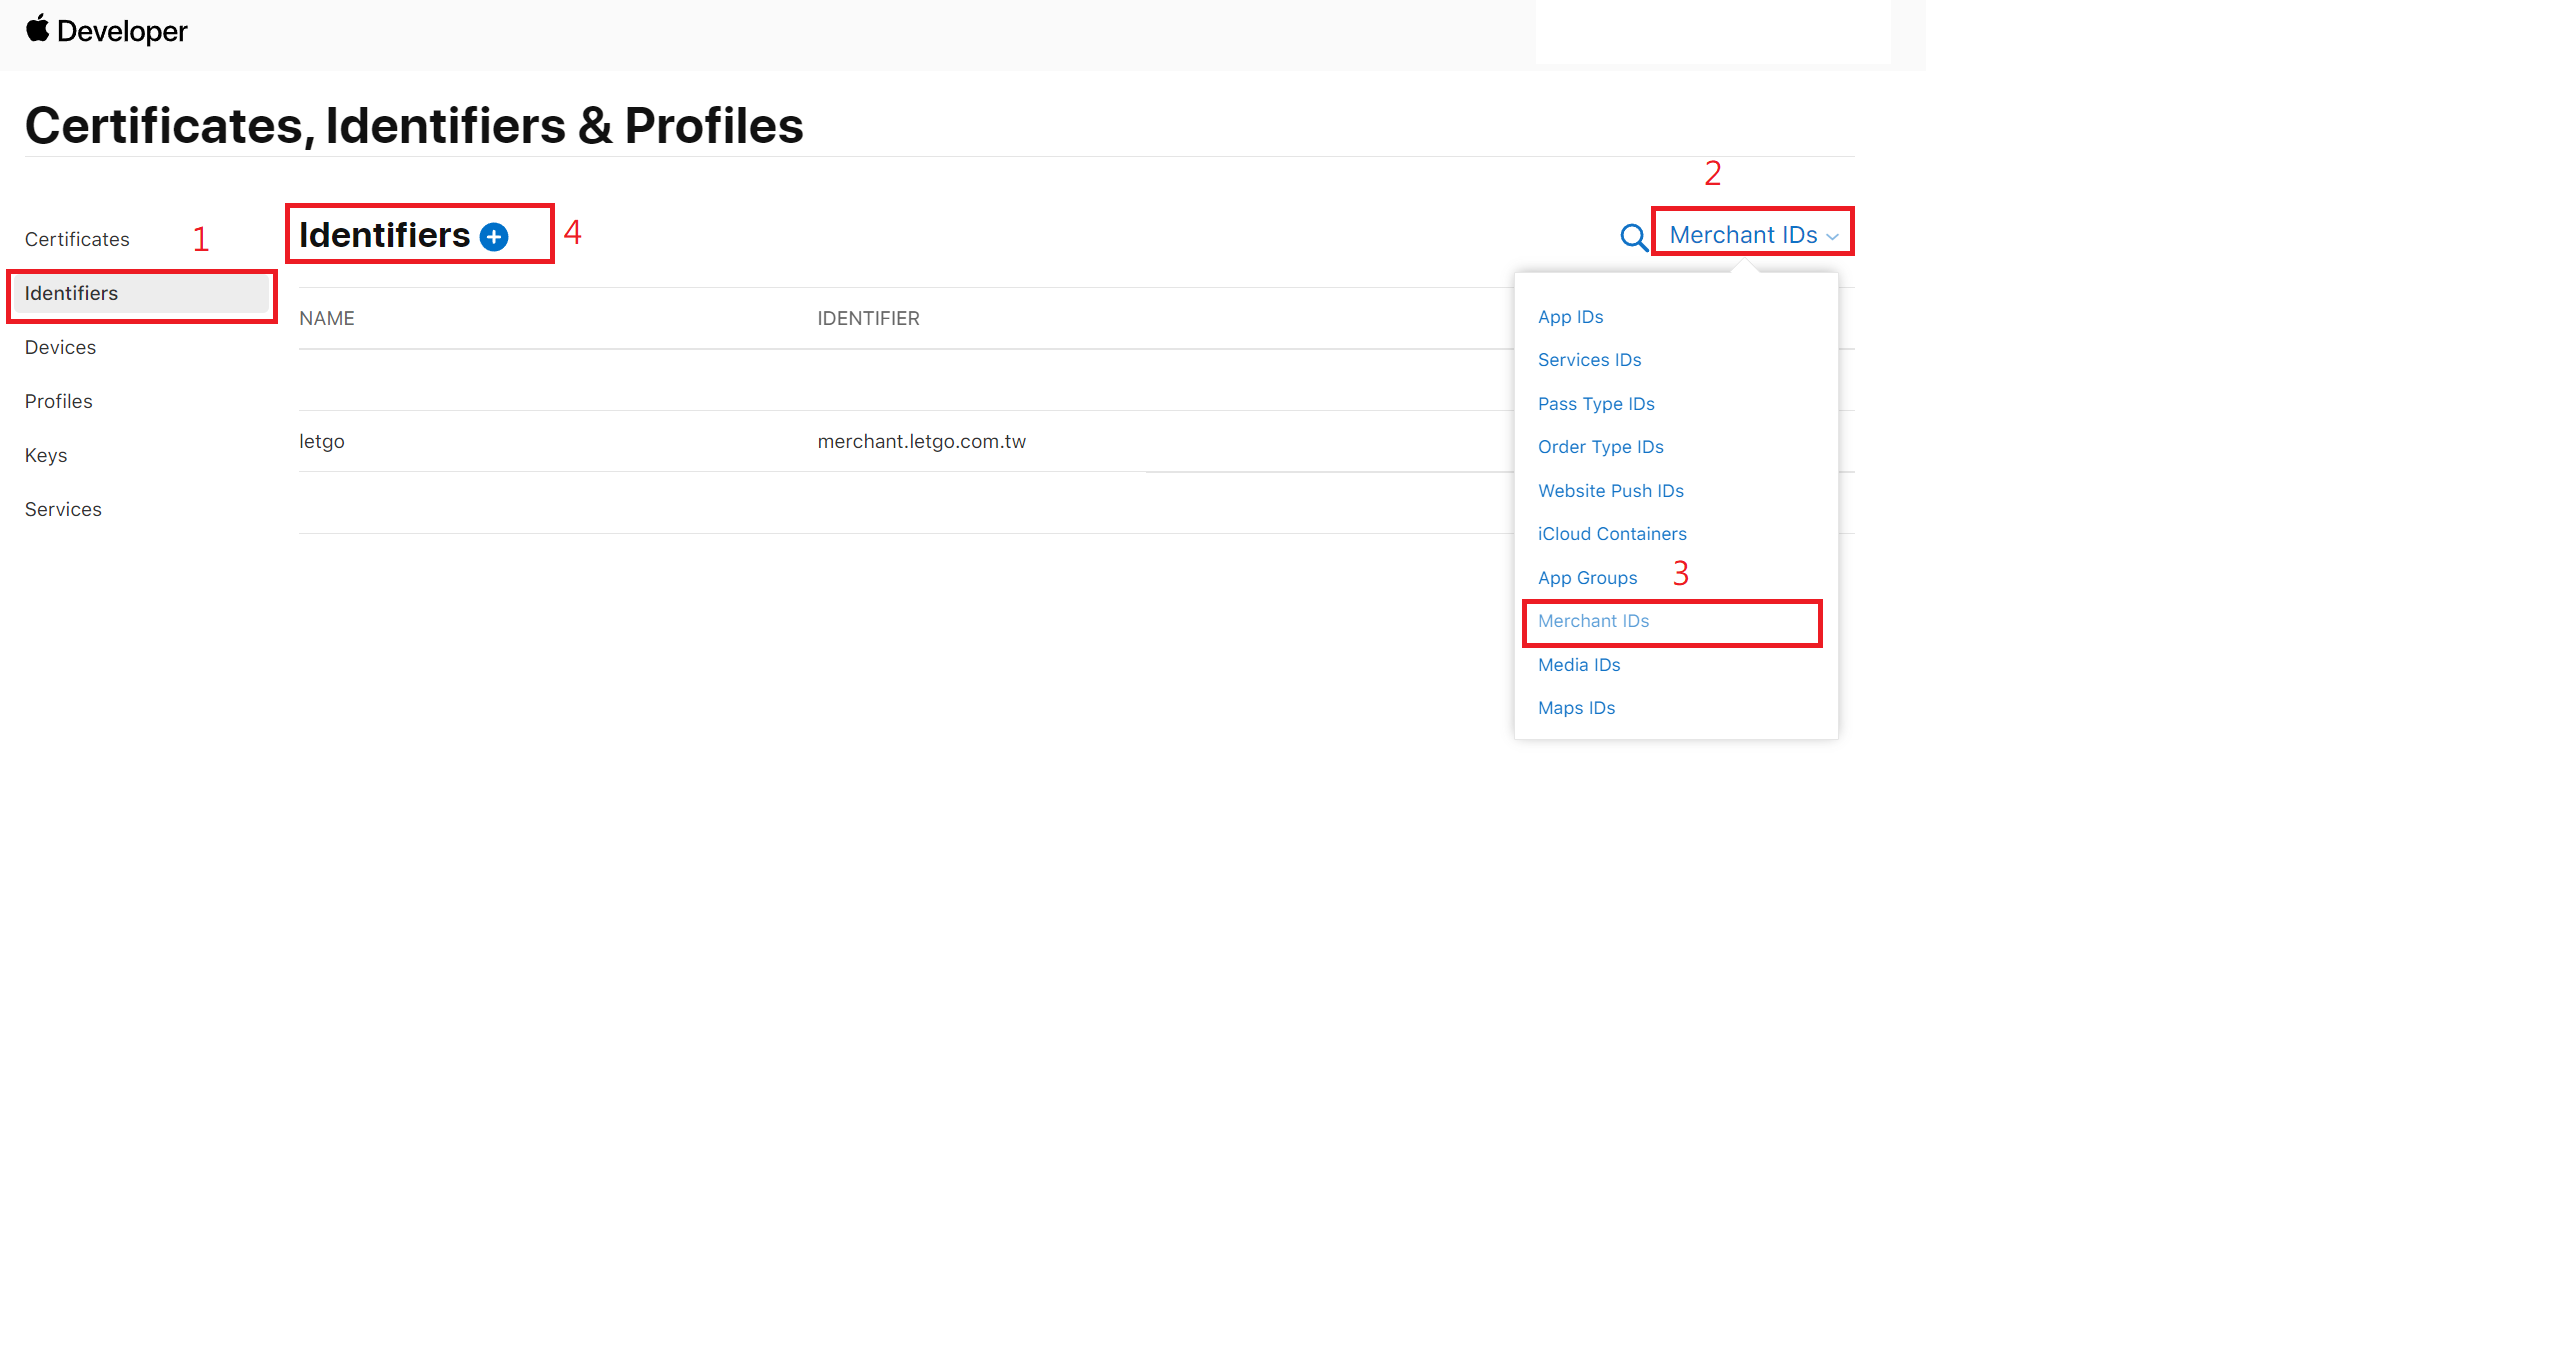
#### Identifiers > App IDs > Merchant IDs > Identifiers +
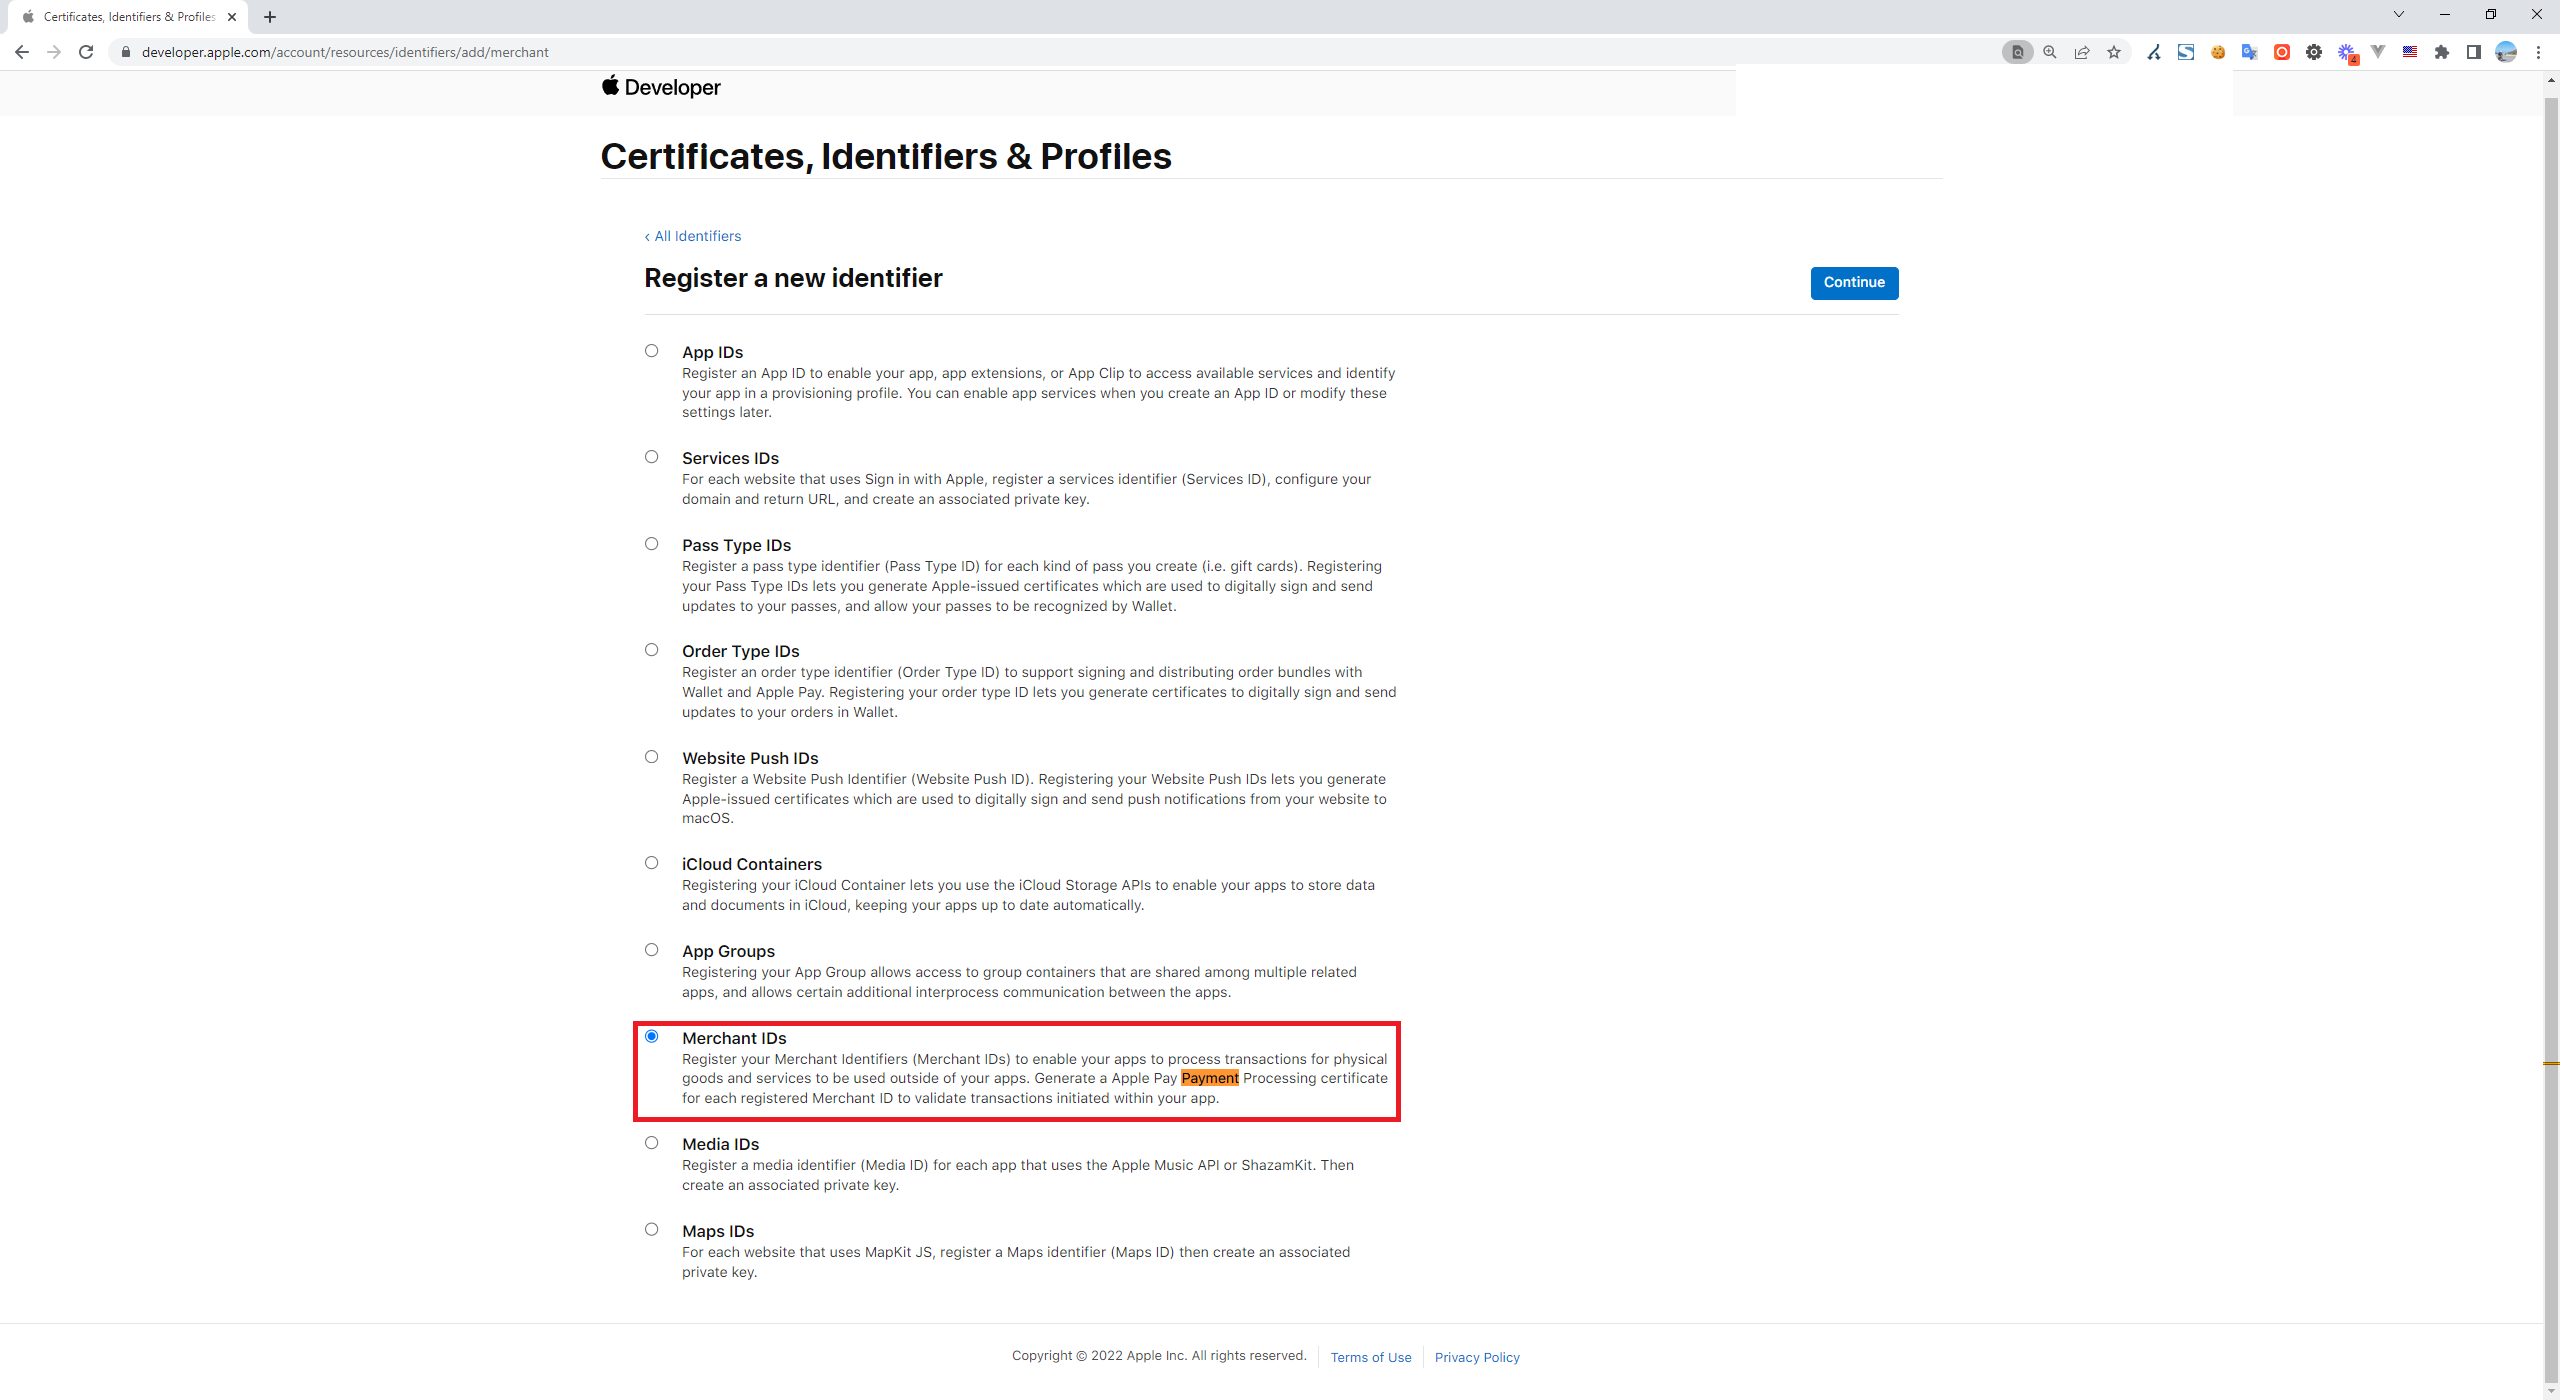
#### Merchant IDs > Continue
#### Name的部份隨便 key,輸入商戶識別 id Identifier (官方建議 {domainName} + {appName }),請先記錄起來,之後程式串接時要傳遞。
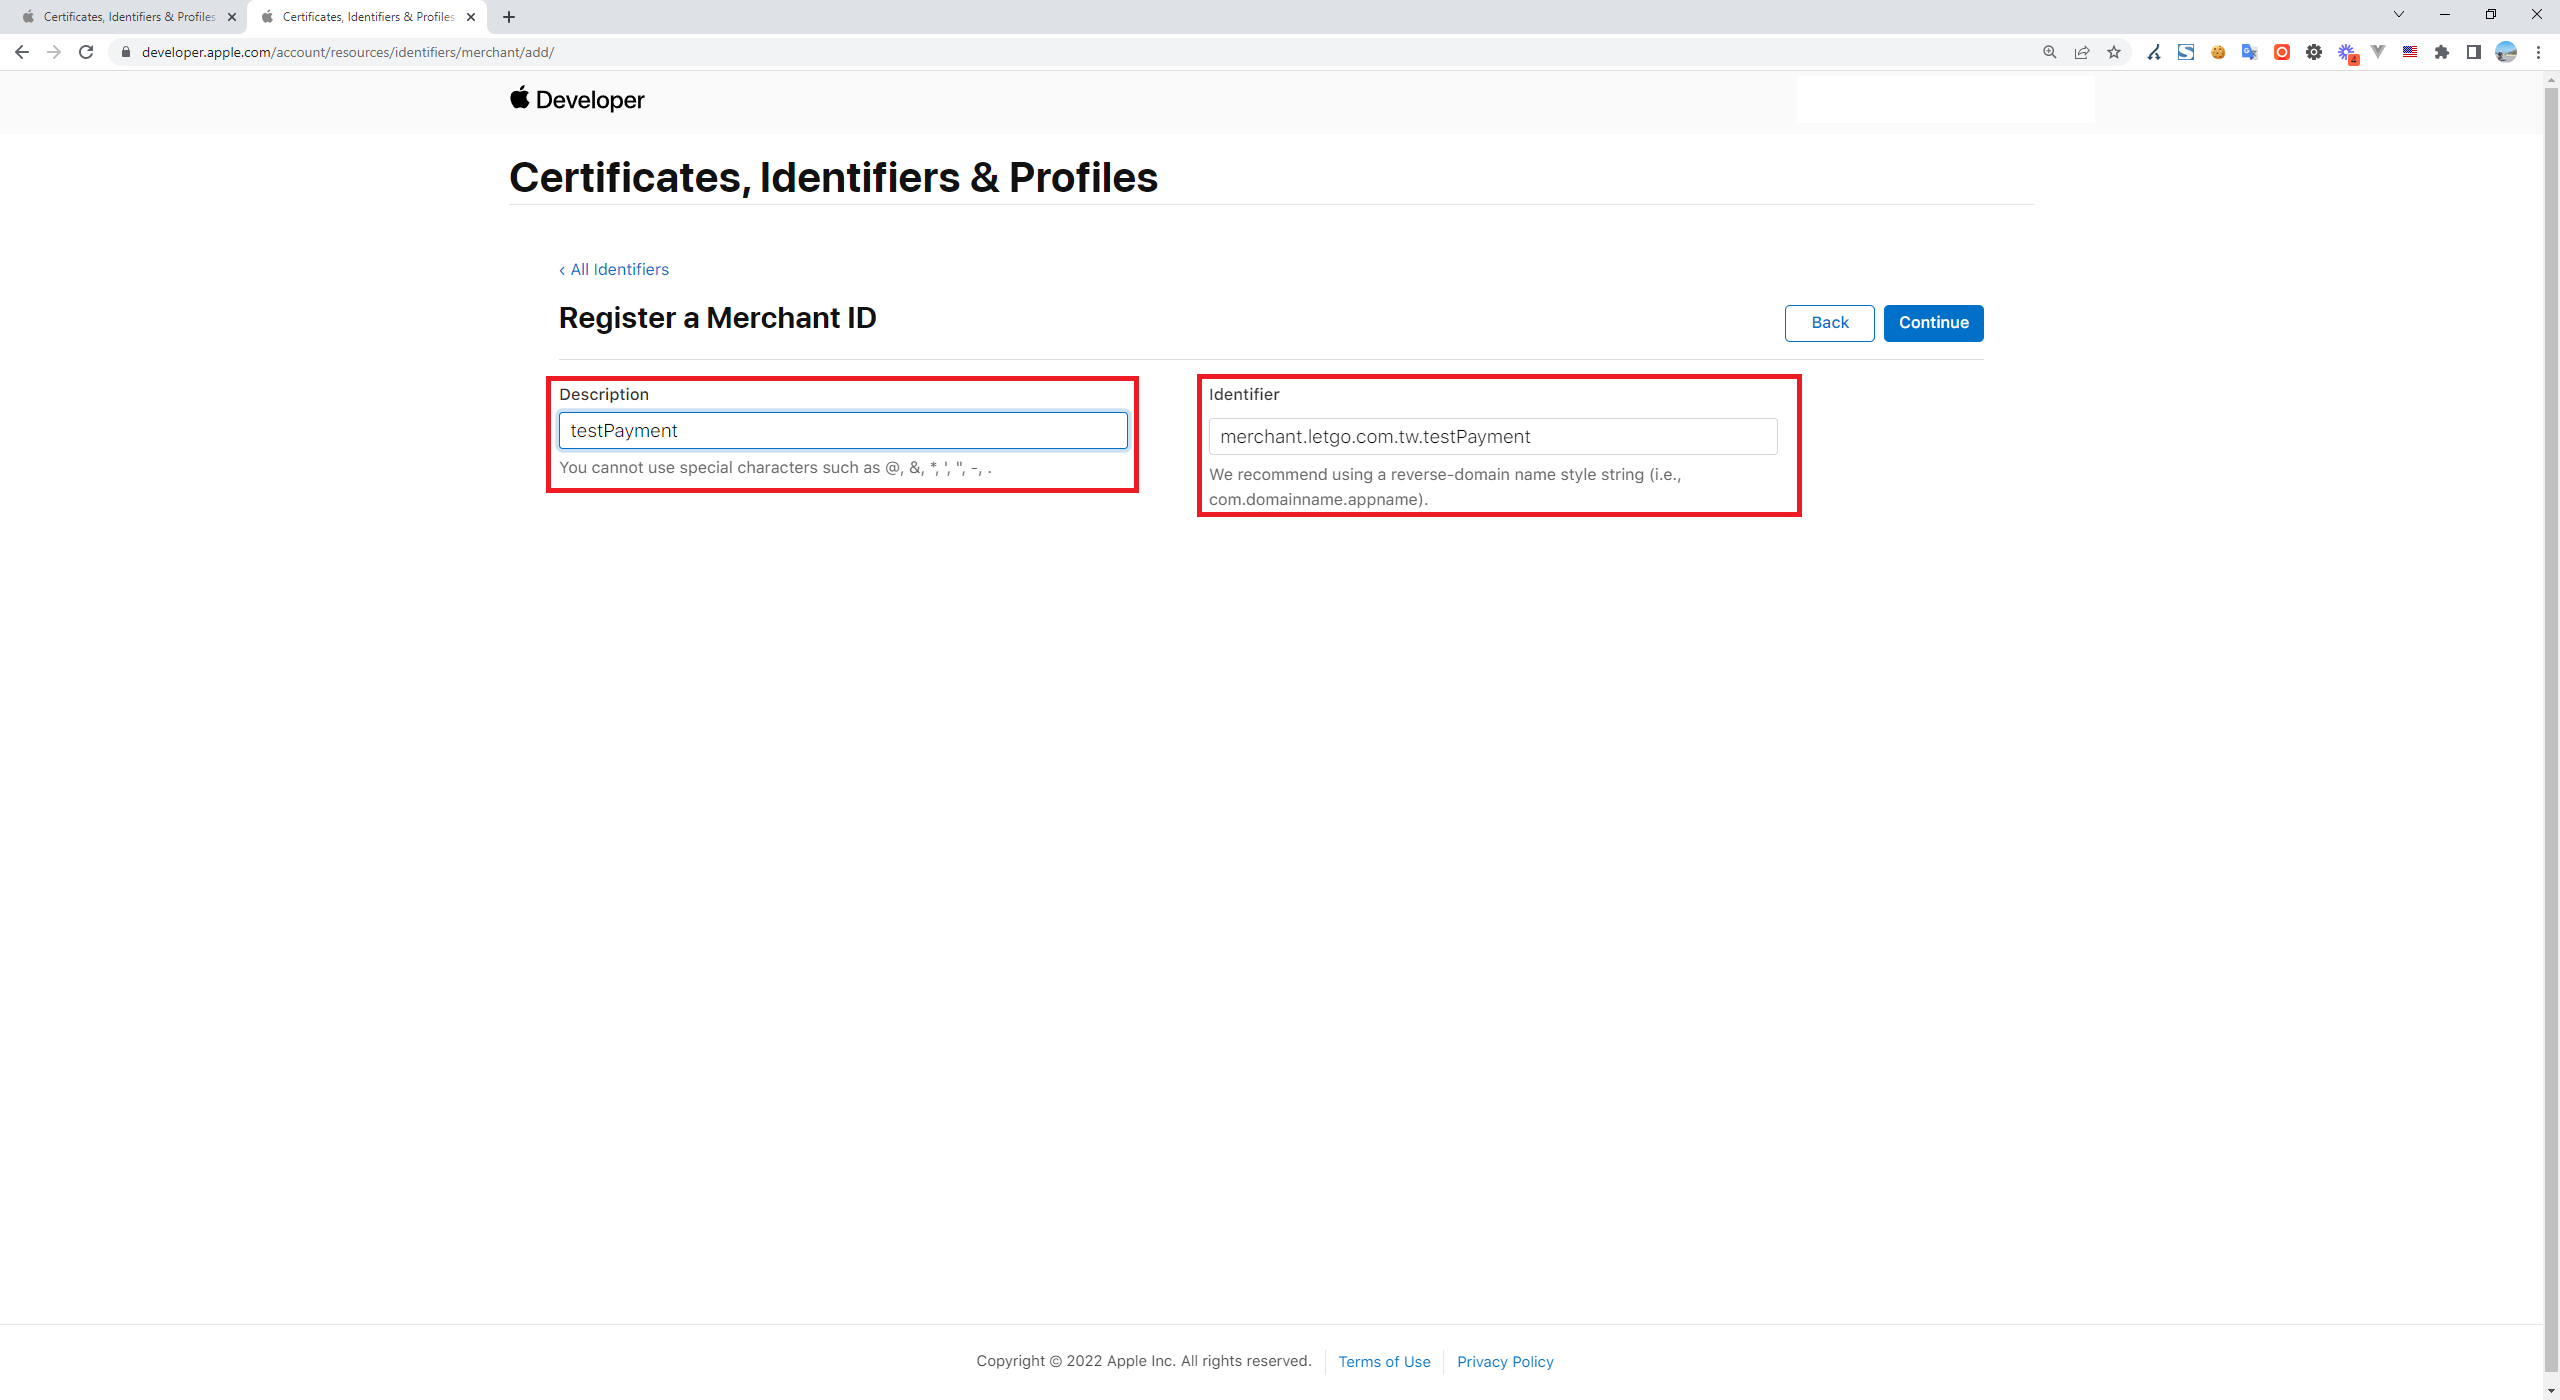
### 接著,從這畫面,我們得知正式撰寫金流程式前必須先準備,以下三項
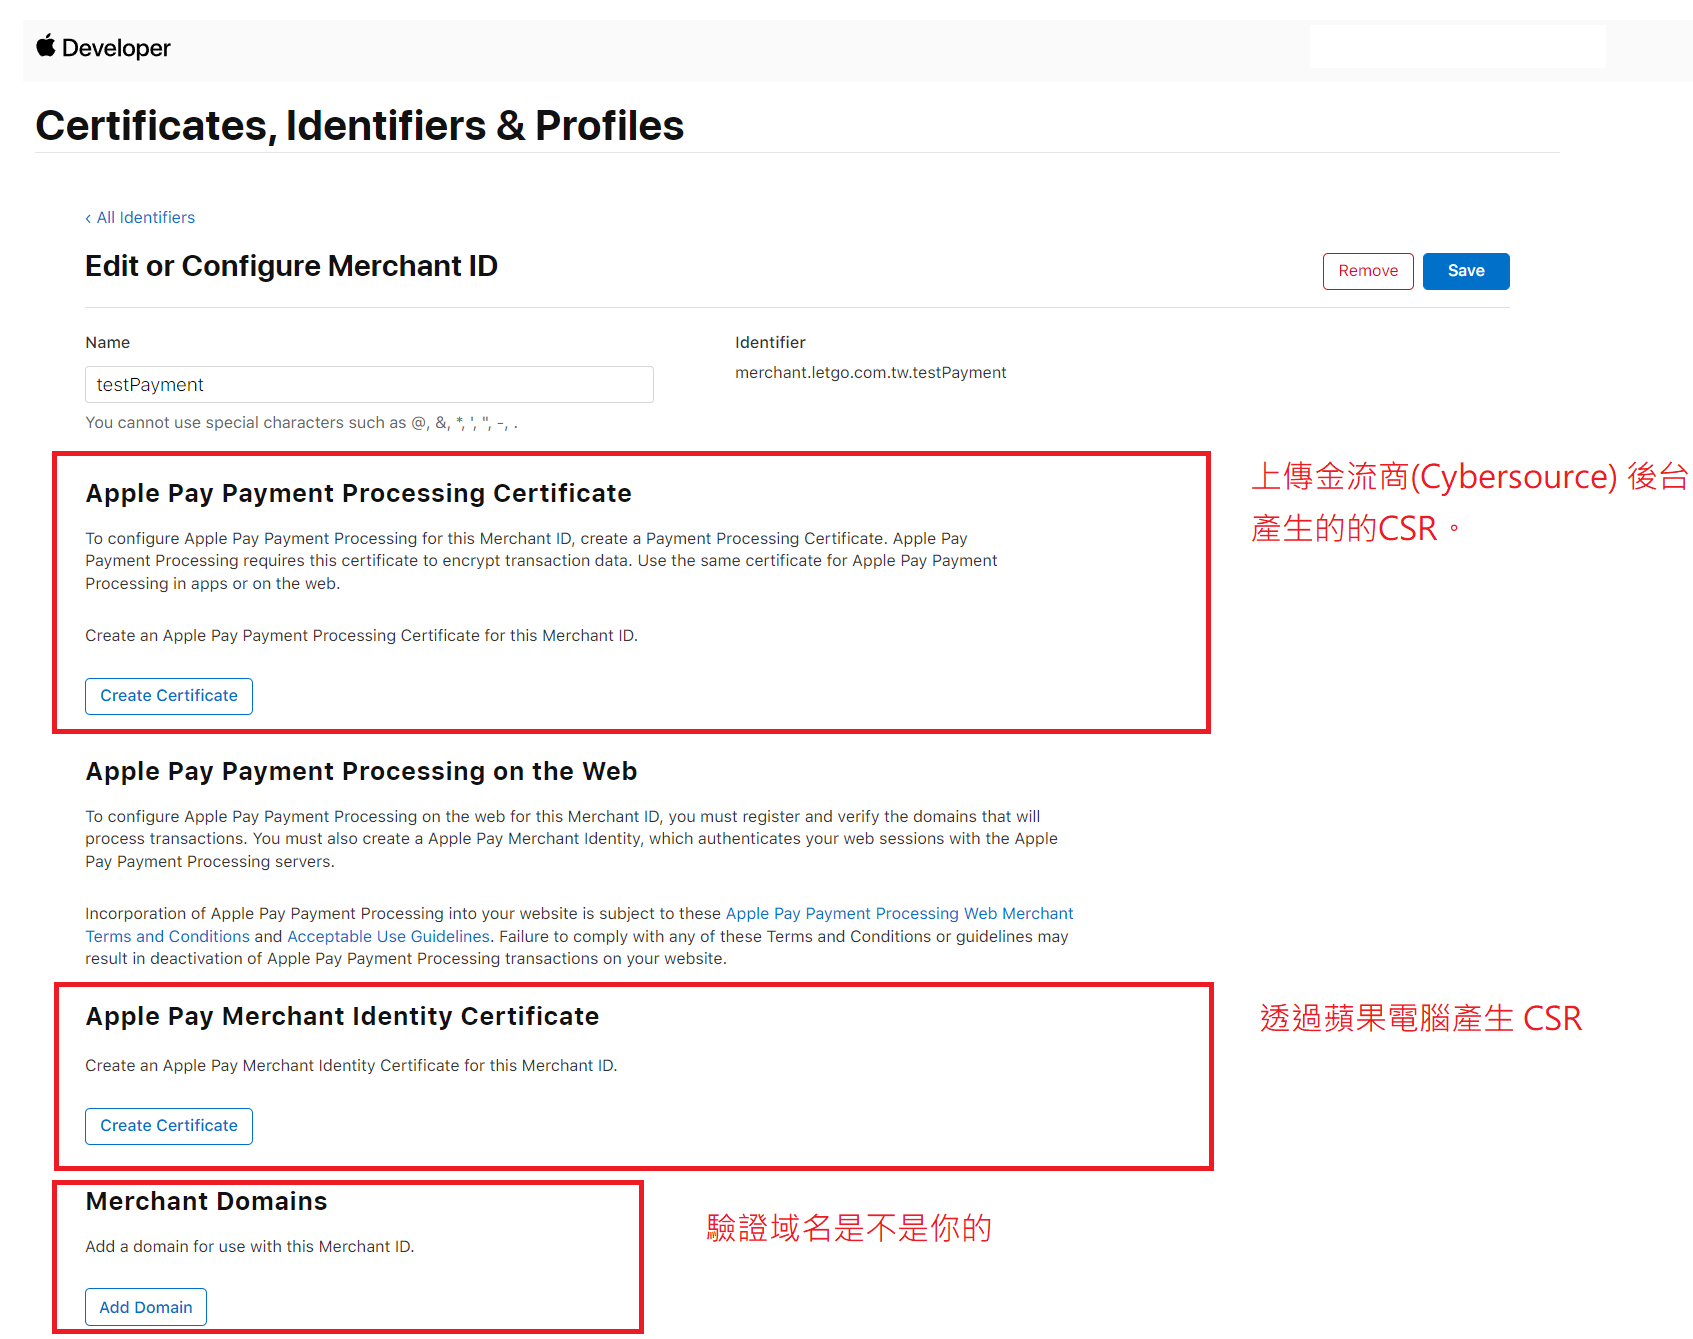
#### 一、上傳金流商(Cybersource 的 CSR)
##### Cybersource's BackOffice > Payment Configuration > Apple Pay > Configure > 填入 Apple Merchant ID > Generate New Certificate Signing Request > 下載憑證 > 上傳至蘋果後台 Apple Pay Payment Processing on the Web
#### 二、透過自己的蘋果電腦產生 CSR,去蘋果後台產生憑證
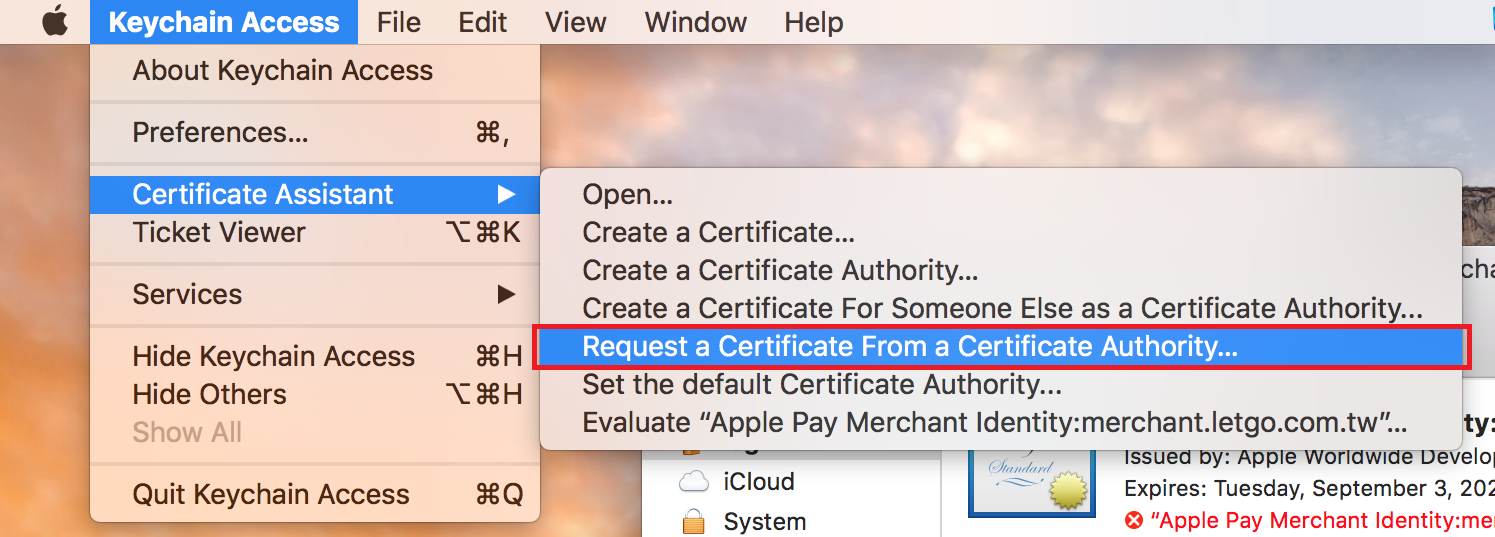
##### Keychain Access > Request a Certificate from Certifcate Authority...
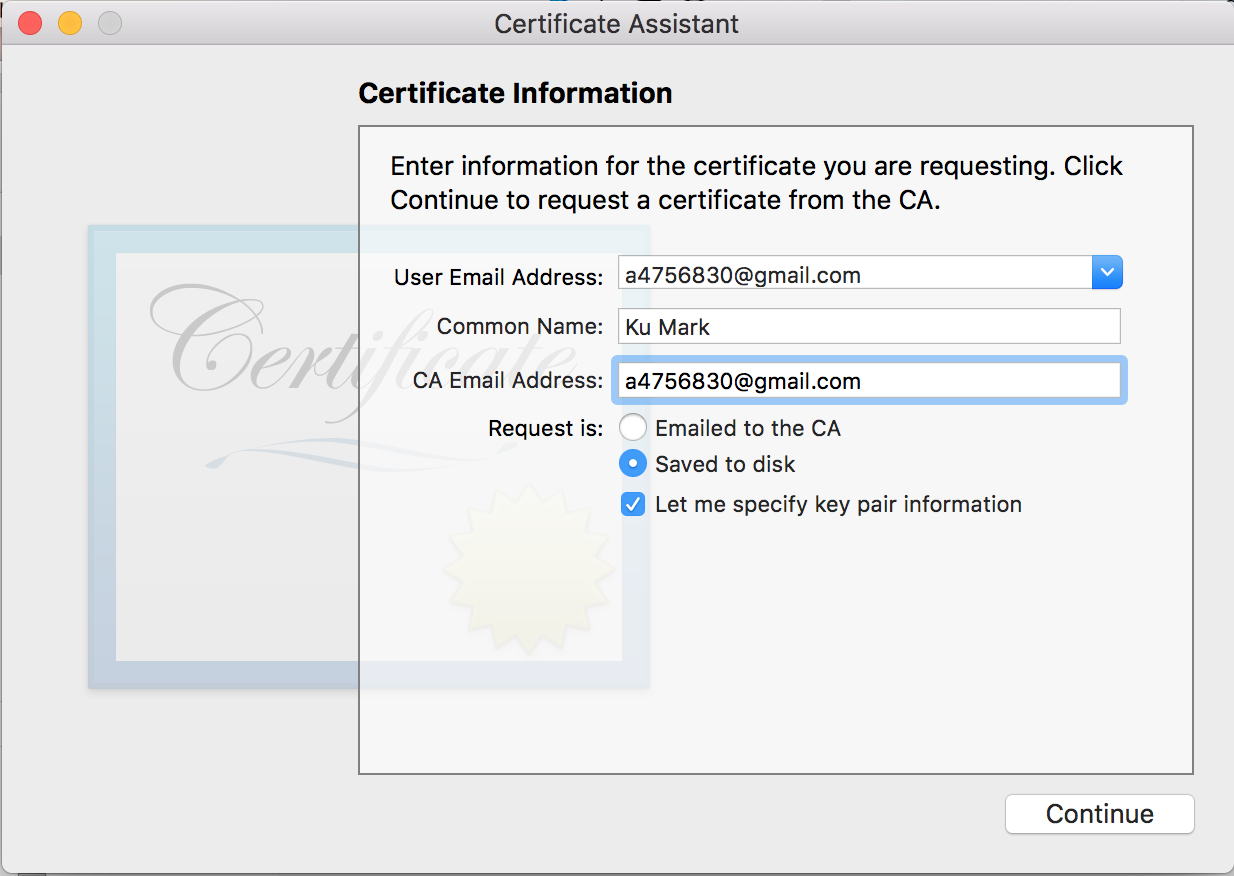
##### 2.輸入 CA 相關資訊
##### 3. 選擇憑證格式 ( 預設 RSA 即可 )
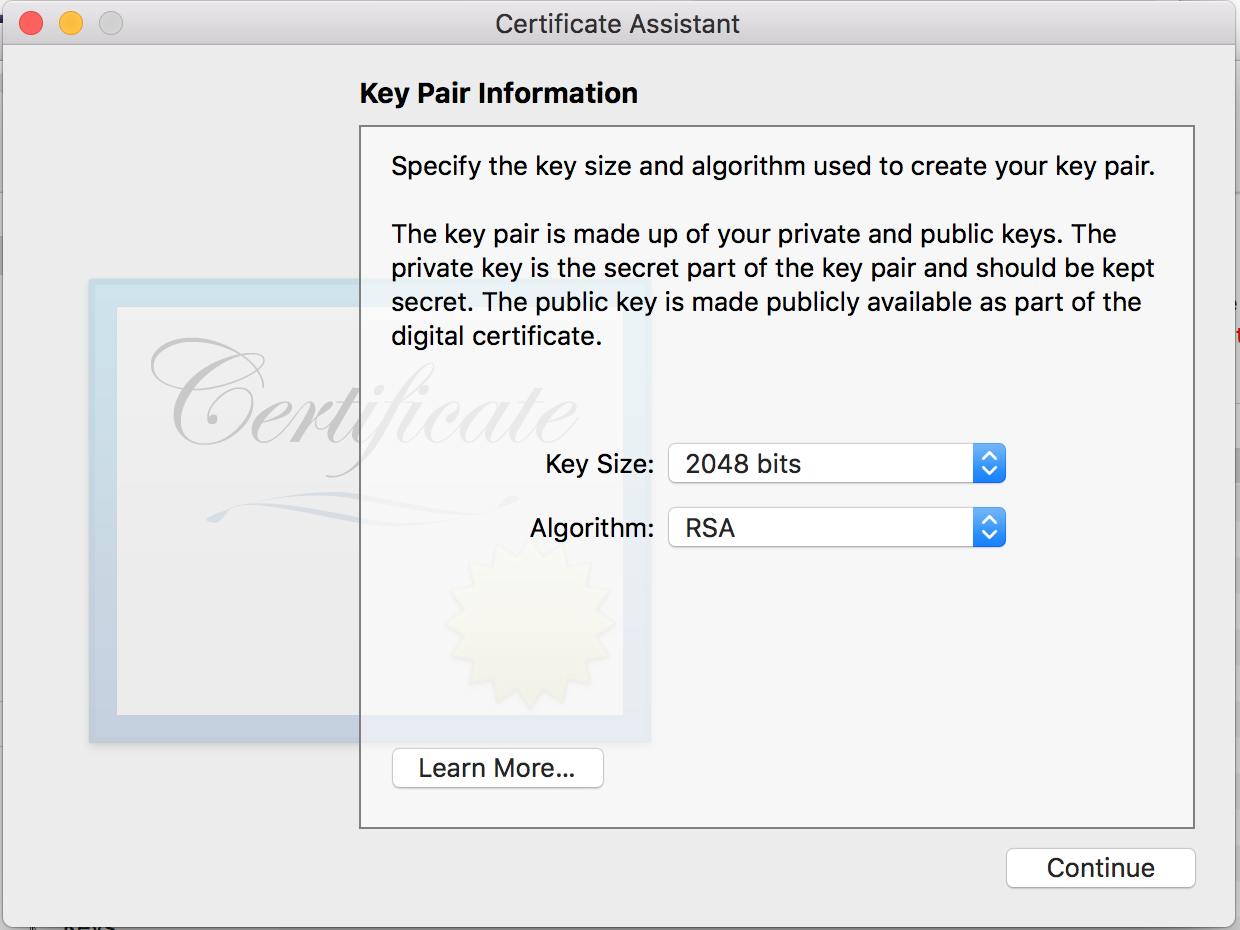
##### 4.至開發人員後台 > Apple Pay Merchant Identity Certificate > 將剛產生的 CSR 上傳上去
##### 5.上傳完後會有個 Download,按下後會將憑證下載至電腦,之後商戶驗證時和蘋果發出請求需要憑證,但 NET x509 元件無法使用 Cer,因此要透過 Apple 電腦轉成 p12 檔。
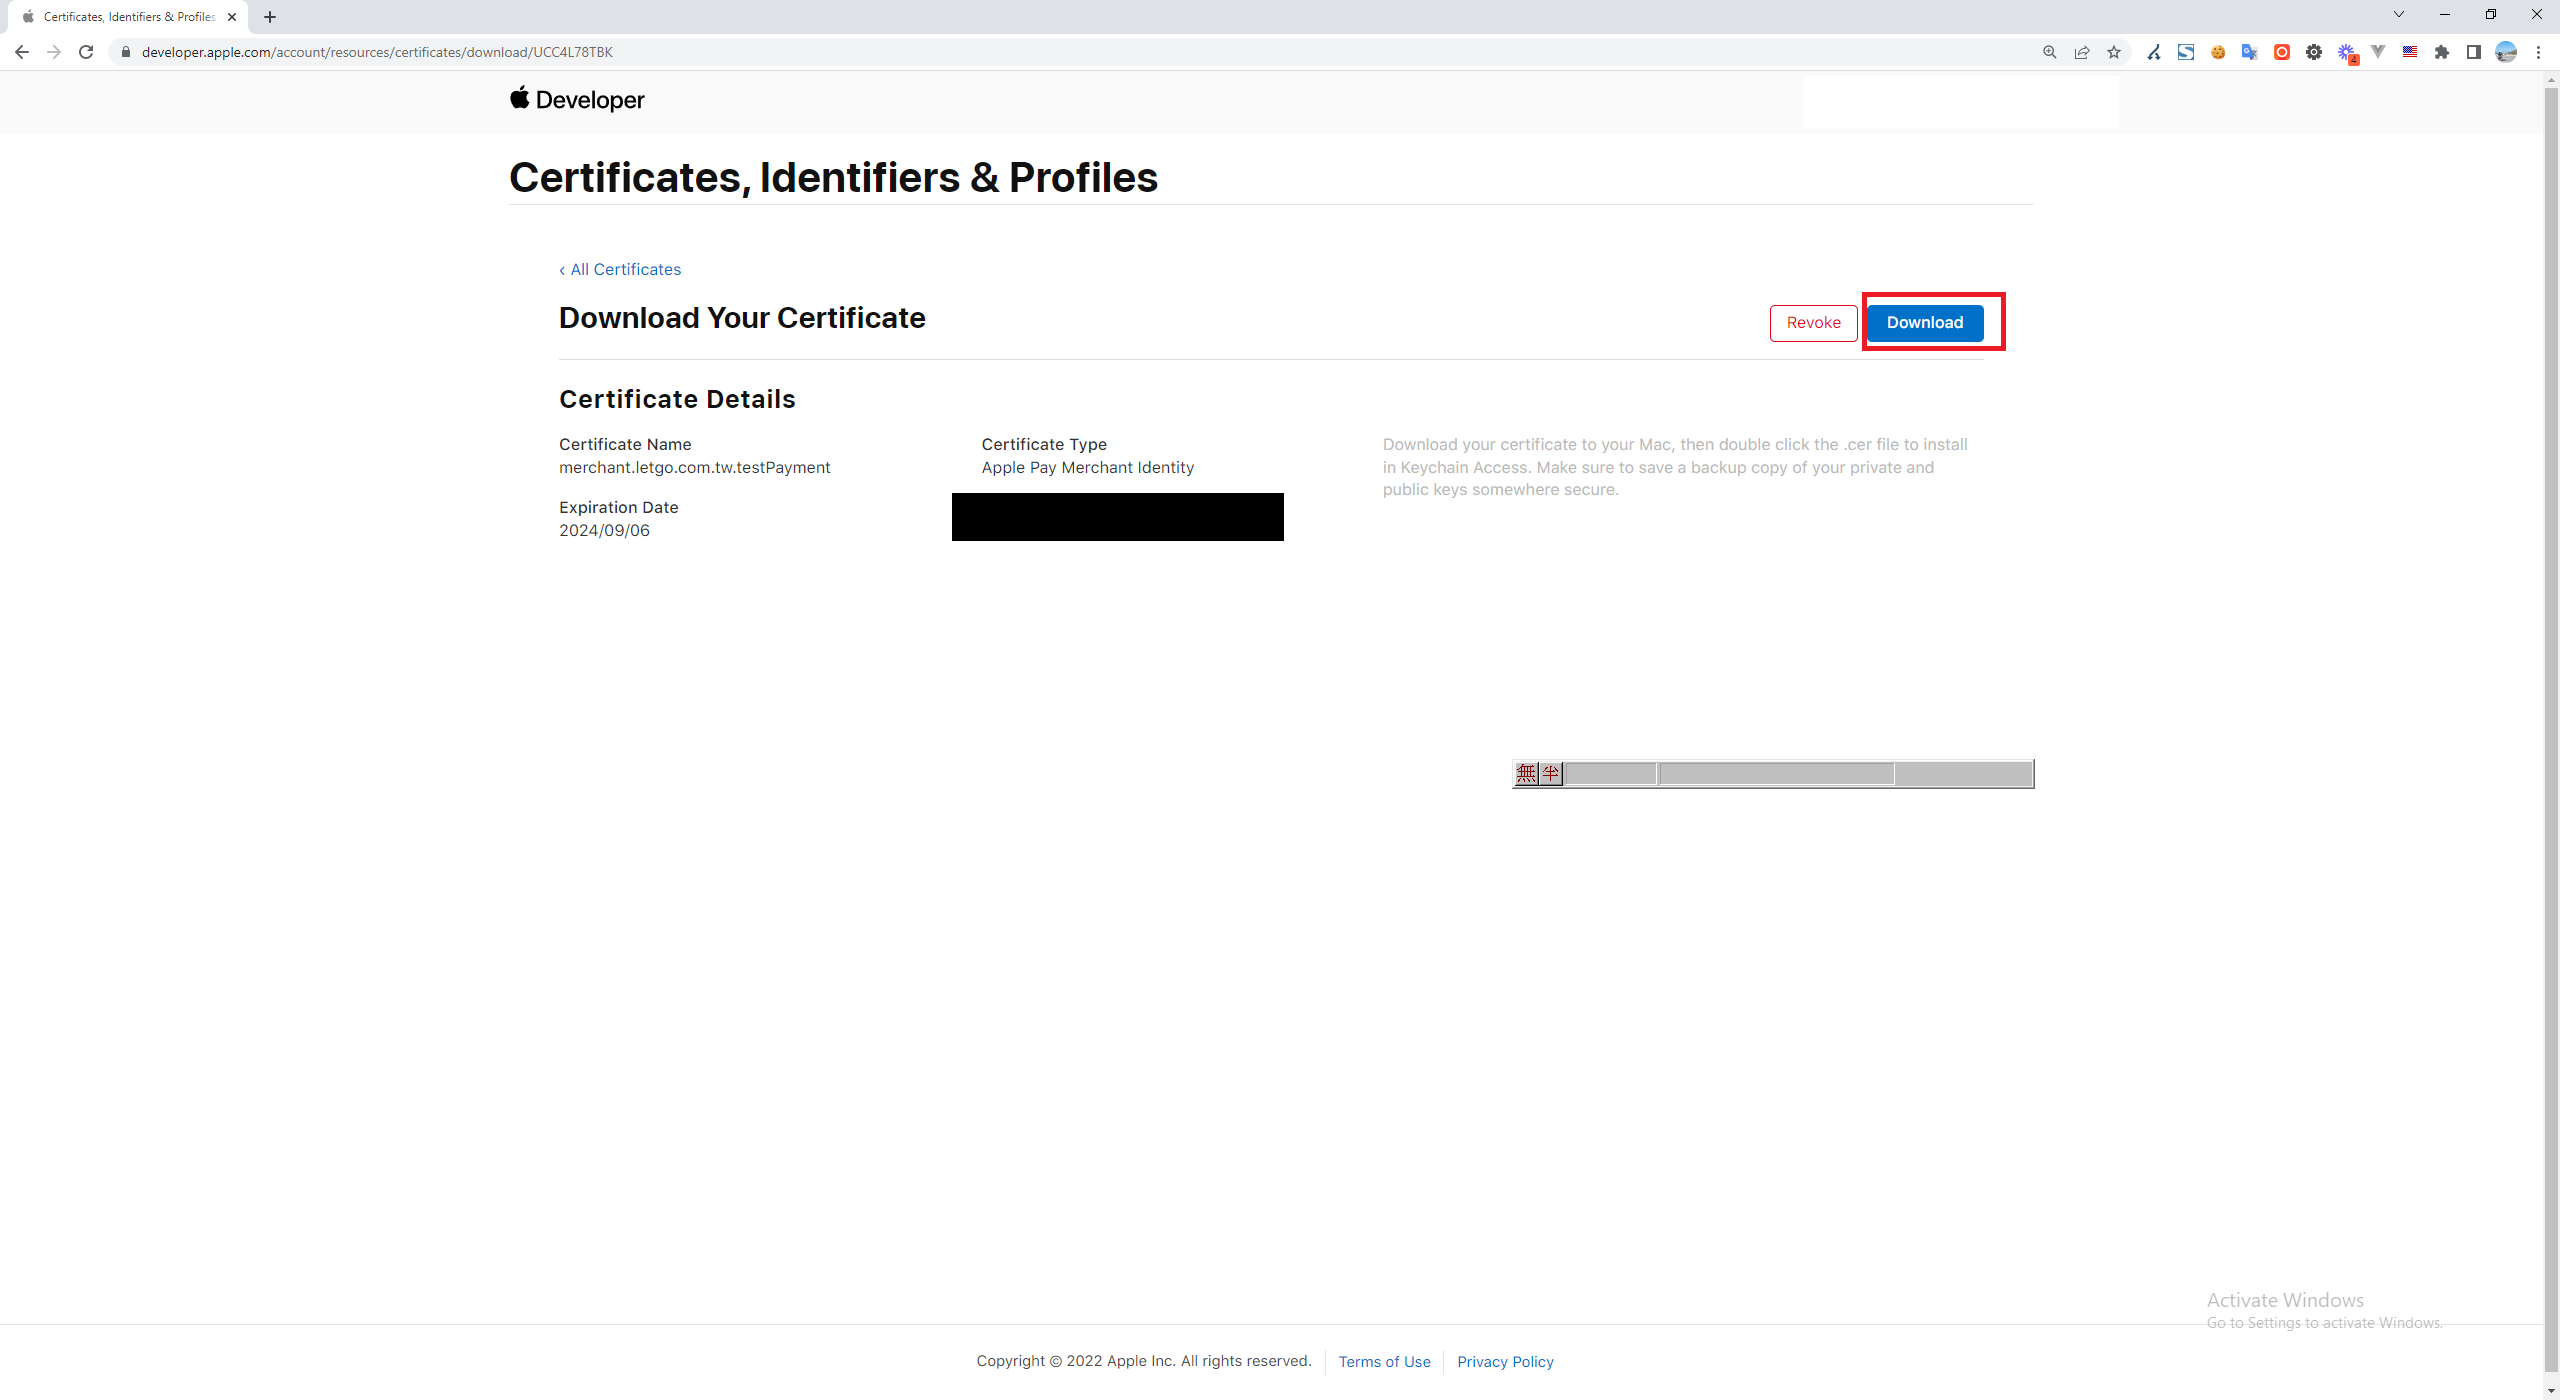
##### 6. 產生 P12 檔 for 後端商戶驗證 Api
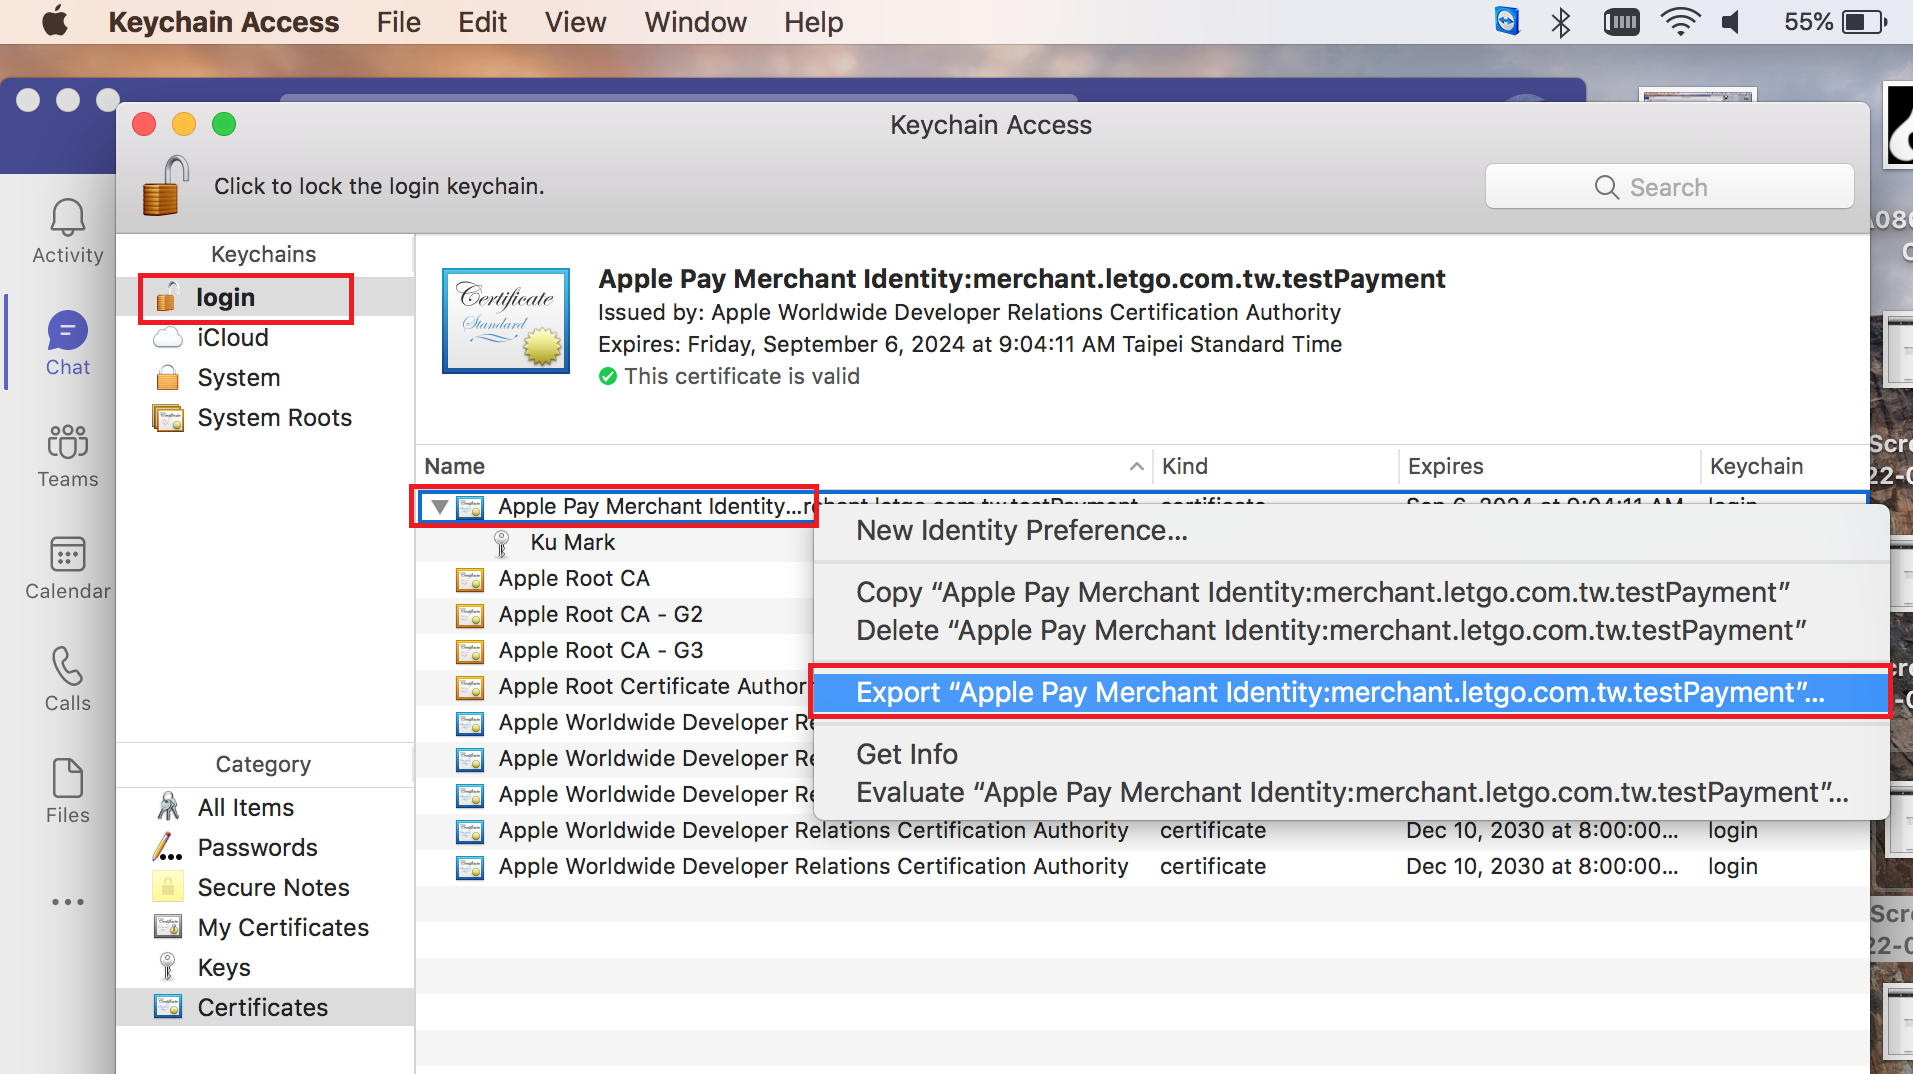
將下載下來的 cer 拖進 Keychain Access 的 login, 剛拖進來會發現憑證是 certificate is not trusted。
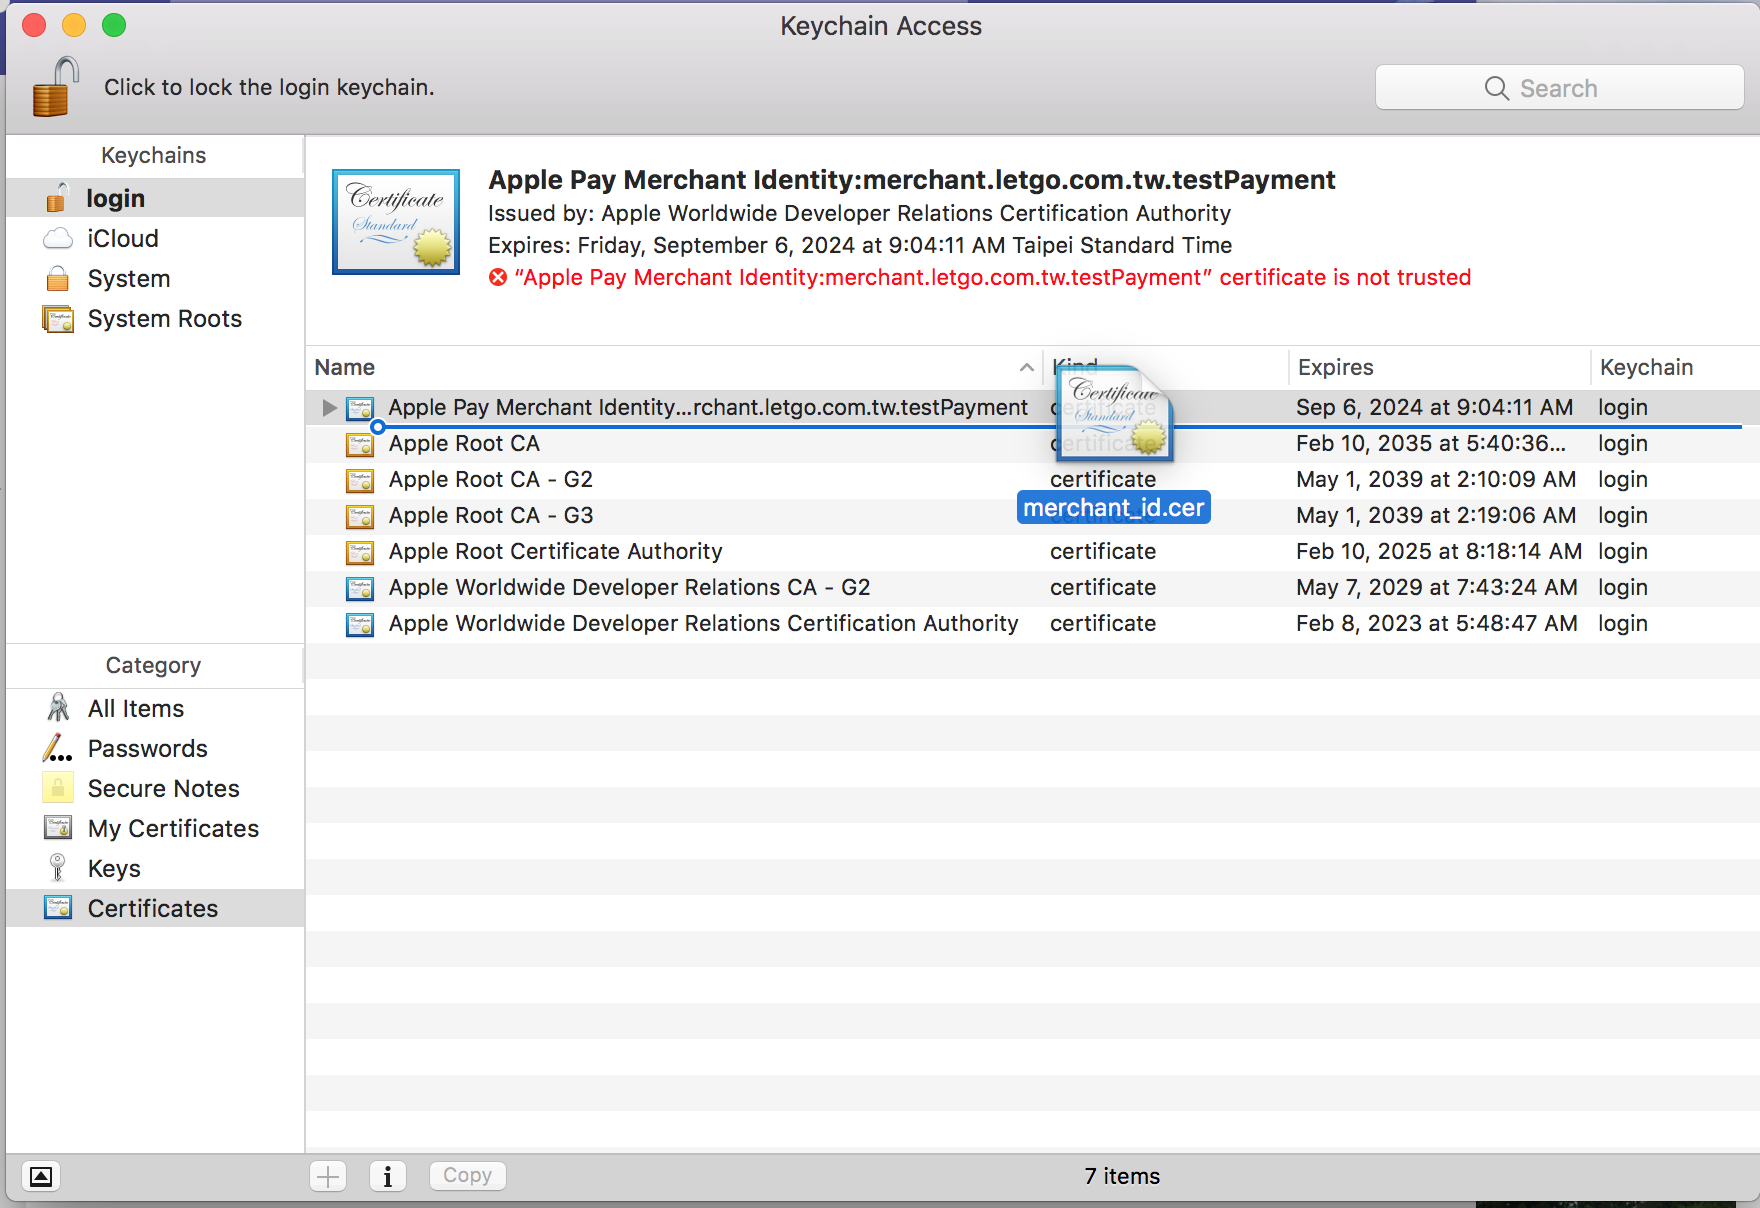
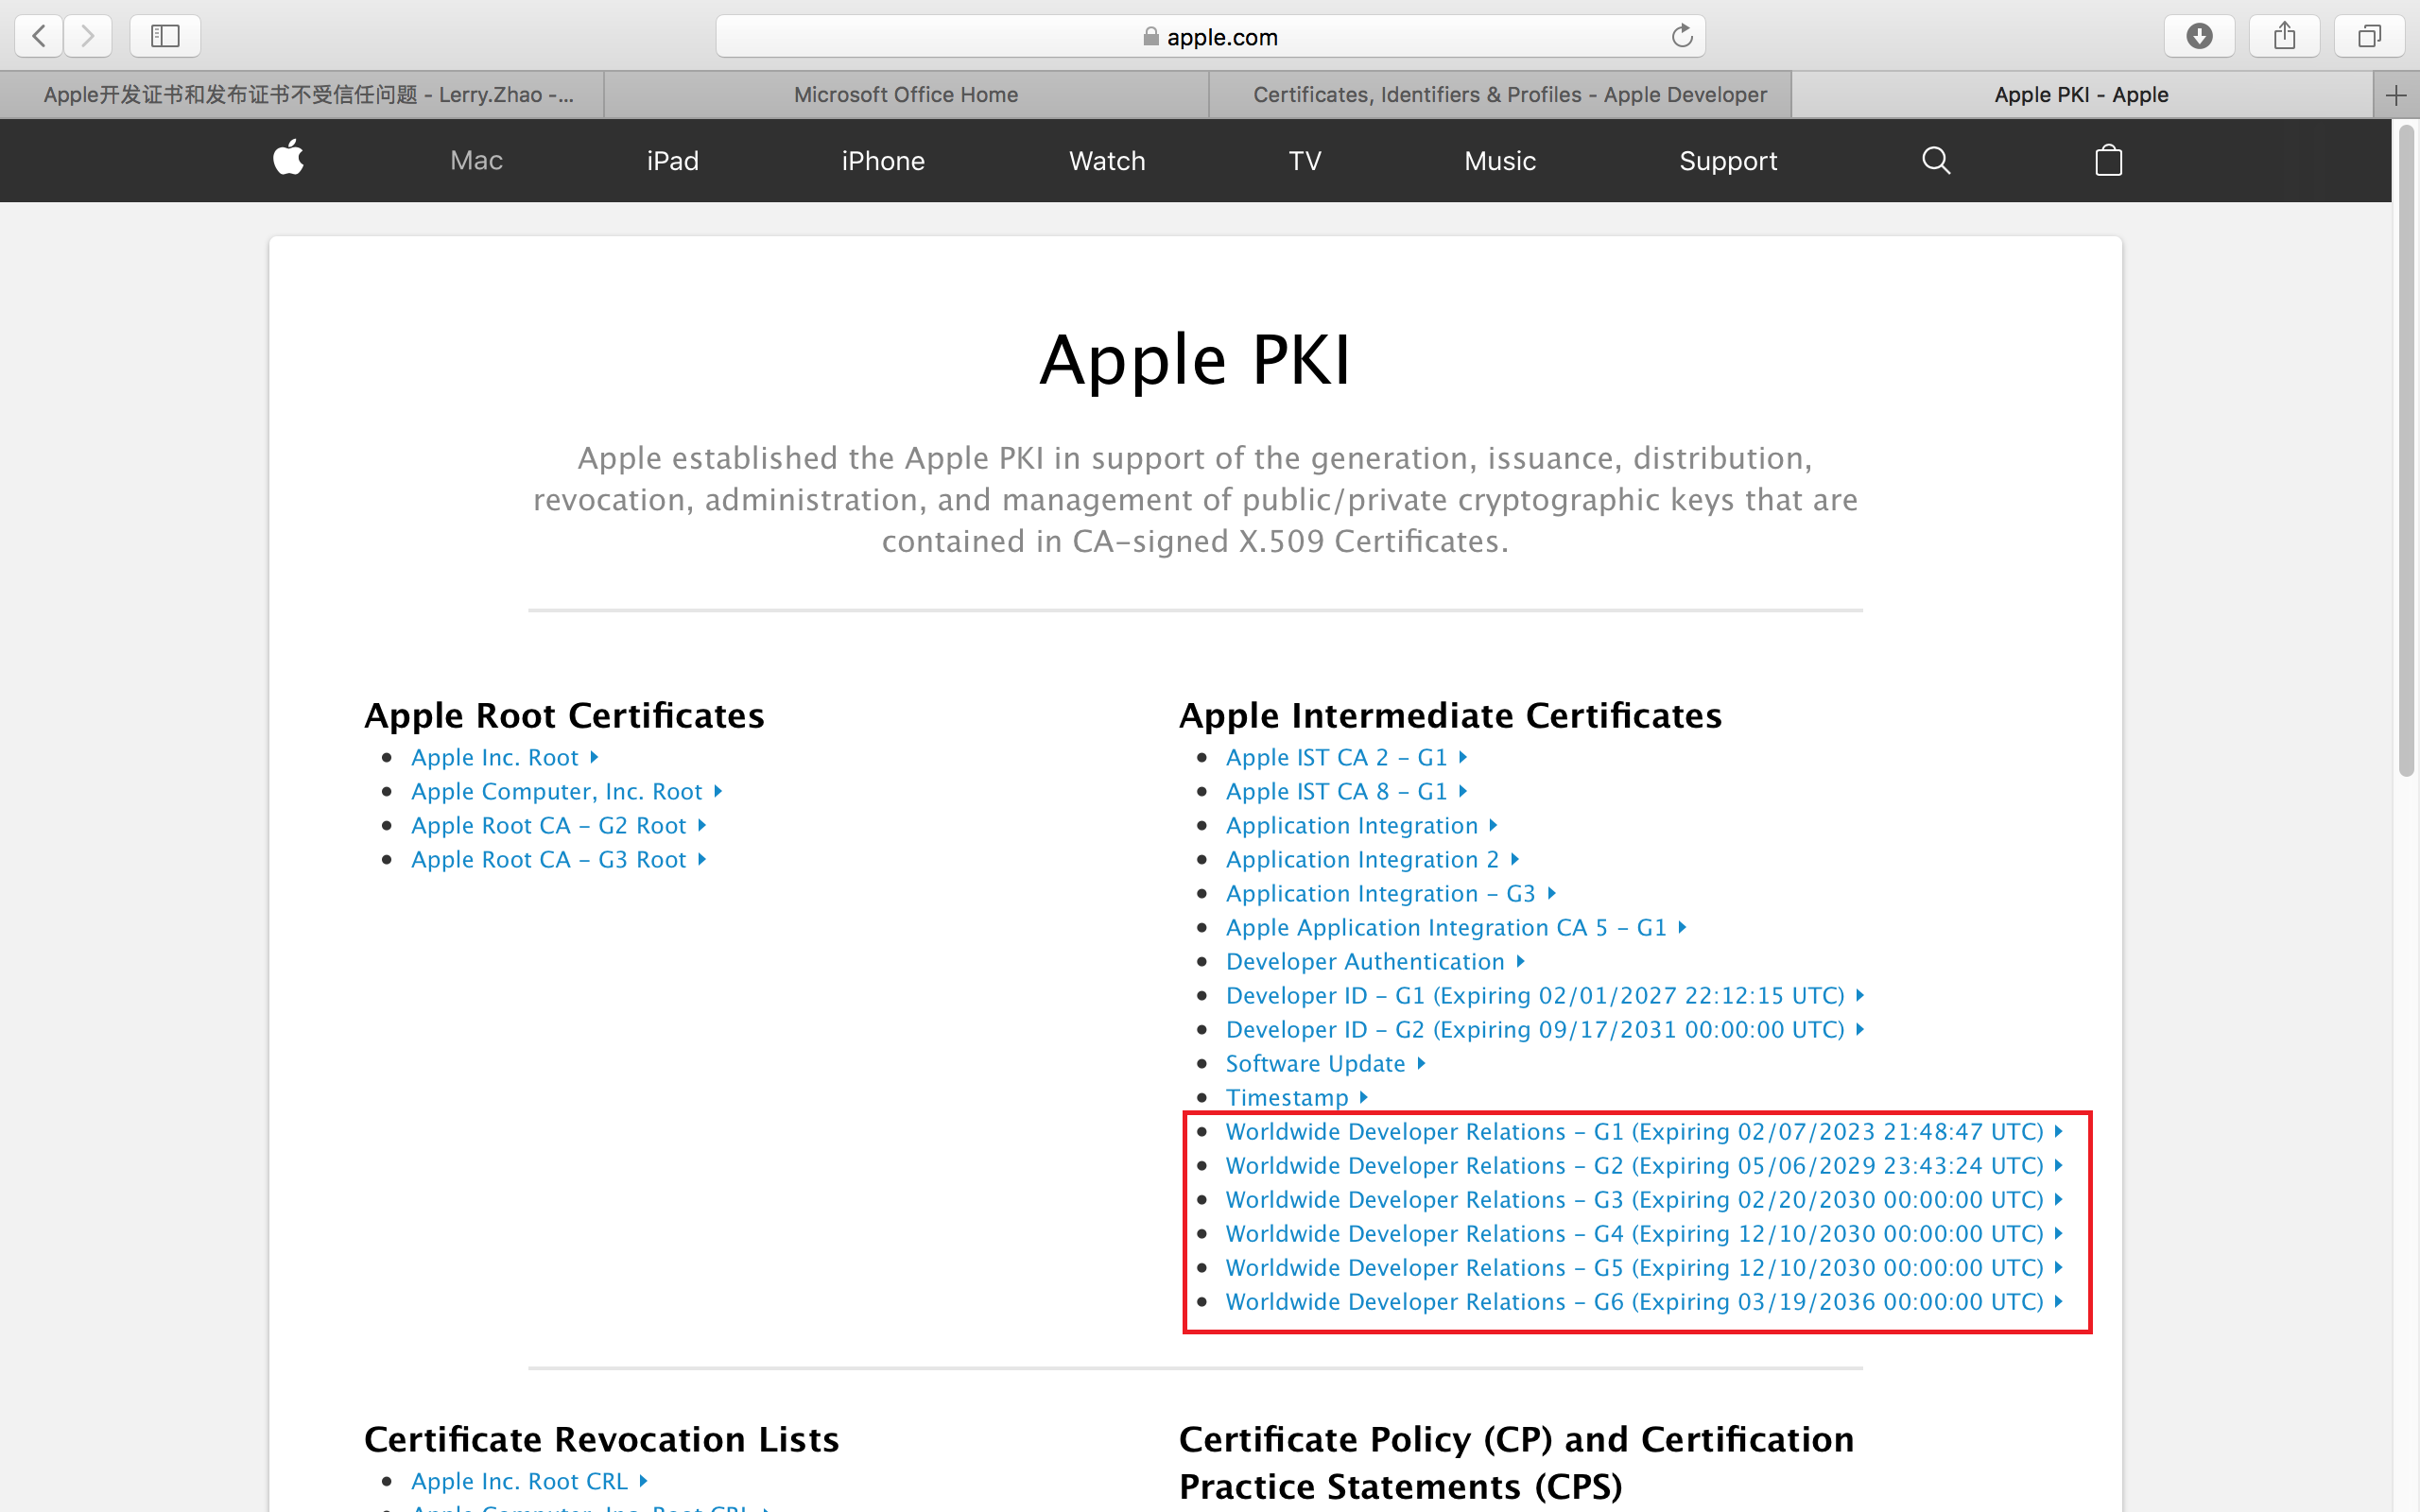
此時到 [APPLE PKI 網站](https://www.apple.com/certificateauthority/ )
安裝圖中紅框選取的憑證後,剛安裝憑證就會變成 This certificate vaild.
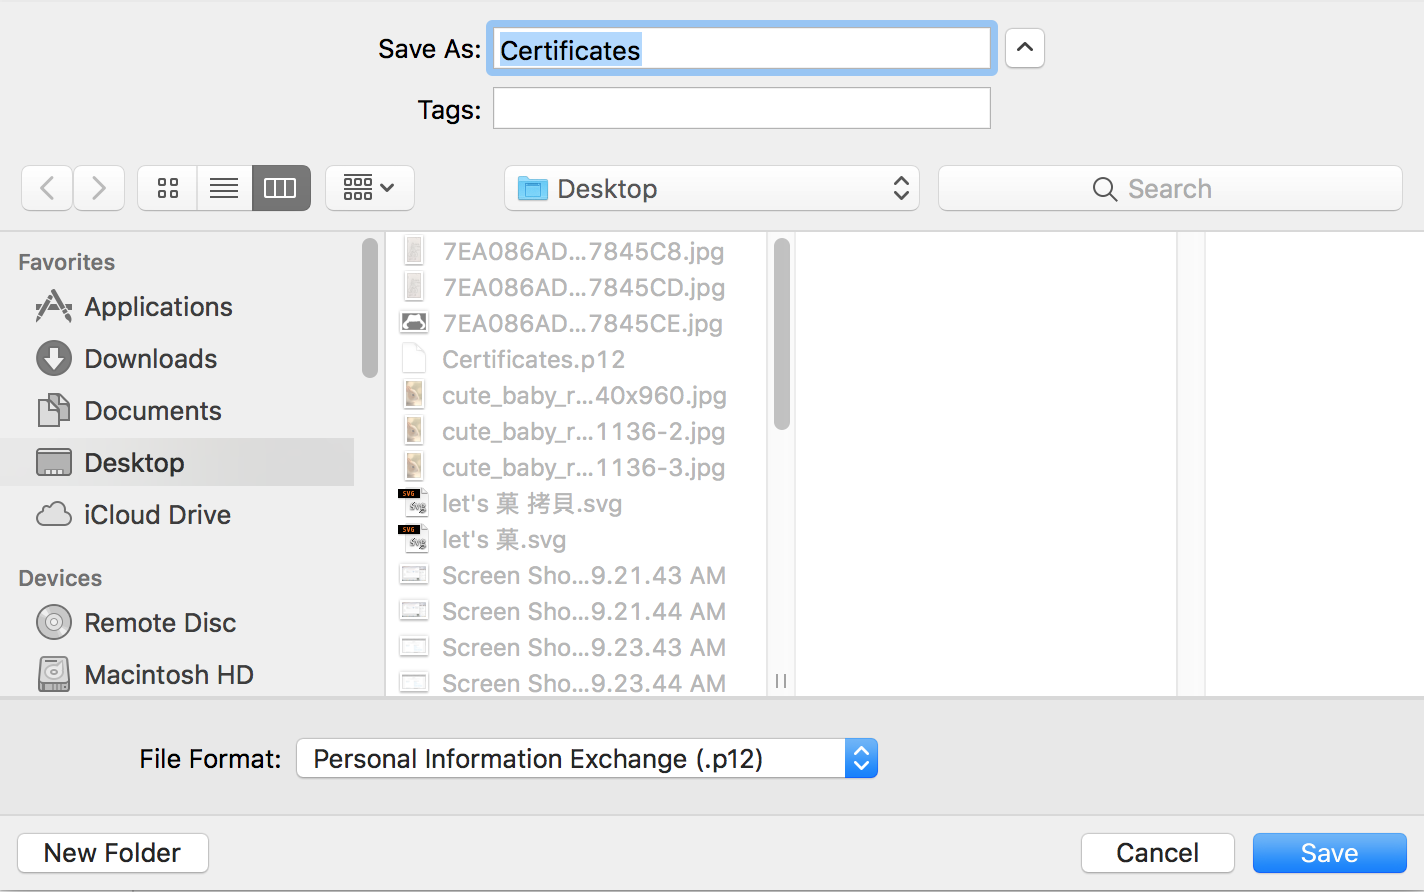
右鍵 > Export ( 密碼可隨便輸 )
##### 三、驗證域名是不是自己的
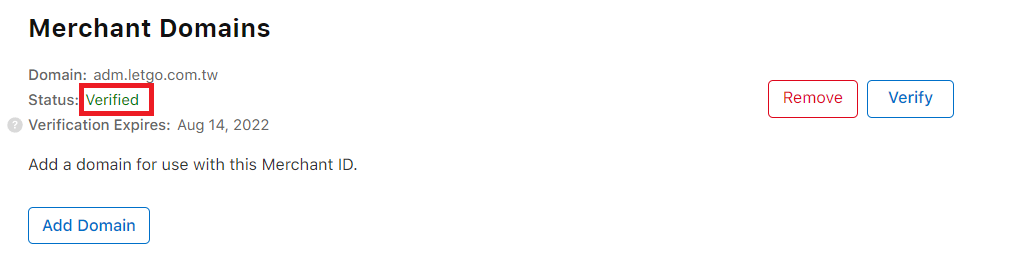
輸入驗證域名 > 下載驗證檔案 > 放在該台網站伺服器 > 按下 Verify按鈕
## 撰寫程式
參考蘋果[官方的 Apple Pay Live Demo](https://applepaydemo.apple.com/),可以從範例程式得知,Apple Pay 的前端主要的事件流程有:
* onvalidatemerchant ( 使用者按下按鈕,至自己的後端驗證商戶 )
* onpaymentauthorized ( 商戶驗證成功,觸發交易 )
* onpaymentmethodselected ( 付款方式選擇 )
* onshippingcontactselected ( 選擇收人時觸發 )
* onshippingmethodselected ( 選擇運輸方式)
### 前端範例程式
```
Apple Pay Welcome
Apple Pay button is only show in safari!!!
123
```
### 後端程式 ( NET MVC)
```
///
/// 商戶驗證
///
[HttpPost]
public JsonResult ValidateMerchant(VerifyMerchantRequest request) {
string strResult = string.Empty;
try {
ServicePointManager.SecurityProtocol = SecurityProtocolType.Tls12;
ServicePointManager.Expect100Continue = false;
System.Net.ServicePointManager.SecurityProtocol = System.Net.SecurityProtocolType.Tls12;
/* Merchant Identity憑證 */
string certPath = Request.MapPath(@"~/App_Data/ApplePay.p12"); //Merchant Identifier憑證路徑
string certPwd = "123"; //Merchant Identifier憑證密碼
X509Certificate2 cert = new X509Certificate2(certPath, certPwd, X509KeyStorageFlags.MachineKeySet);
/* 建立PayLoad */
var payload = new {
displayName = "letgo", // 名稱
initiative = "web", // 網頁
initiativeContext = "adm.letgo.com.tw", // 域名
merchantIdentifier = "merchant.letgo.com.tw.testPayment", // 商戶號
};
string strPayLoad = JsonConvert.SerializeObject(payload);
/* 將Payload以POST方式拋送至Apple提供的validationURL */
/* HTTP Request需以Merchant Identity憑證送出 */
/* 驗證成功後,Apple將會回傳Merchant Session物件*/
#region HTTP Web Result
HttpWebRequest httpRequest = (HttpWebRequest)HttpWebRequest.Create(request.ValidationUrl);
httpRequest.Method = WebRequestMethods.Http.Post;
httpRequest.ContentType = "application/json";
httpRequest.ContentLength = strPayLoad.Length;
httpRequest.ClientCertificates.Add(cert);
using (StreamWriter sw = new StreamWriter(httpRequest.GetRequestStream())) {
sw.Write(strPayLoad);
sw.Flush();
sw.Close();
}
HttpWebResponse response = httpRequest.GetResponse() as HttpWebResponse;
using (StreamReader sr = new StreamReader(response.GetResponseStream(), Encoding.UTF8)) {
strResult = sr.ReadToEnd();
sr.Close();
}
#endregion HTTP Web Result
}
catch (Exception ex) {
}
finally {
}
/* 將Merchant Session物件回應至Client端*/
return Json(strResult);
}
///
/// 付款
///
///
///
[HttpPost]
public async JsonResult PaymentProcess(PaymentProcessRequest)
{
// todo 和金流商串接,呼叫你的金流商付款 Api
}
}
```
## 界接過程中遇到的問題
#### 後端請求和蘋果在商戶驗證時,出現 The underlying connection was closed: An unexpected error occurred on a send 錯誤
錯誤的憑證蘋果的 Api gateway 不會回應你,請仔細檢查商戶或域名驗證、請求時帶的憑證,傳遞的 Payload 一定要正確。
#### 和 Cybersource 建立訂單時,出現 Invalid_Request,並指定paymentInformation.fluidData.value 欄位錯誤
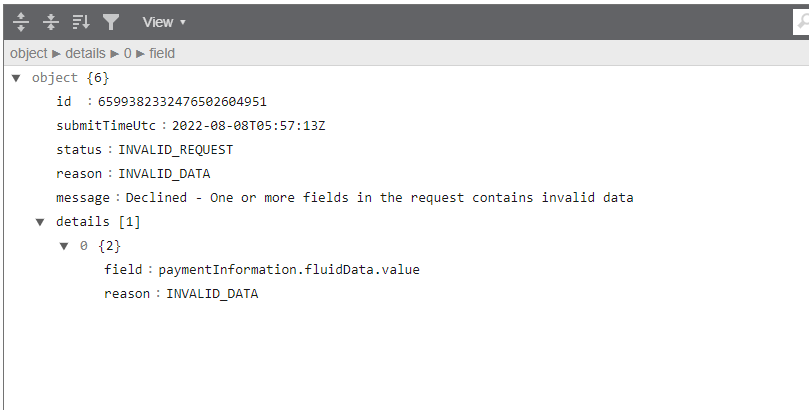
主因 Cybersource沒有提供 Apple Pay 的測試環境,請直接用正式環境,進行開發。
#### 引入 Apple js 時,專案有使用 Typescript,出現 type script error
```
npm install @types/applepayjs --save --dev
```
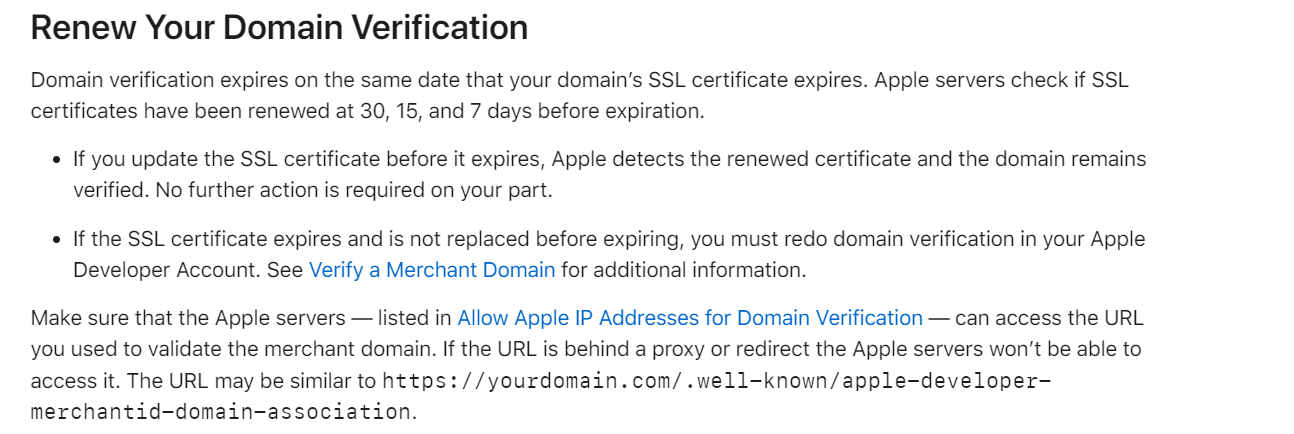
#### 十分重要!!! 憑證效期只有兩年
依據[官方文件](https://developer.apple.com/documentation/apple_pay_on_the_web/maintaining_your_environment)蘋果會通知憑證失效,但兩年請重新做一次 p12 及上傳金流商的 CSR
#### apple pay 按鈕出來的了,但按了沒回應
* 小數位一定要小於兩位
* apple pay js 可能背景做了些什麼,一定得提前載入
#### apple pay 測試卡號
[官方文件](https://developer.apple.com/apple-pay/sandbox-testing/)
## 參考資料
### [Cybersource 交易狀態碼](https://support.cybersource.com/knowledgebase/Knowledgearticle/?code=000001630)
### [Apple Pay 官方網站](https://developer.apple.com/apple-pay/planning/)
### [关于Apple Pay接入和开发,看这一篇就够了](https://zhuanlan.zhihu.com/p/45068888)
### [立即富線上金流 Apple Pay 串接文件](https://www.paynow.com.tw/applepay/PayNow_ApplePay_v1.0.5.pdf)
### [Radial Payments & Fraud Documentation](https://docs.radial.com/ptf/Content/文章分類/payments/apple-pay-web.htm)
### [院長的系統開發大小事](https://ianwu.tw/press/programming/third_party/integrate_apple_pay_on_web.html#%E5%8F%83%E8%80%83%E8%B3%87%E6%96%99)
### [參考 Apple React 範例程式](https://github.com/google-pay/google-pay-button/tree/main/src/button-react)
### [綠界科技 Apple Pay 金流介接 - NET 範例程式](https://github.com/ECPay/ApplePay_NET)
### [站內付 2.0 - 串接文件](https://www.ecpay.com.tw/Content/files/gw_701.pdf)
---
## 關於本文與作者
本文出自 [Mark Ku's Blog](https://blog.markkulab.net/post/apple-pay-on-web-cybersource-integration)
授權條款: [CC BY 4.0](https://creativecommons.org/licenses/by/4.0/) — 轉載或引用請註明作者並附上原文連結
### 關於作者
**[Mark Ku](https://blog.markkulab.net/author/mark-ku)** — Software Solution Provider
- 10+ 年資深軟體工程師,現為 AI 應用 Builder
- 專注大型平台架構設計,從北美電商到AI SaaS訂閱收費系統
- 結合 AI Agent 與自動化,打造高效可演進的產品技術基礎
### 作者開發的免費工具
以下工具皆可免費使用:
- [免費 PDF 簽名工具](https://blog.markkulab.net/tools/pdf-sign): 線上 PDF 簽名工具,瀏覽器內完成手繪、打字、上傳簽名,可拖曳放置、縮放、下載。所有處理都在你的裝置完成,檔案不會上傳。
- [VS Code Refactory](https://blog.markkulab.net/tools/refactory): Refactory 是一款 VS Code 重構擴充套件:34 個重構動作、37 條 code smell 檢查、Code Health 儀表板、18 種語言、534 支測試。懂你的專案慣例:介面放哪、DI 註冊寫在哪、'use client' 該不該加;還會用 git 修改頻率 × 複雜度排出「該先修哪個檔案」,並一鍵把壞味道交給你自己電腦上的 Claude Code 修。免費使用,原始碼不離開你的機器。
- [DB-Kit 資料庫管理工具](https://blog.markkulab.net/tools/db-kit): DB-Kit 是一個用 Tauri + Rust + React 打造的輕量跨平台資料庫管理工具,用單一一致的介面同時管理 MySQL、MariaDB、PostgreSQL、SQL Server、Oracle、SQLite、MongoDB、Redis、Kafka、Elasticsearch 與 RabbitMQ 十一種資料來源:連線密碼以 OS keychain 加密、SSH Tunnel、完整 CRUD、視覺化查詢建構器、多結果集同時顯示、跨連線資料傳輸與比對同步、Excel / CSV 匯入匯出、執行計畫視覺化、ER 圖、排程備份、SQL 壓力測試(p50~p99 延遲百分位)、15 條規則的 SQL 審查、Kafka 訊息瀏覽與監控告警;繁中 / 英文雙語介面,內建 AI 助手(自然語言生成 SQL、AI 審查與調校建議)與命令列工具 dbk。免費開源(MIT),提供 Windows / macOS / Linux 安裝檔。
- [VS Code Super Mermaid](https://blog.markkulab.net/tools/super-mermaid): Super Mermaid 是一款 VS Code 擴充套件:開箱即用的漂亮 Mermaid 圖表,自動上色、即時預覽、滑鼠平移縮放、PNG / SVG 高解析匯出,內建 21 種範本與多種主題。免費開源(MIT)。
- [React Super Mermaid](https://blog.markkulab.net/tools/react-super-mermaid): react-super-mermaid 是一個開源 React 元件庫:一行 即可渲染漂亮的 Mermaid 圖表,內建 colorful / sketch 主題、平移縮放、圖內搜尋、SVG / PNG 高解析匯出。輕量、SSR 安全、完整 TypeScript 型別。免費開源(MIT)。
- [Jira / Confluence Super Mermaid](https://blog.markkulab.net/tools/jira-super-mermaid): Atlassian Forge app:在 Jira issue 與 Confluence 內文直接寫 Mermaid 語法,畫流程圖、時序圖、狀態機與甘特圖。11 種圖表、SVG / PNG 匯出、明暗主題、完整中日韓文字支援。取得 Runs on Atlassian 資格:圖表存在你自己的站台,app 不呼叫任何第三方服務。免費,即將上架 Atlassian Marketplace。
- [Mermaid 線上預覽](https://blog.markkulab.net/tools/mermaid-preview): 在瀏覽器裡寫 Mermaid、即時看圖,整張圖表壓進網址就能分享。免註冊、不上傳伺服器,相容 mermaid.live 的分享連結。
- [React Intl Phone Number](https://blog.markkulab.net/tools/react-intl-phone-number): react-intl-phone-number 是一個開源 React 元件:framework-agnostic、不依賴 antd,提供 E.164 進出、可搜尋國旗 / 國碼下拉、可配置驗證等級(strict / mobile-strict / loose)、可主題化 CSS 與 i18n,電話邏輯由 google-libphonenumber 驅動。輕量、完整 TypeScript 型別。免費開源(MIT)。
- [Uptime Kuma Cluster](https://blog.markkulab.net/tools/uptime-kuma-cluster): 把單機版 Uptime Kuma 改造成高可用叢集:OpenResty + Lua 智慧負載平衡、MariaDB 共享狀態、健康檢查與自動 Failover,附叢集管理 REST API,一行 Docker Compose 啟動。免費開源(MIT)。
- [特教專案](https://blog.markkulab.net/education): 為特殊教育學生製作的學習教材
### 每日 Podcast
- [科技新鮮事](https://blog.markkulab.net/category/tech-news): 每日精選 AI 與科技趨勢,透過語音摘要快速掌握最新技術動態,涵蓋 AI 應用、軟體架構、DevOps 與工程實戰。 — RSS: https://blog.markkulab.net/feed.xml
- [AI股市蝦聊](https://blog.markkulab.net/category/ai-stock-chat): 每個交易日用 AI 分析台股盤勢,以雙人對話聊當天的盤中觀察與隔日預測。 — RSS: https://blog.markkulab.net/ai-stock-chat/feed.xml
### 電子報
[訂閱電子報](https://blog.markkulab.net/subscribe) — 第一時間收到新文章通知,無垃圾信、隨時可取消訂閱。