---
title: "Apple Pay on Web + Cybersource Integration Notes"
description: "A Complete Guide to Integrating Apple Pay + Cybersource on the Web: Apple Developer Portal Setup, P12 Certificate Generation, Frontend PaymentRequest API, and .NET MVC Backend Merchant Validation."
canonical_url: "https://blog.markkulab.net/en/post/apple-pay-on-web-cybersource-integration"
author: "Mark Ku"
author_url: "https://blog.markkulab.net/en/author/mark-ku"
site: "Mark Ku's Tech Notes"
date_published: "2022-08-11 01:01:01 +0800"
category: "Payment"
tags: ["apple-pay", "cybersource", "payment", "dotnet", "javascript"]
language: "en"
license: "CC BY 4.0"
license_url: "https://creativecommons.org/licenses/by/4.0/"
attribution: "when reusing or quoting, credit the author and link back to the original"
---
# Apple Pay on Web + Cybersource Integration Notes
## Context
For work, I needed to integrate Apple Pay into e-commerce websites for the US and German markets.
## How Apple Pay Works
[Reference: Joeman's video](https://www.youtube.com/watch?v=ksFXEY6P_ec)
## How Many People in the US Use Apple Pay
[Reference: oberlo website](https://www.oberlo.com/statistics/how-many-people-use-apple-pay)
## Differences Between Apple Pay / Google Pay and Third-Party Payments
The biggest difference between Apple Pay/Google Pay and third-party payment providers is that third-party gateways help handle accounting issues with banks, whereas Apple Pay/Google Pay do not.
From Apple's official [success stories](https://developer.apple.com/apple-pay/payment-platforms/), you can see that the companies that integrate directly with Apple Pay and banks are quite large. Most others go through a Payment Provider. My guess is that most banks don't have standardized processes, and regulations differ by country. If data exchange with a bank fails, it creates a lot of accounting problems to resolve, and handling these issues is beyond the means of a typical company.
## How to Initiate Payments on the Web
In the early days, each browser had its own JS library for implementation. Later, the W3C defined a standard specification for browser payments, which is now implemented in Safari and Chrome as the PaymentRequest API.
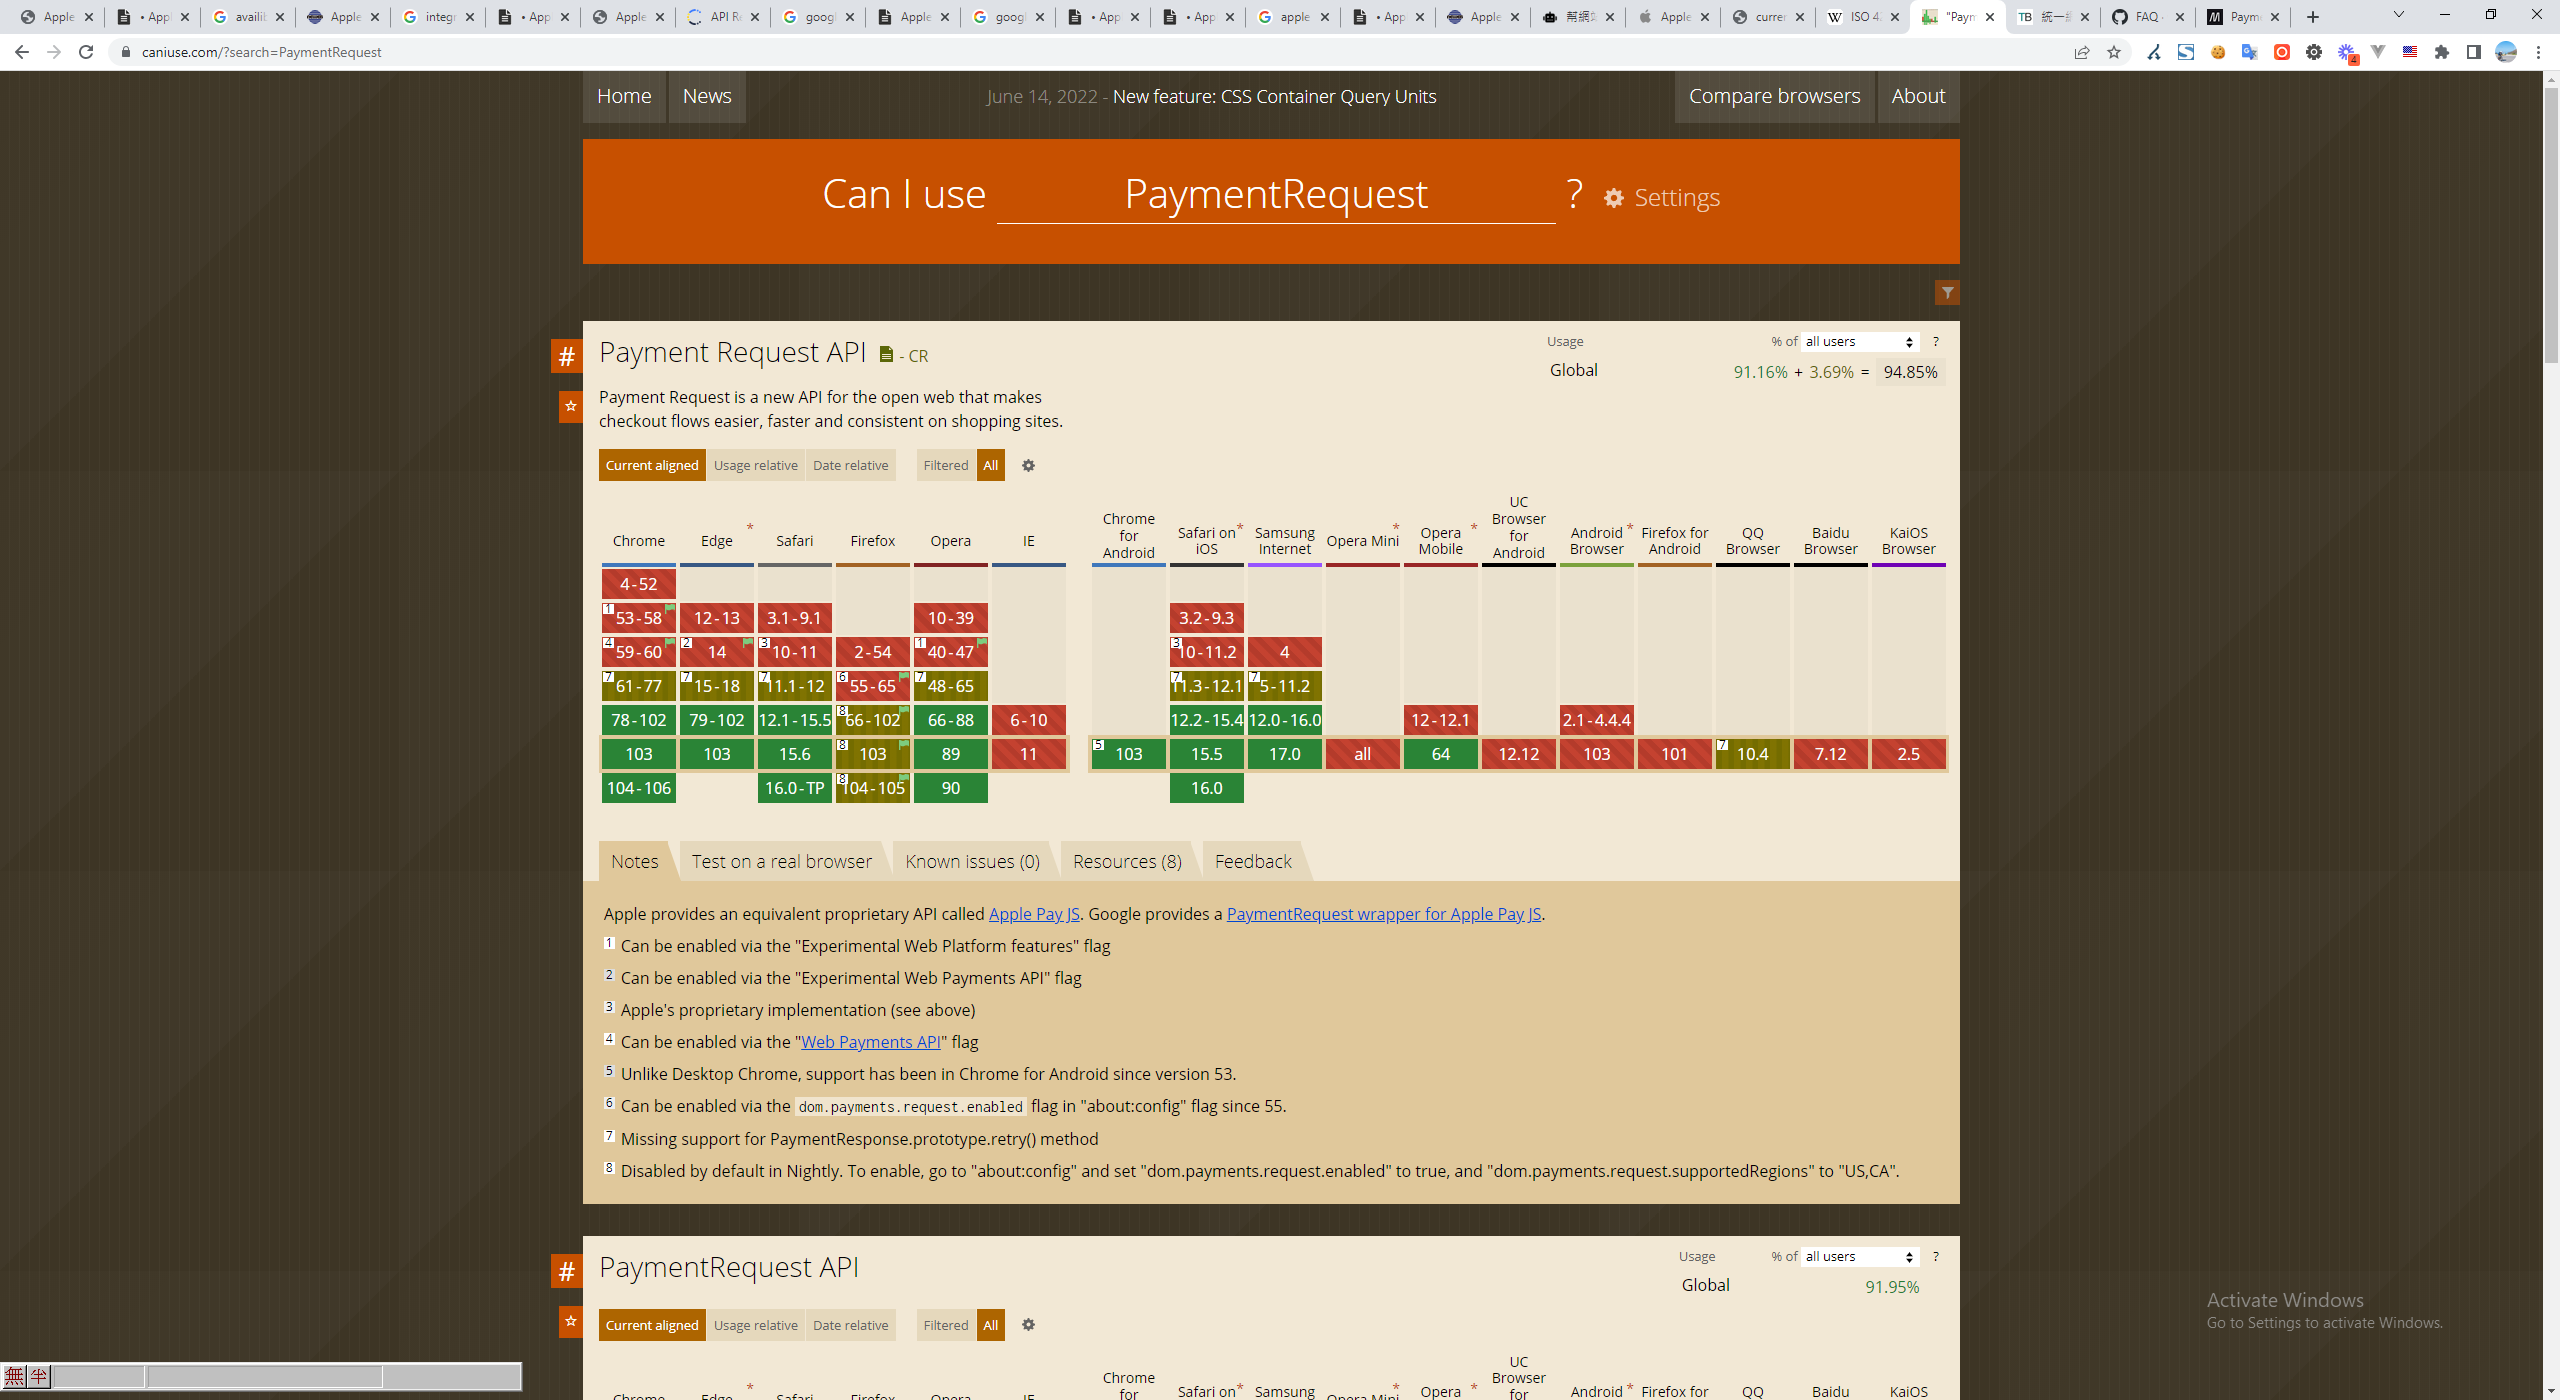
(Compatibility)
* Based on testing, `window.PaymentRequest` requires HTTPS. Otherwise, the object cannot be found in the browser.
* Apple Pay only works on Safari (desktop and mobile).
## Prerequisites Before Starting Integration
* The payment page needs an HTTPS environment (dev, prod).
* An Apple computer and an iPhone.
* The merchant must have an Apple Developer account ($99 USD / Year).
* The merchant domain must be verified in the developer portal.
* Upload the payment processor's CSR and the developer's CSR to the Apple developer portal.
* The Apple Pay button and related logos must comply with [Apple's UI guidelines](https://developer.apple.com/apple-pay/marketing/).
## Apple Pay Payment Flow
User presses the payment button > Frontend calls a backend API to validate the merchant with Apple and create a transaction session, obtaining a client-side token > The iPhone then prompts the user for Face ID or Touch ID verification > Frontend calls your own backend API to request order creation with the payment processor.
## First, Configure and Obtain Certificates from the Apple Developer Portal Before Coding
### Create a Merchant ID
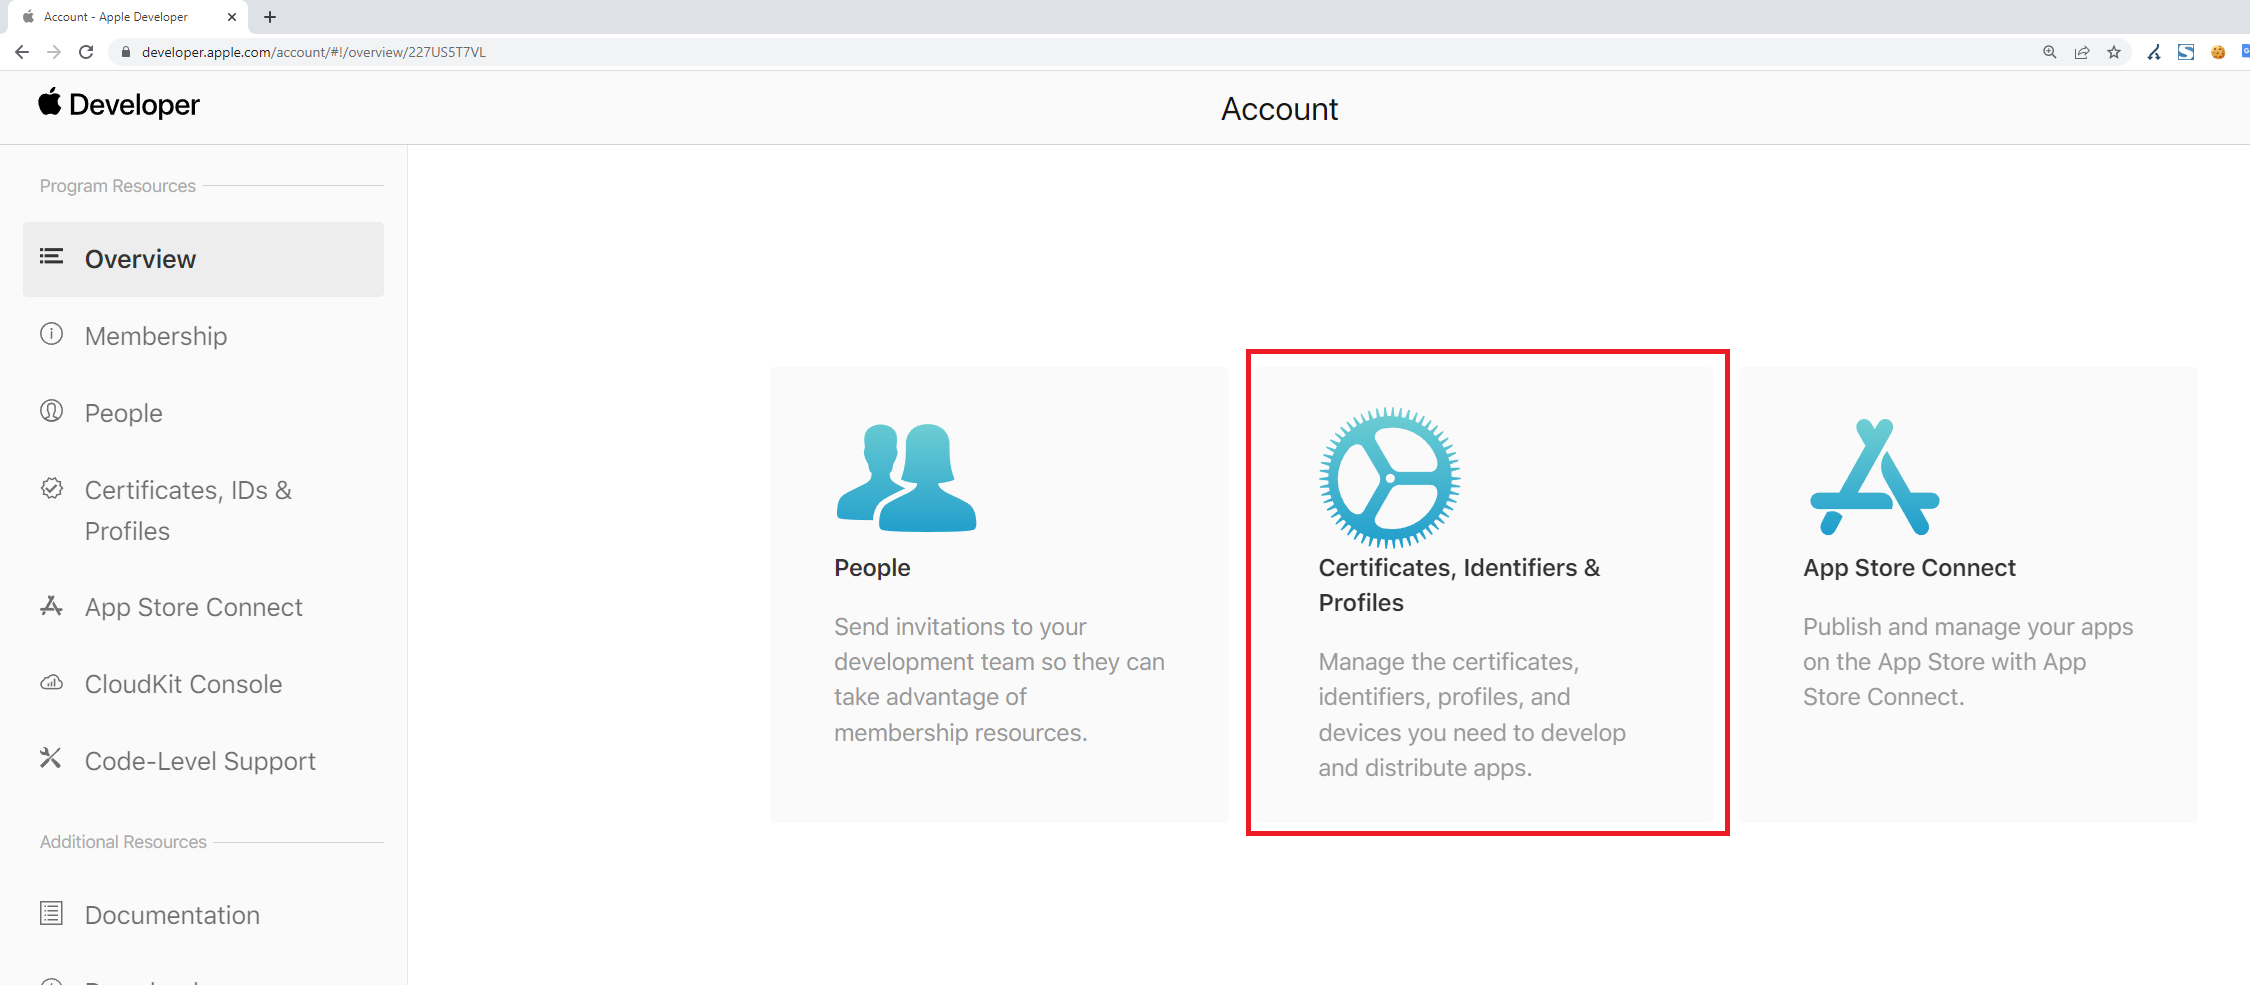
#### Go to the [Apple Developer Portal](https://developer.apple.com/account) > Certificates, Identifiers & Profiles
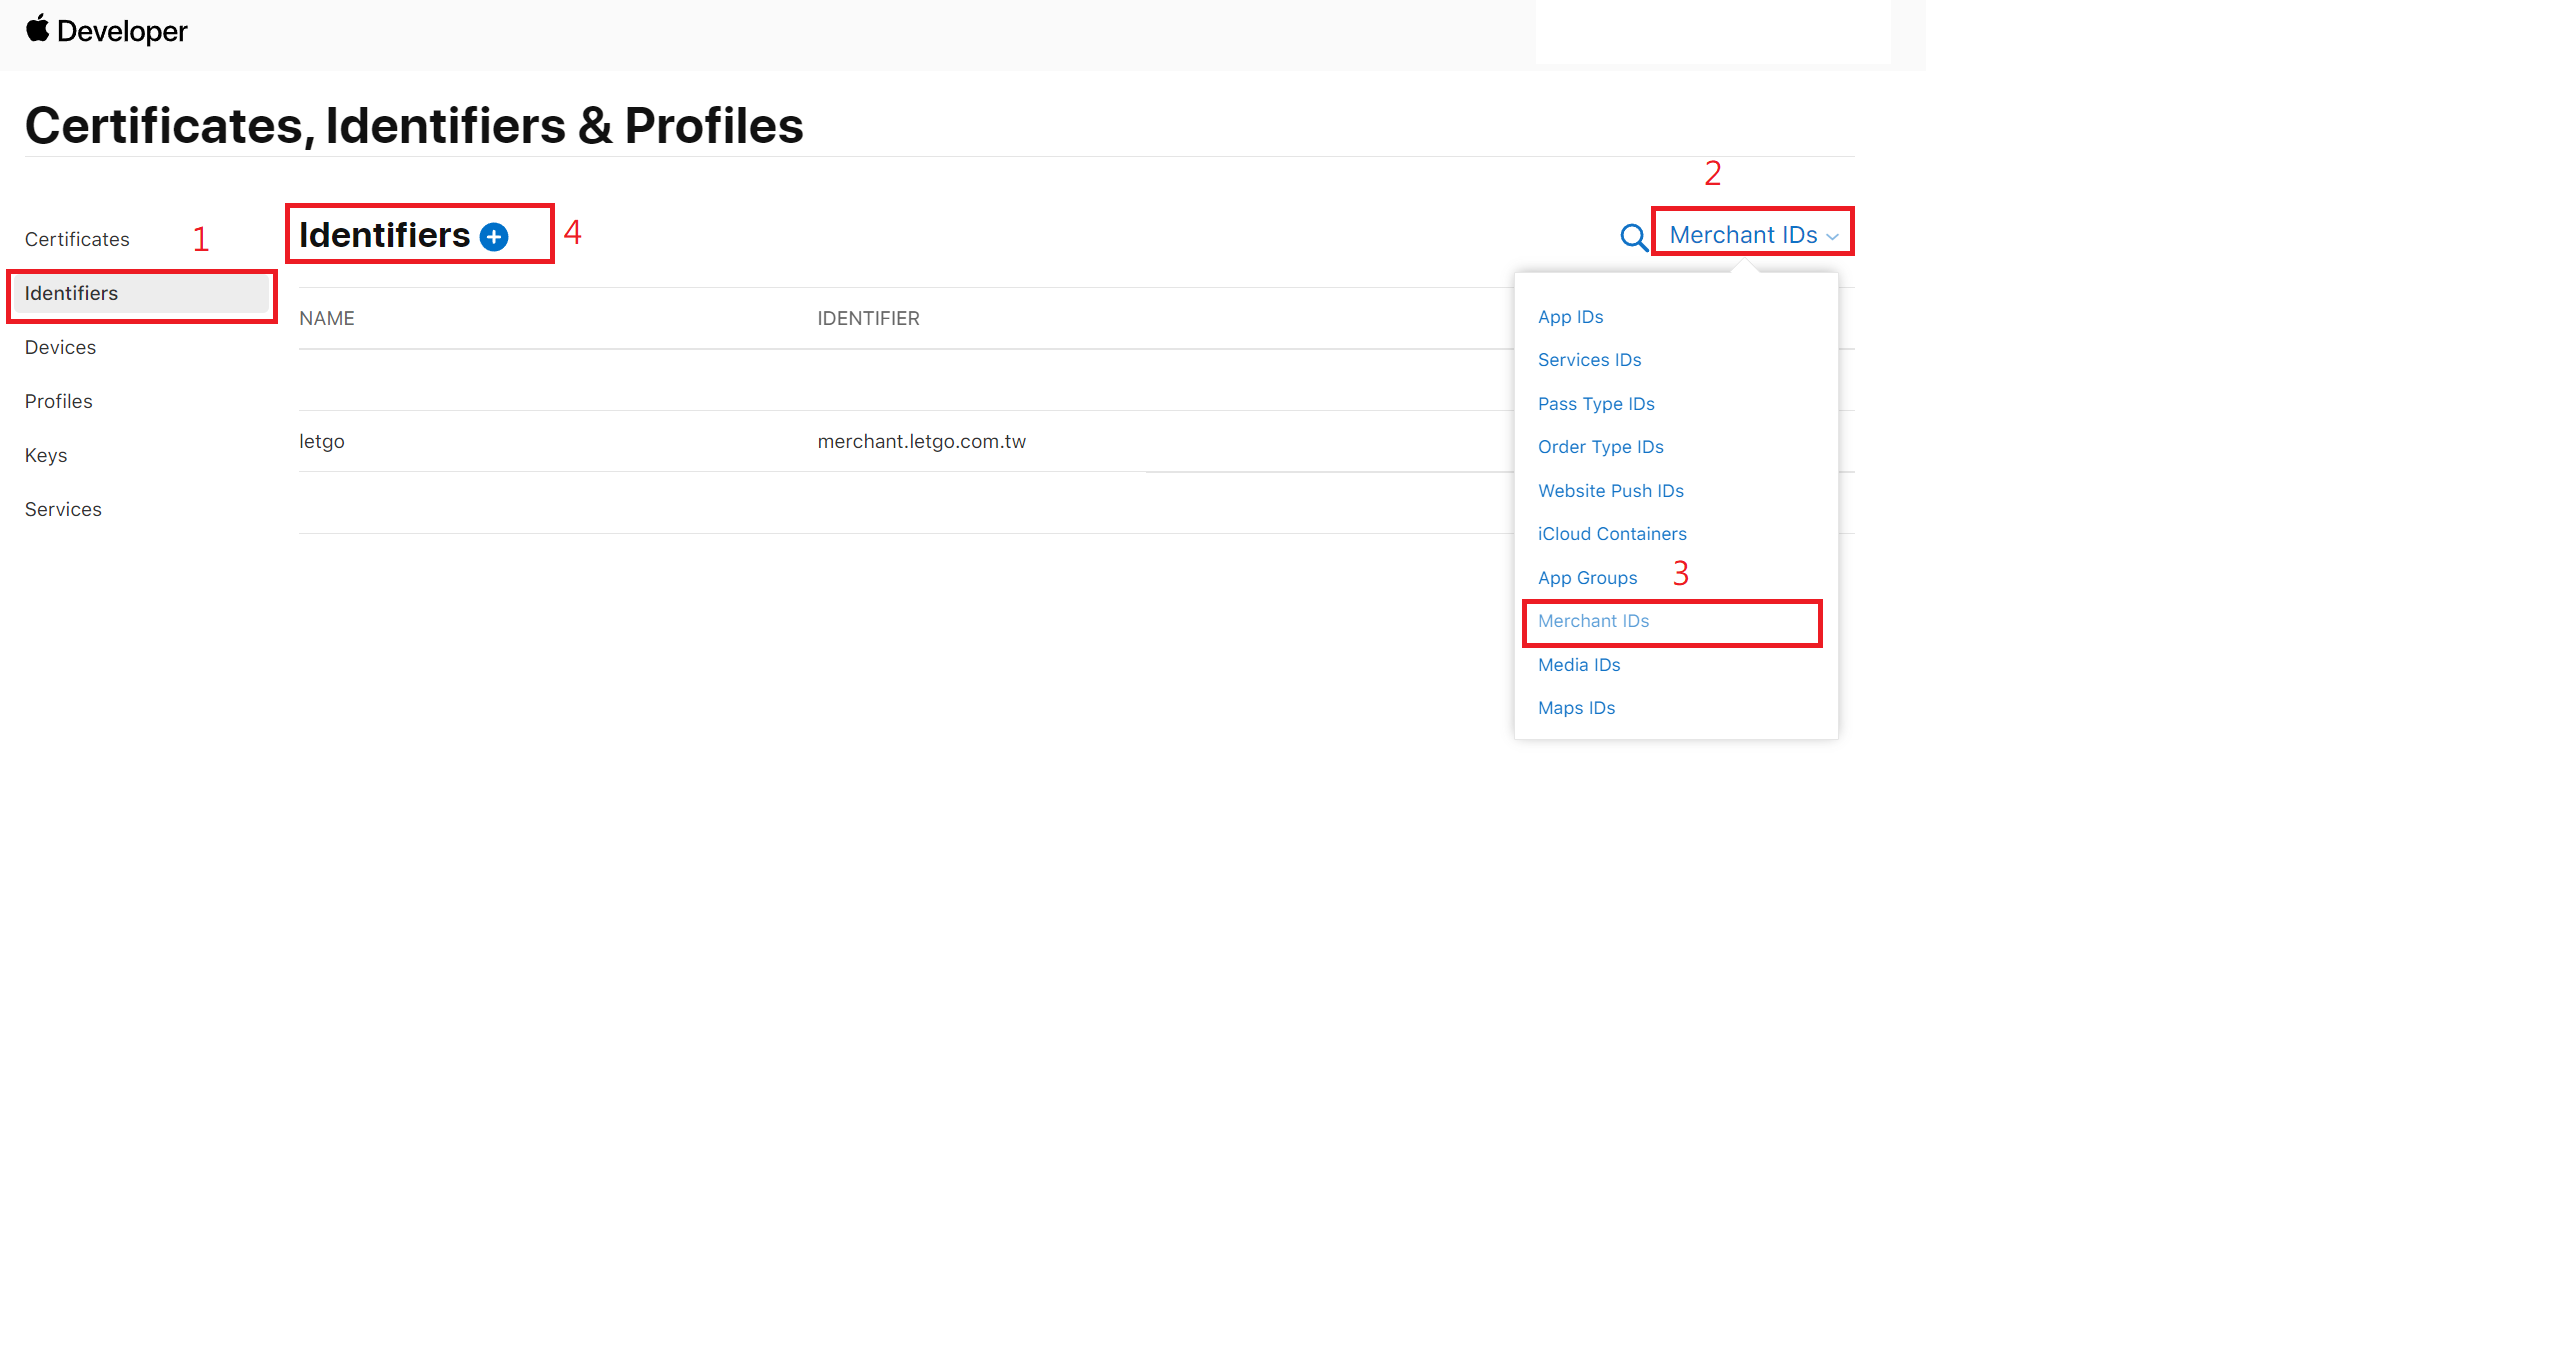
#### Identifiers > App IDs > Merchant IDs > Identifiers +
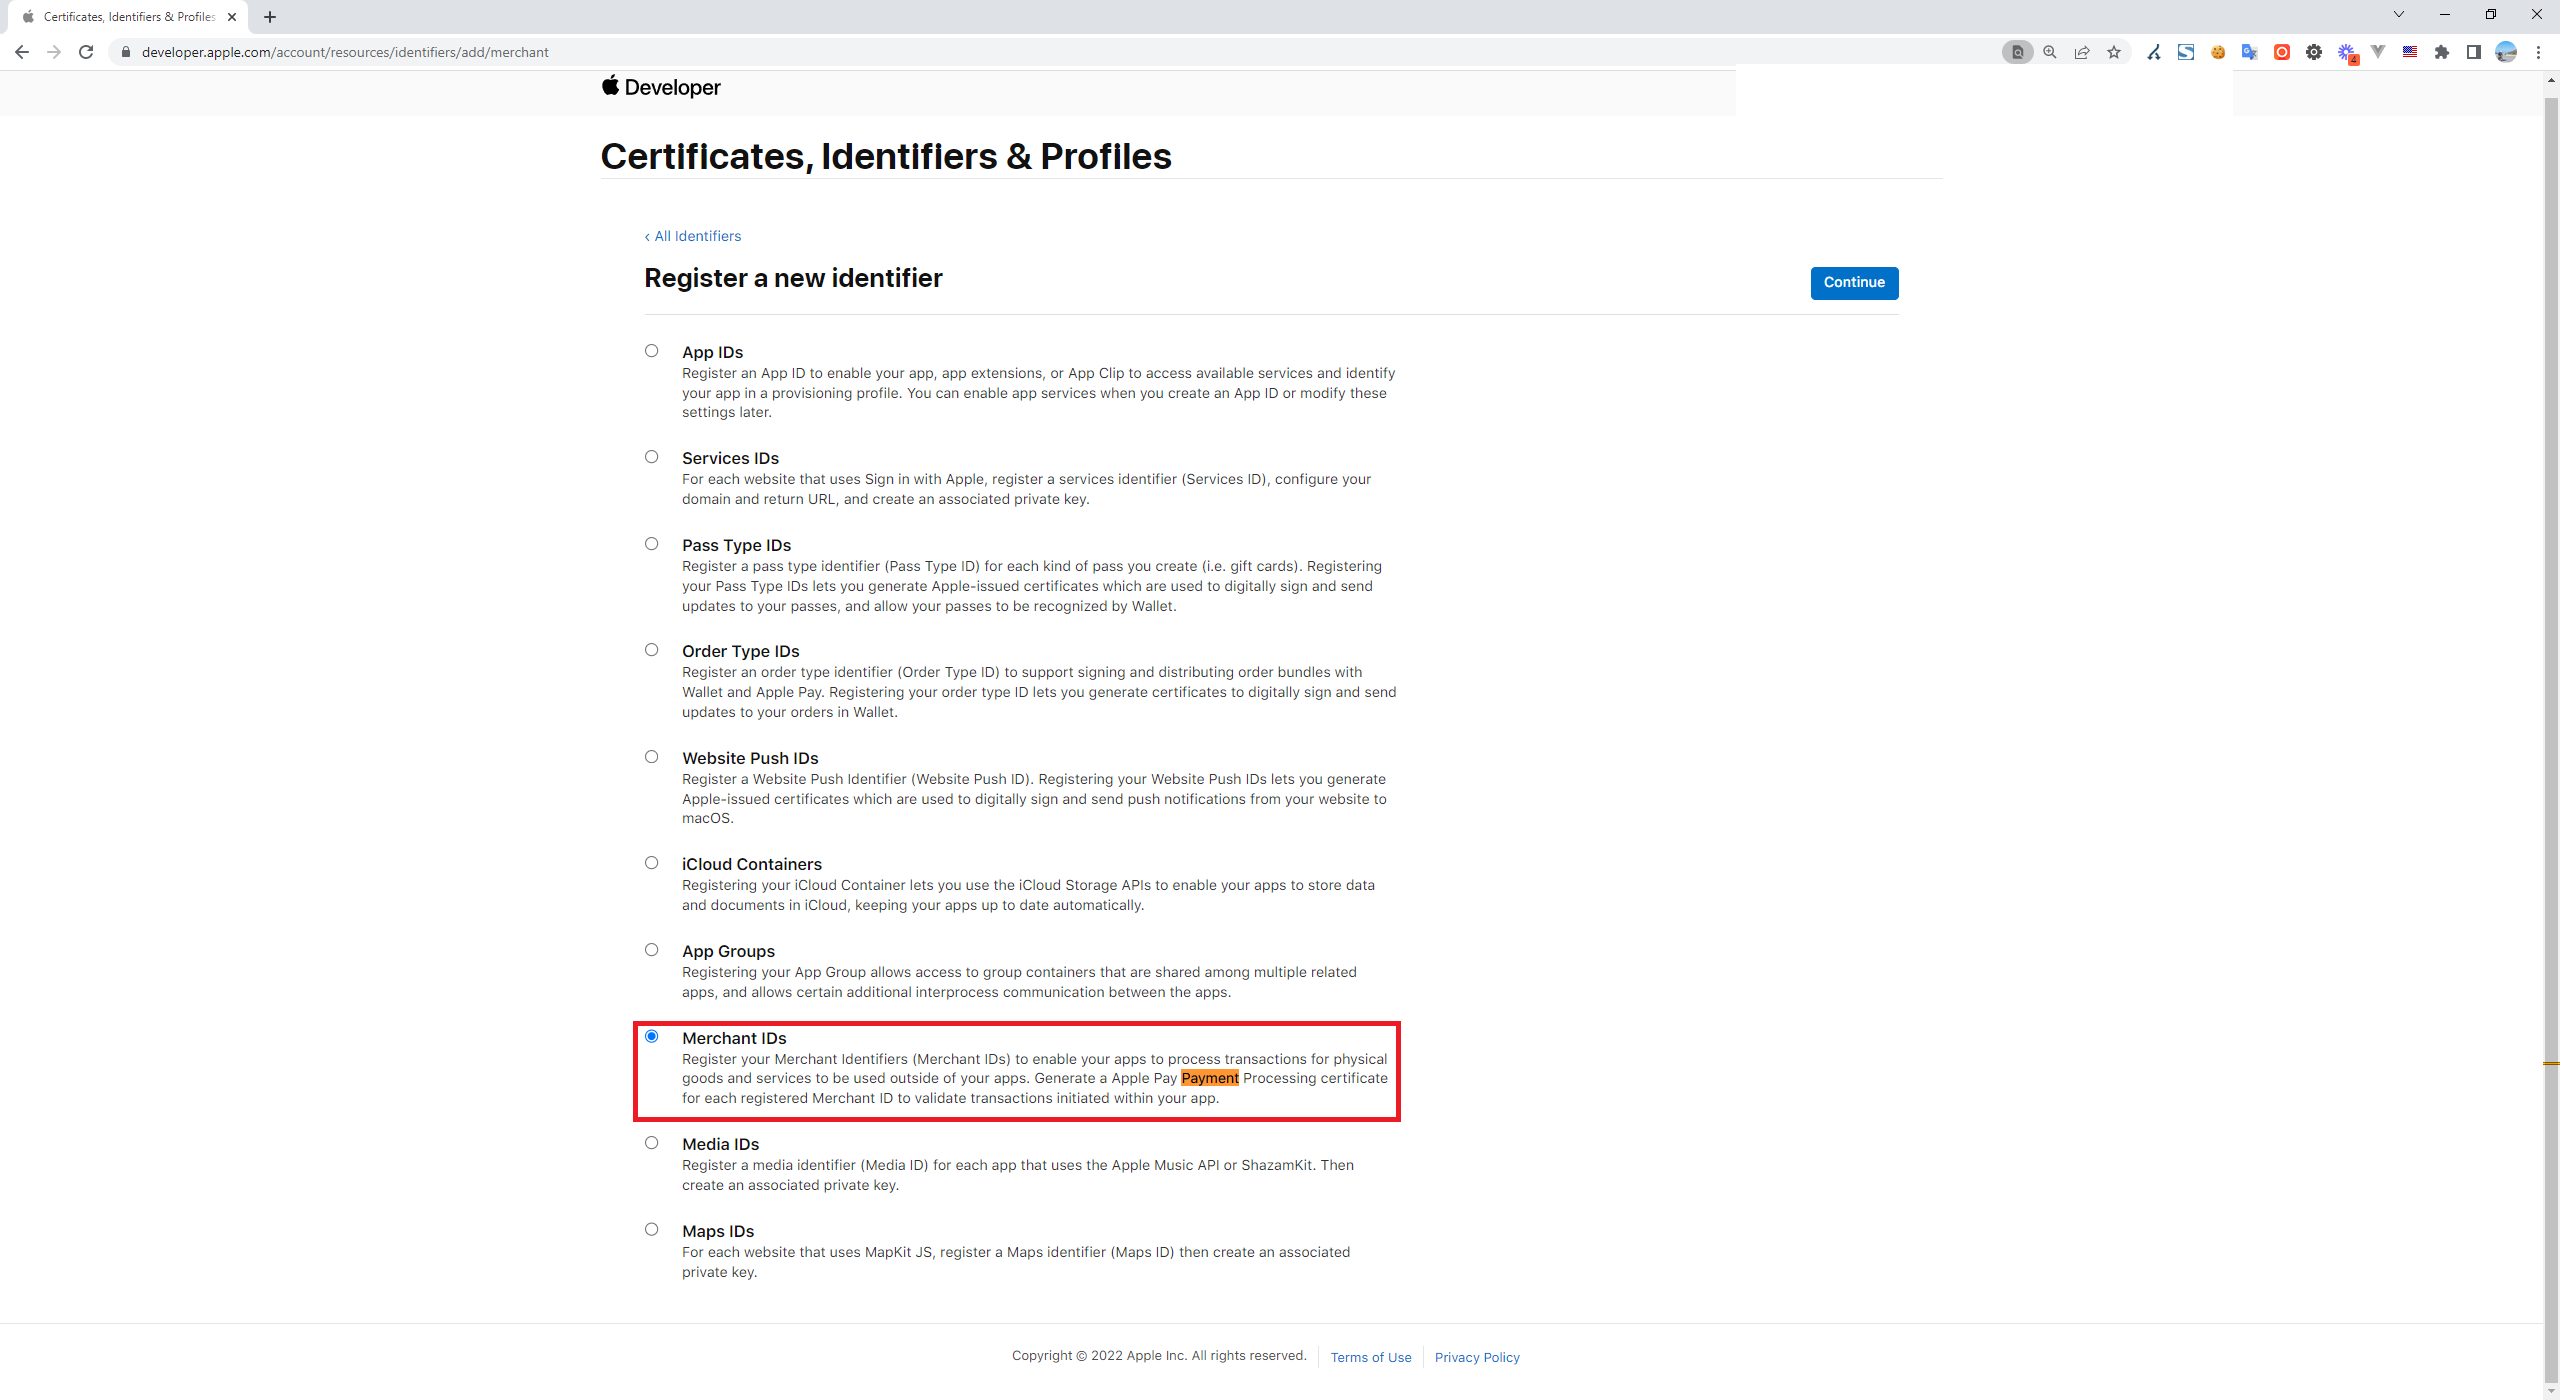
#### Merchant IDs > Continue
#### The Name can be anything. Enter the merchant identifier (official recommendation: {domainName} + {appName}). Make sure to save this, as it will be needed for the integration.
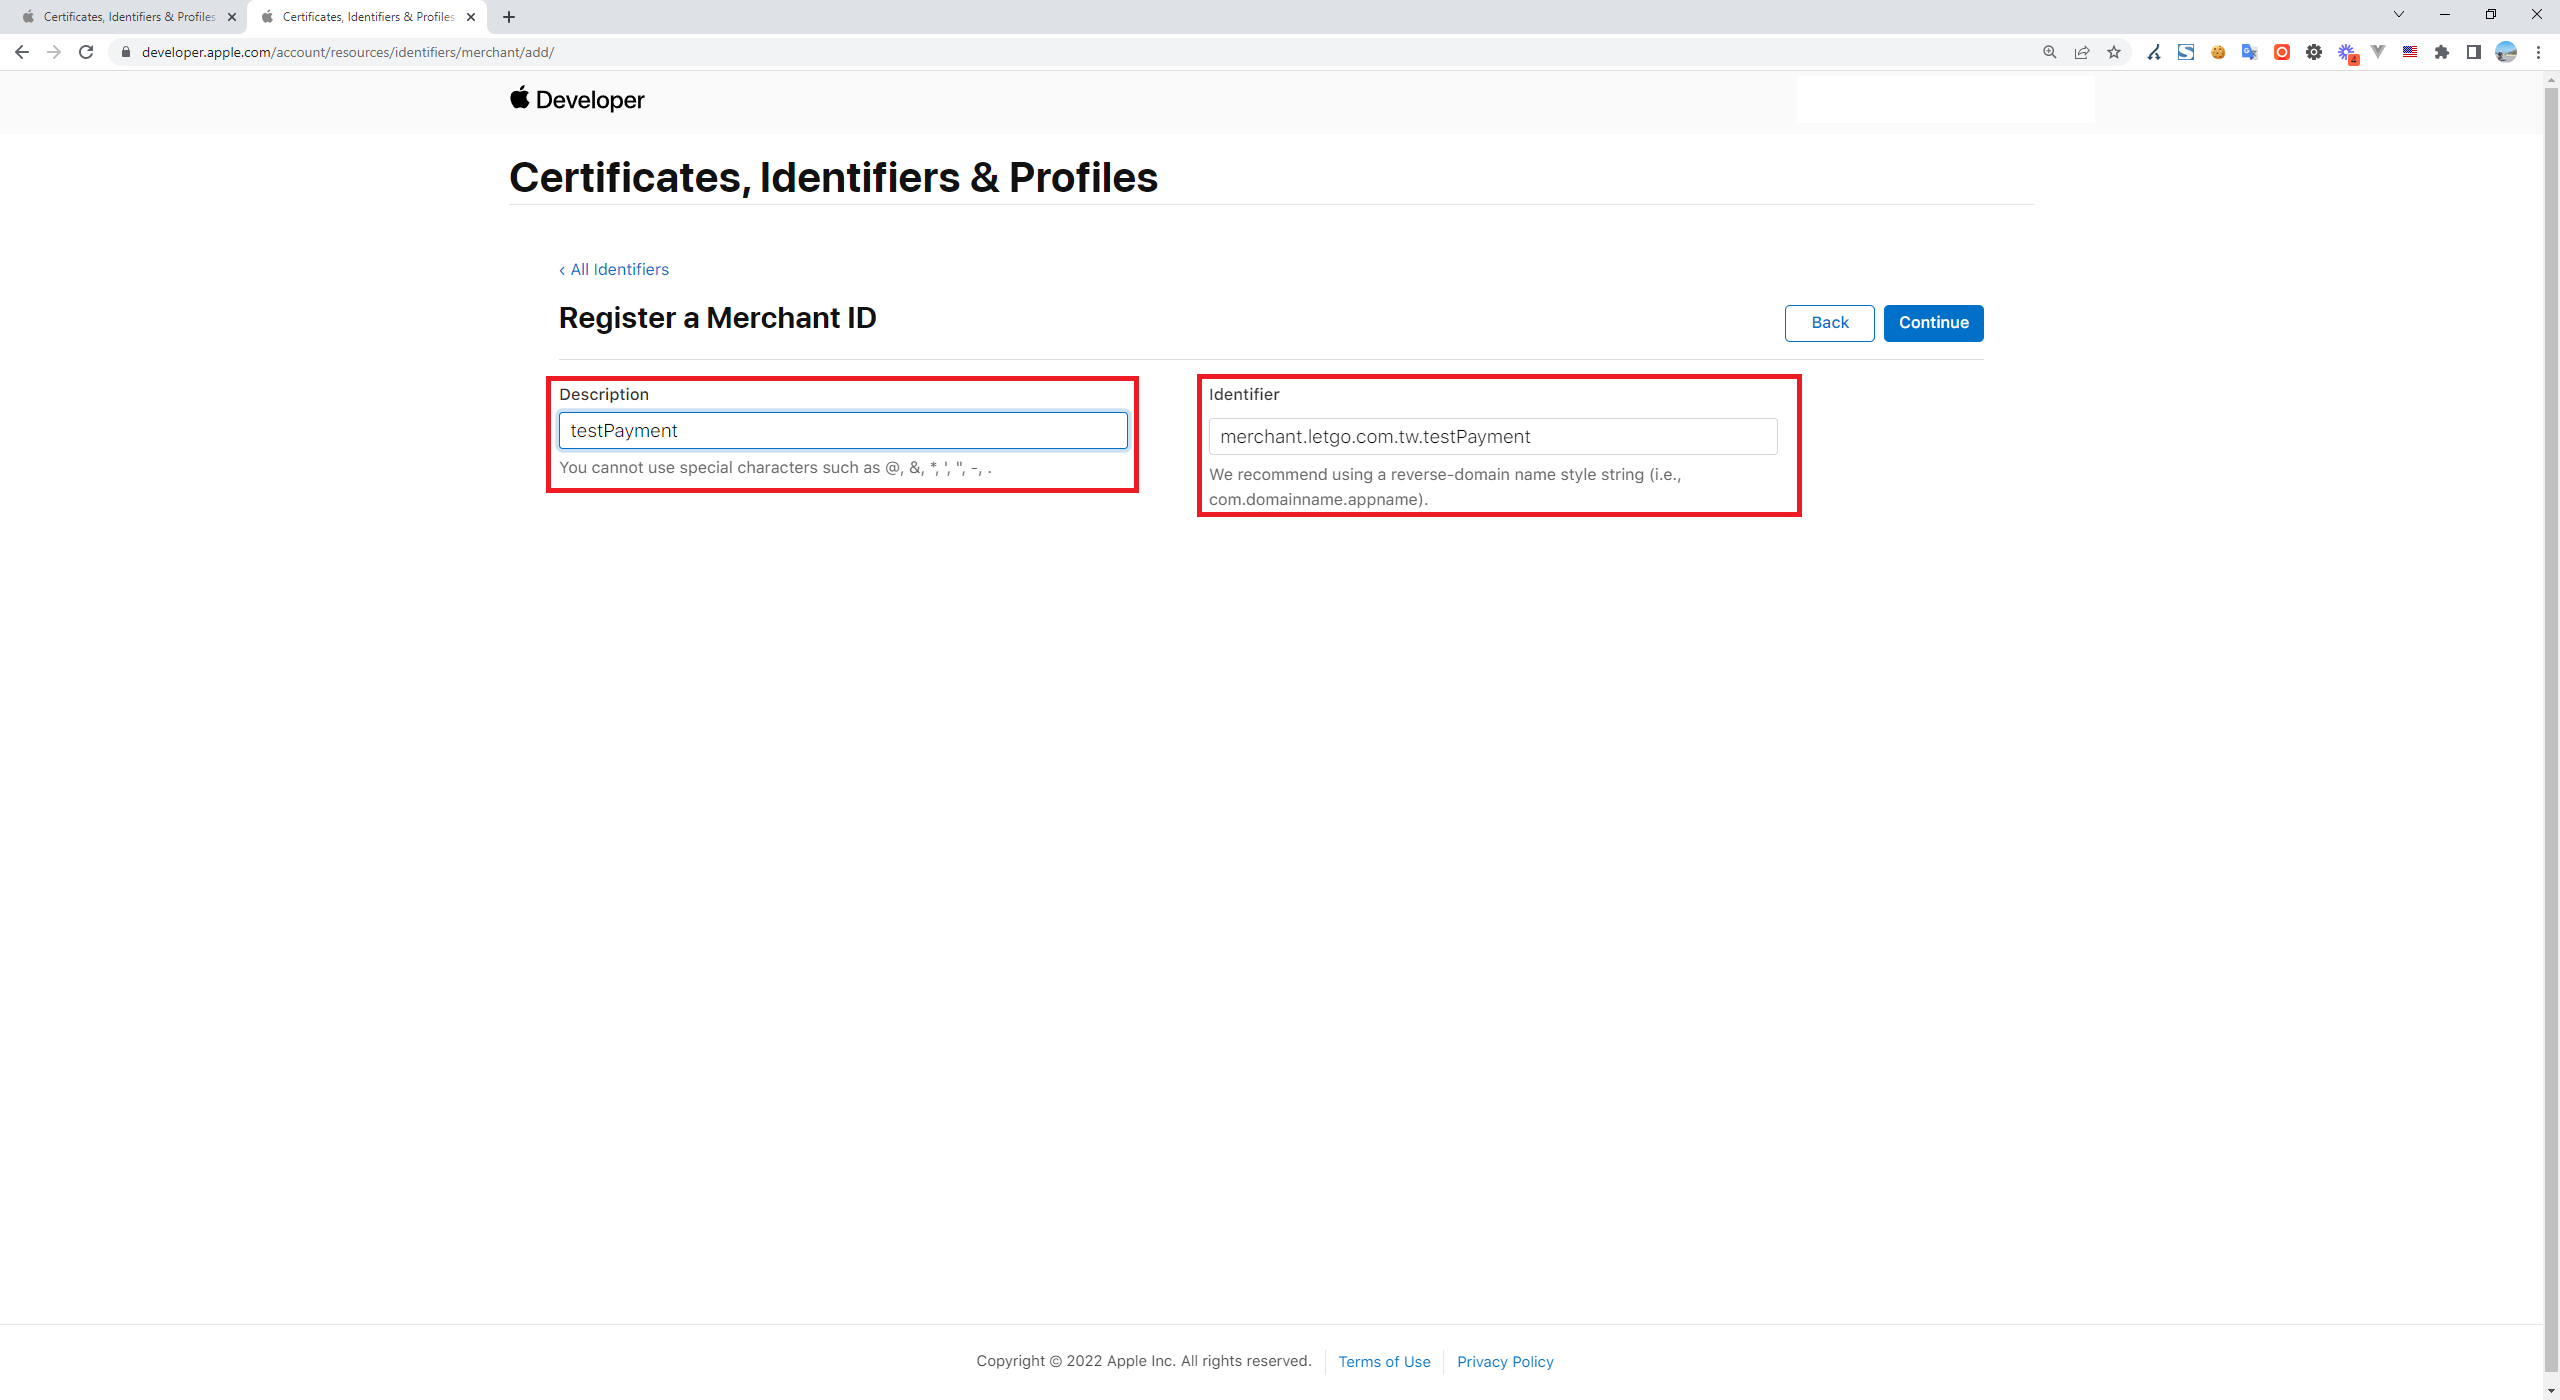
### Next, from this screen, we can see that we need to prepare the following three items before writing the payment code
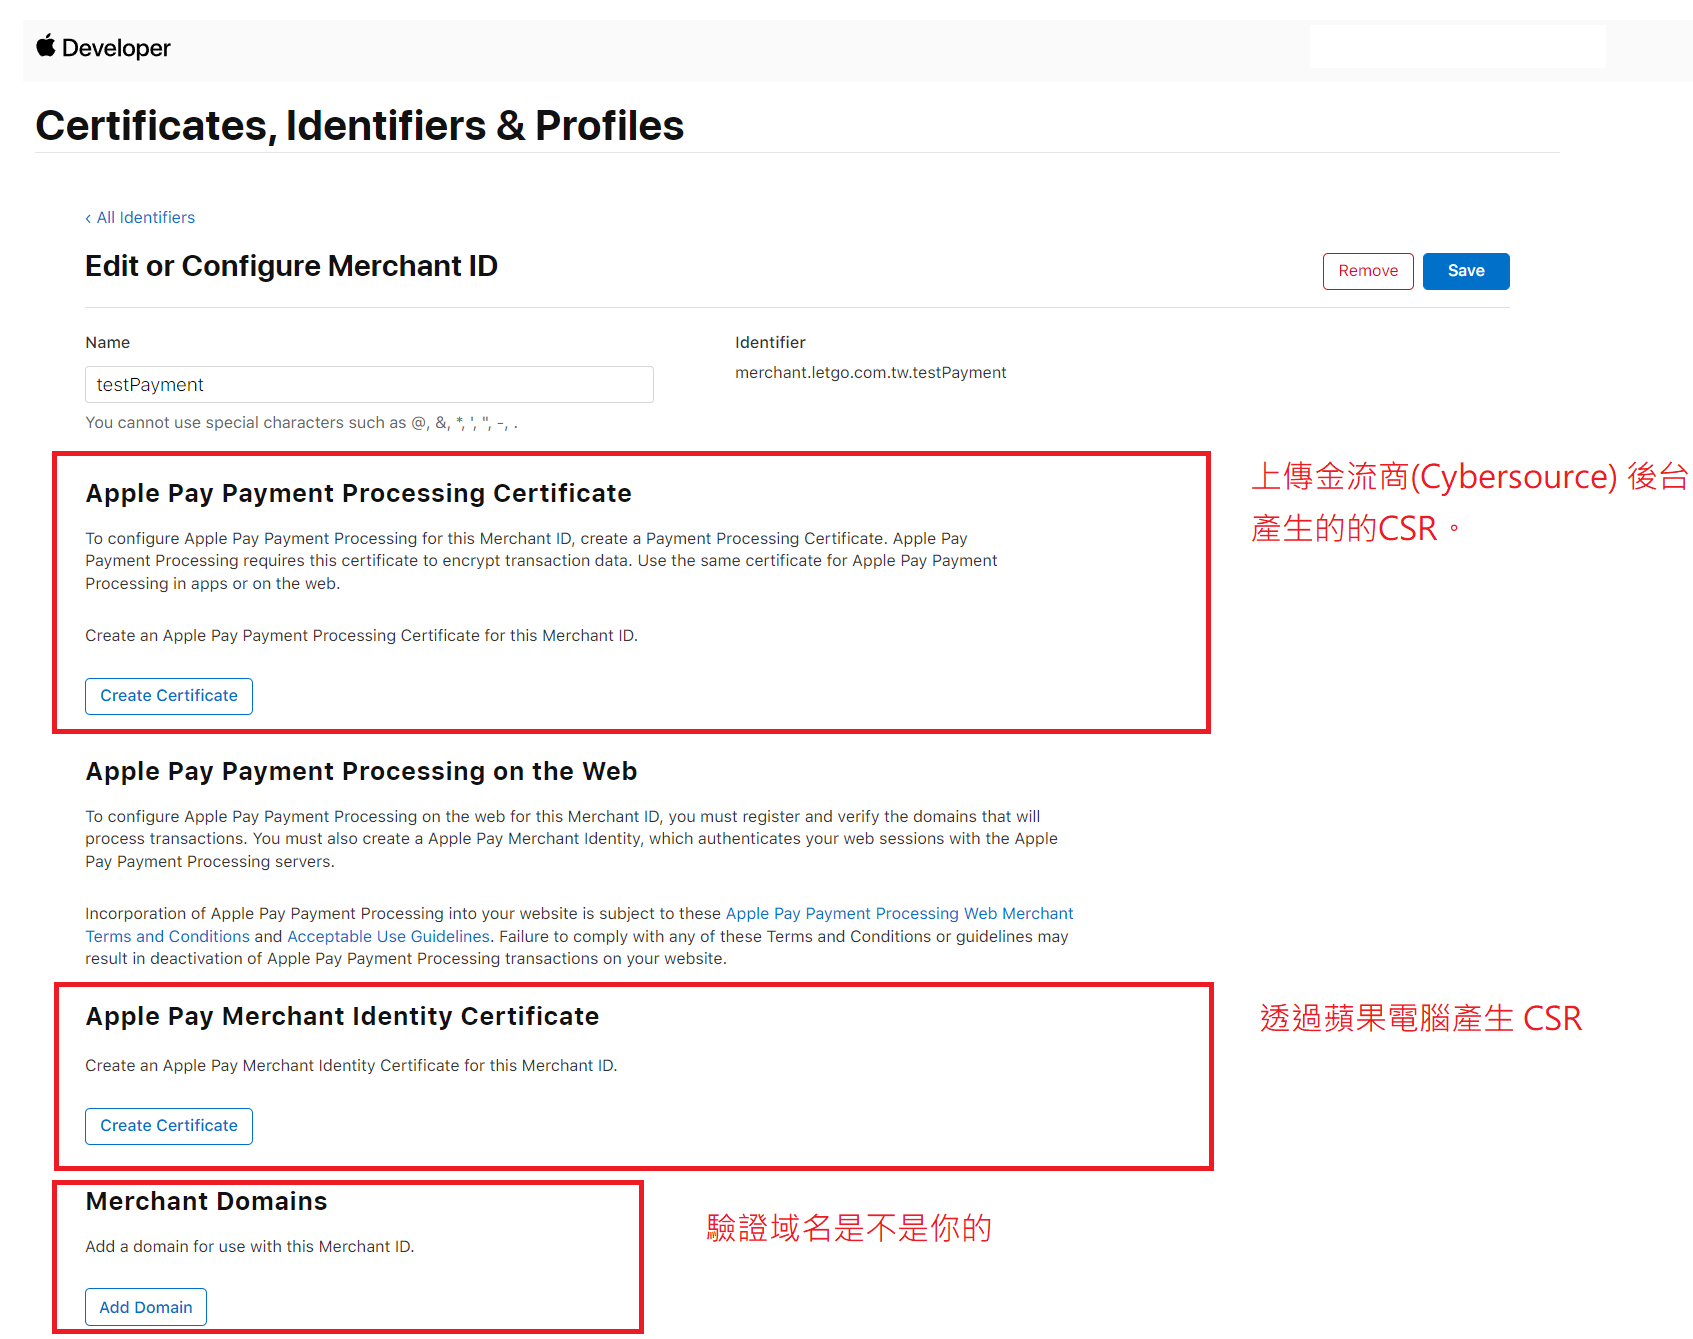
#### 1. Upload the Payment Processor's CSR (Cybersource)
##### Cybersource's BackOffice > Payment Configuration > Apple Pay > Configure > Enter Apple Merchant ID > Generate New Certificate Signing Request > Download the certificate > Upload it to the Apple developer portal under "Apple Pay Payment Processing on the Web".
#### 2. Generate a CSR on your Mac and create a certificate in the Apple developer portal
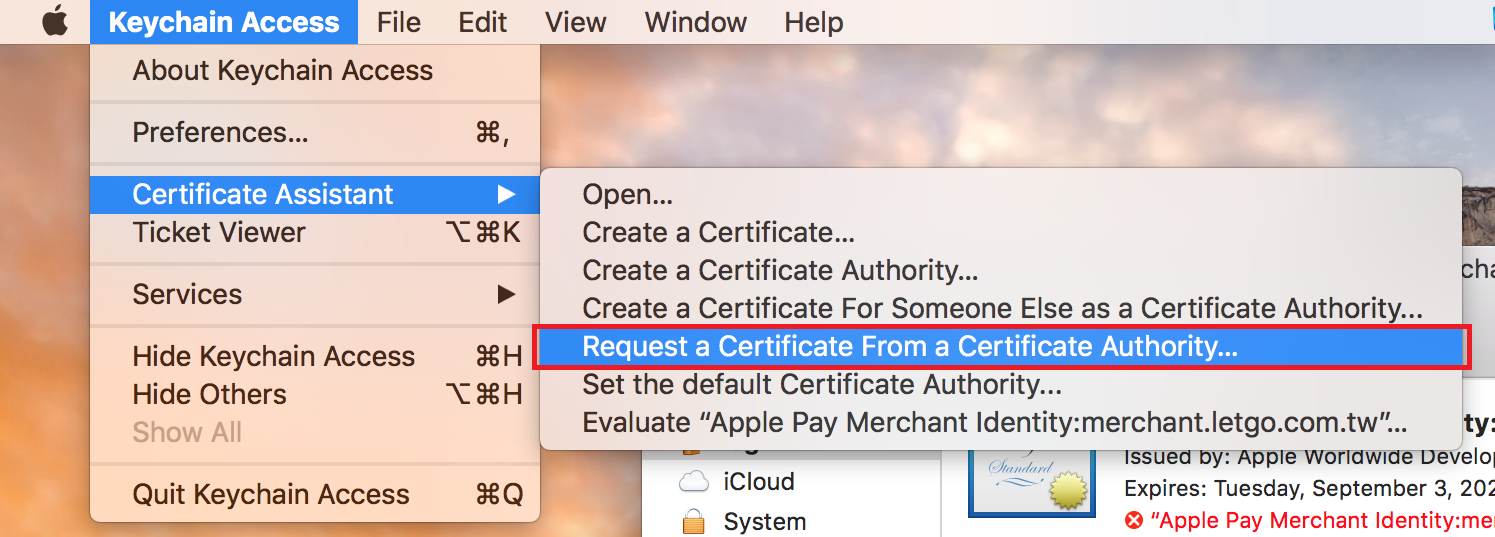
##### Keychain Access > Request a Certificate from a Certificate Authority...
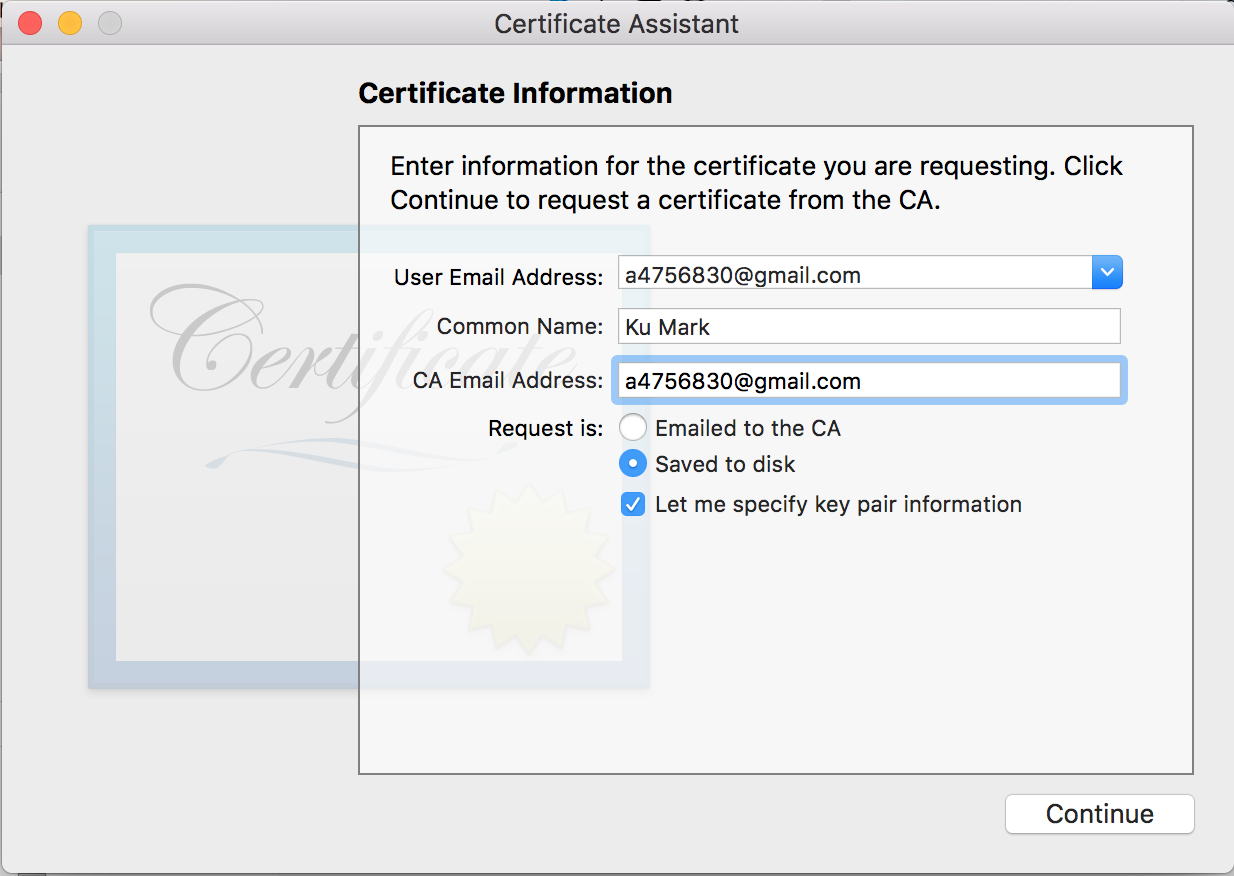
##### 2. Enter CA-related information
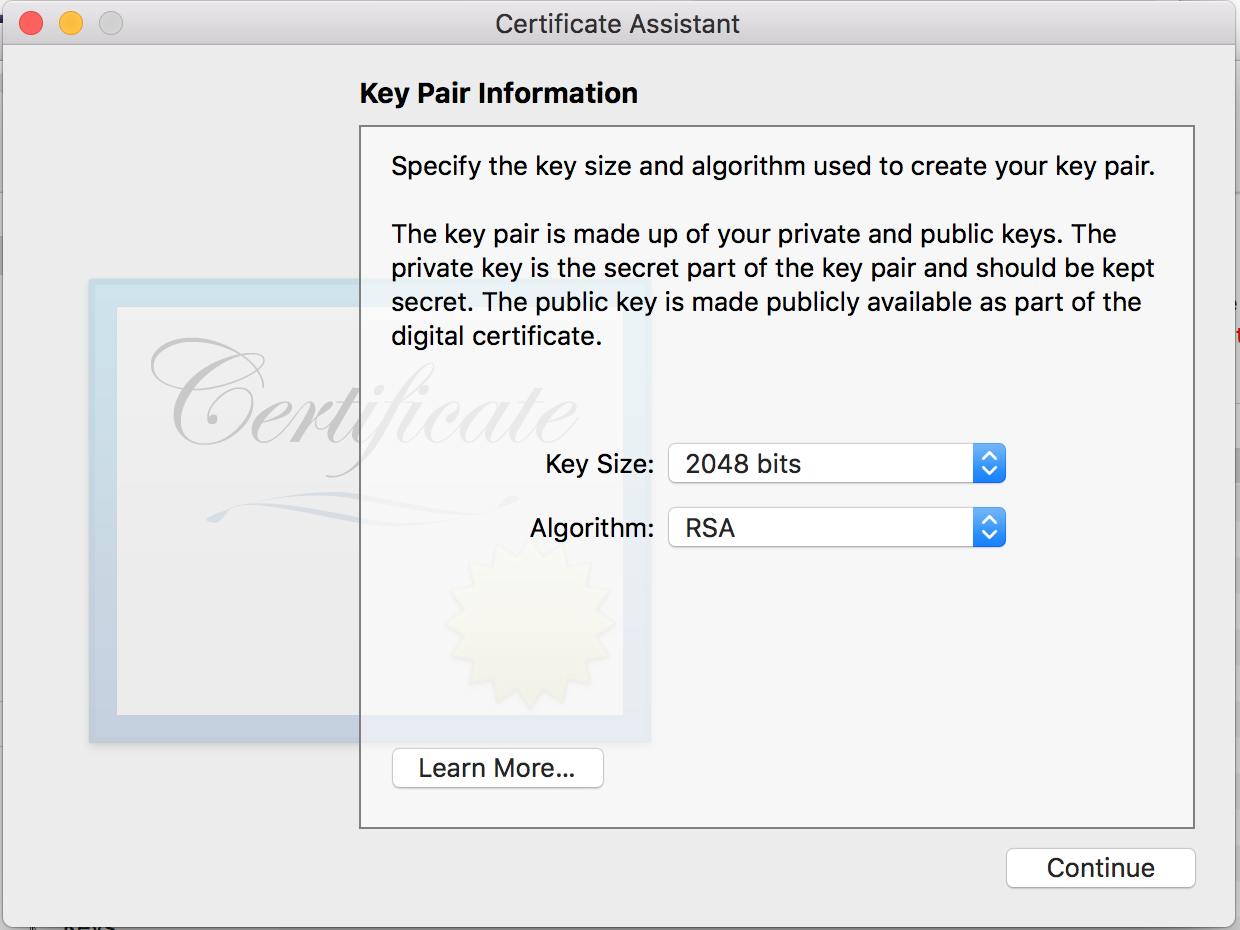
##### 3. Choose the certificate format (the default, RSA, is fine)
##### 4. Go to the developer portal > Apple Pay Merchant Identity Certificate > Upload the CSR you just generated
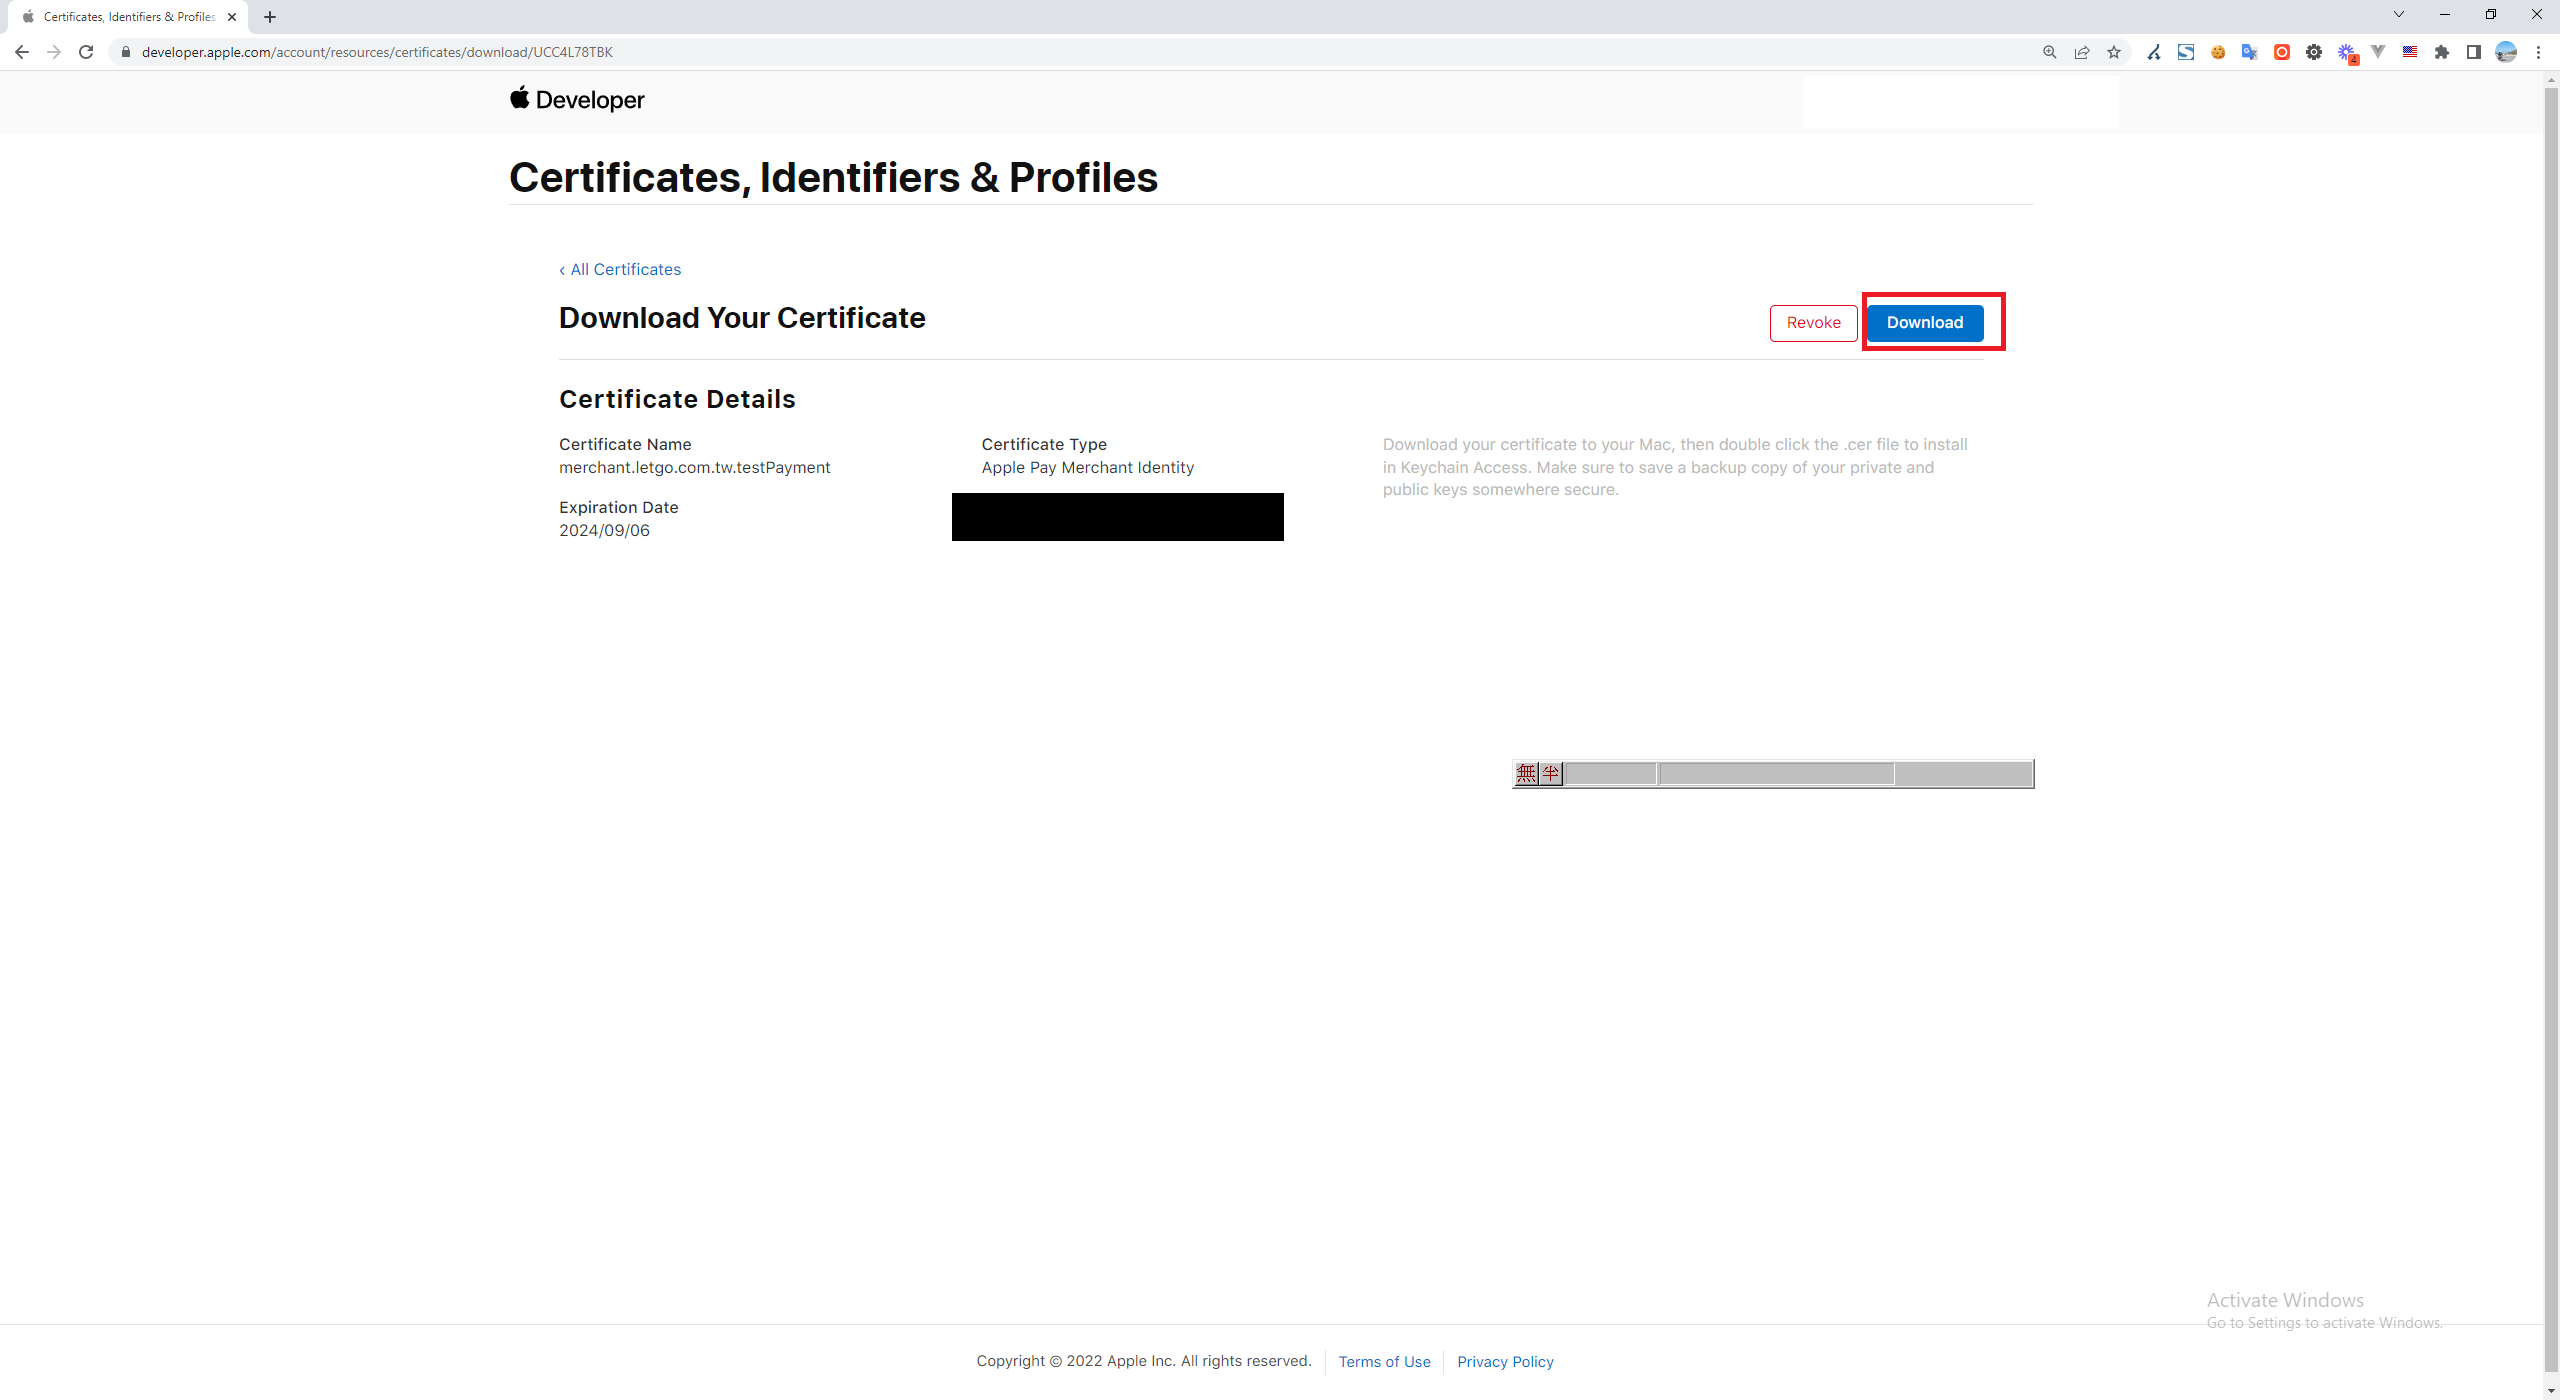
##### 5. After uploading, a "Download" button will appear. Click it to download the certificate to your computer. This certificate is needed to make requests to Apple for merchant validation. However, the .NET X509 component cannot use .cer files, so you need to convert it to a .p12 file using a Mac.
##### 6. Generate a .p12 file for the backend merchant validation API
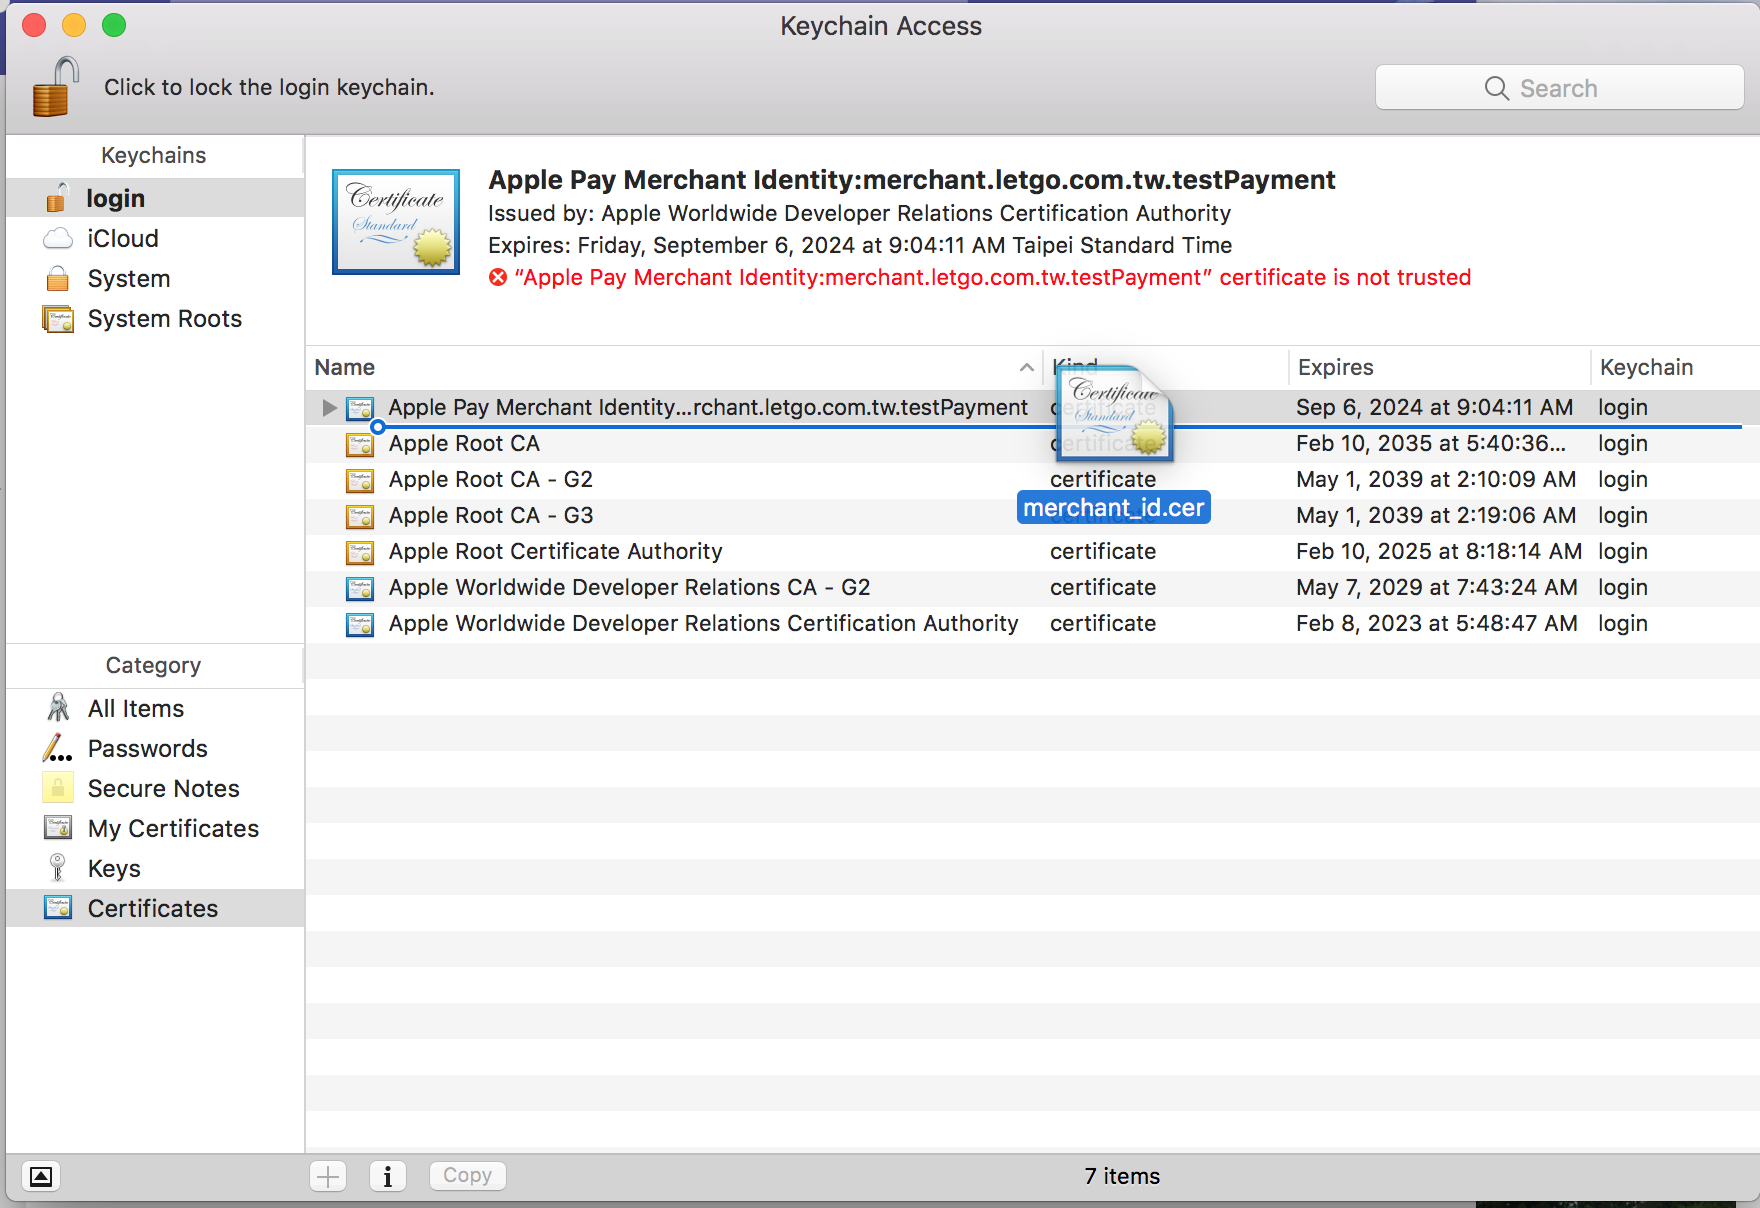
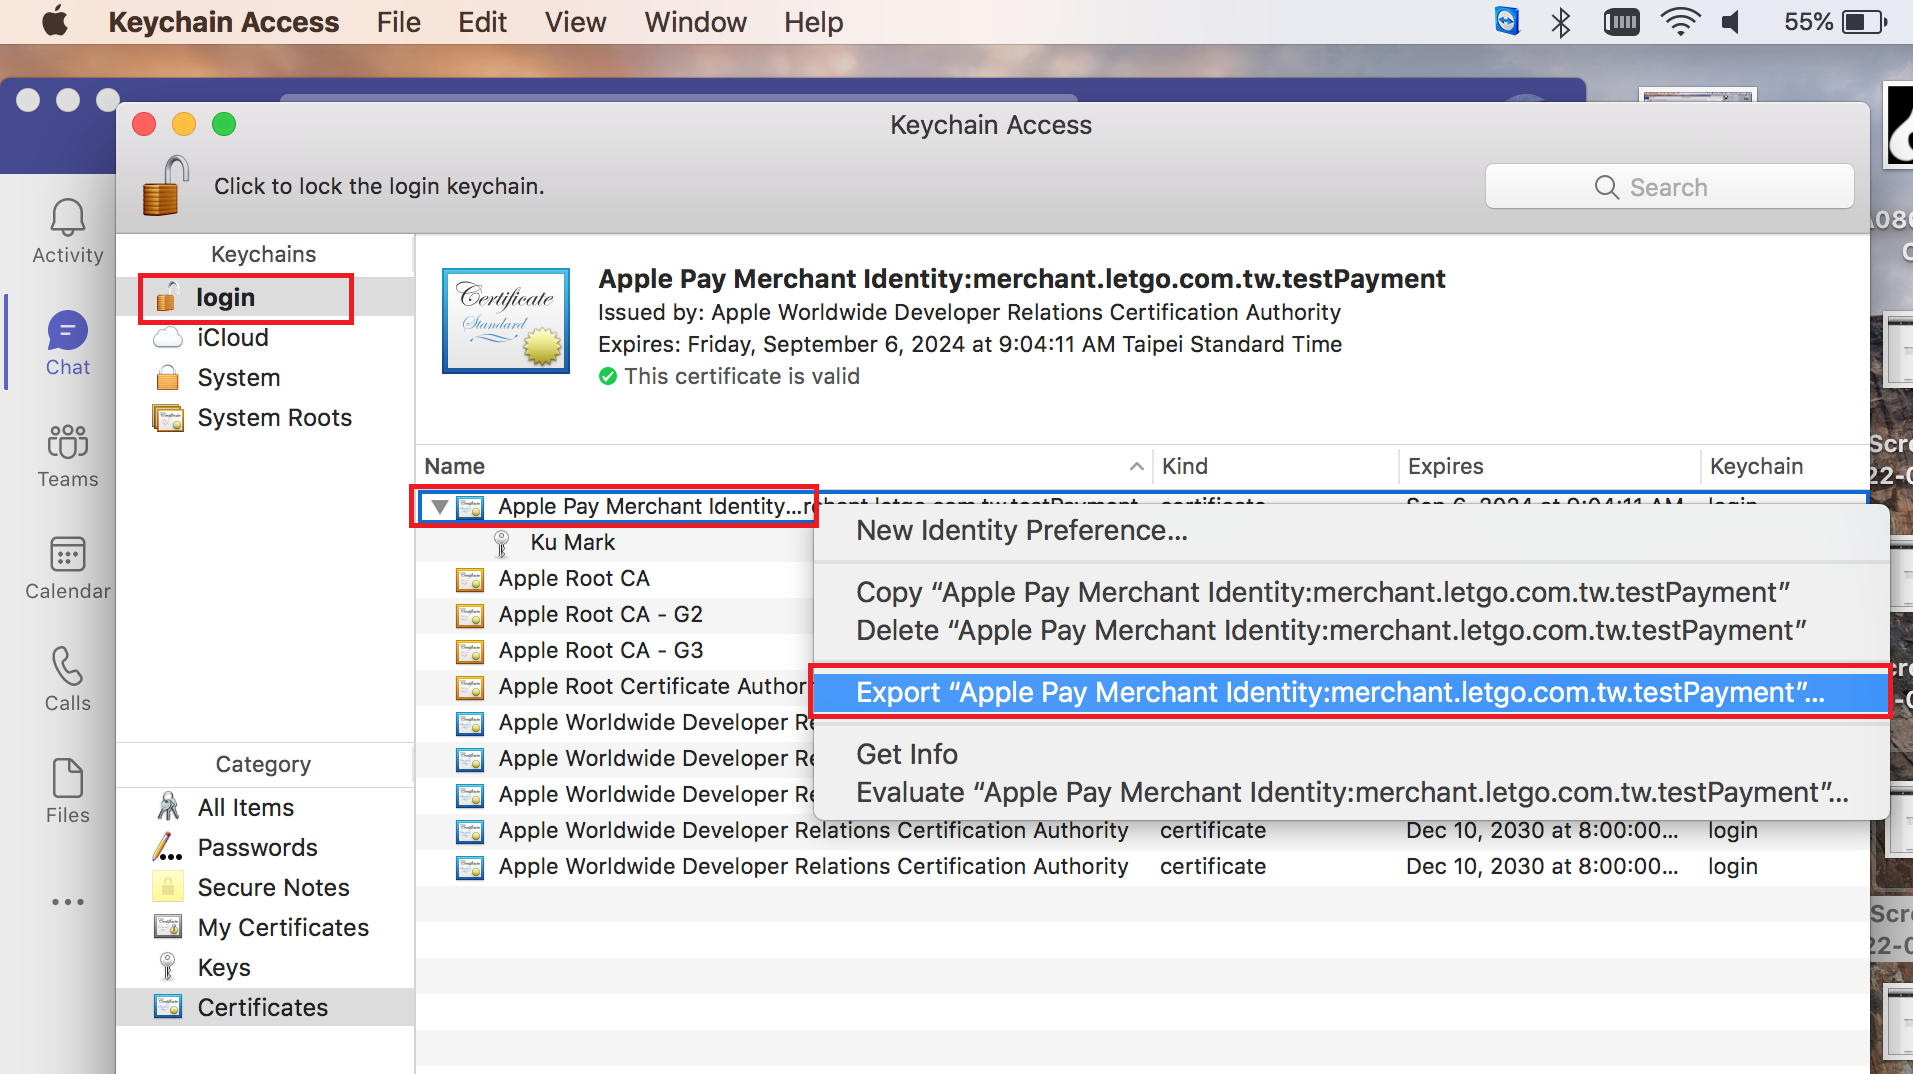
Drag the downloaded .cer file into the "login" keychain in Keychain Access. You will notice that the certificate is "not trusted".
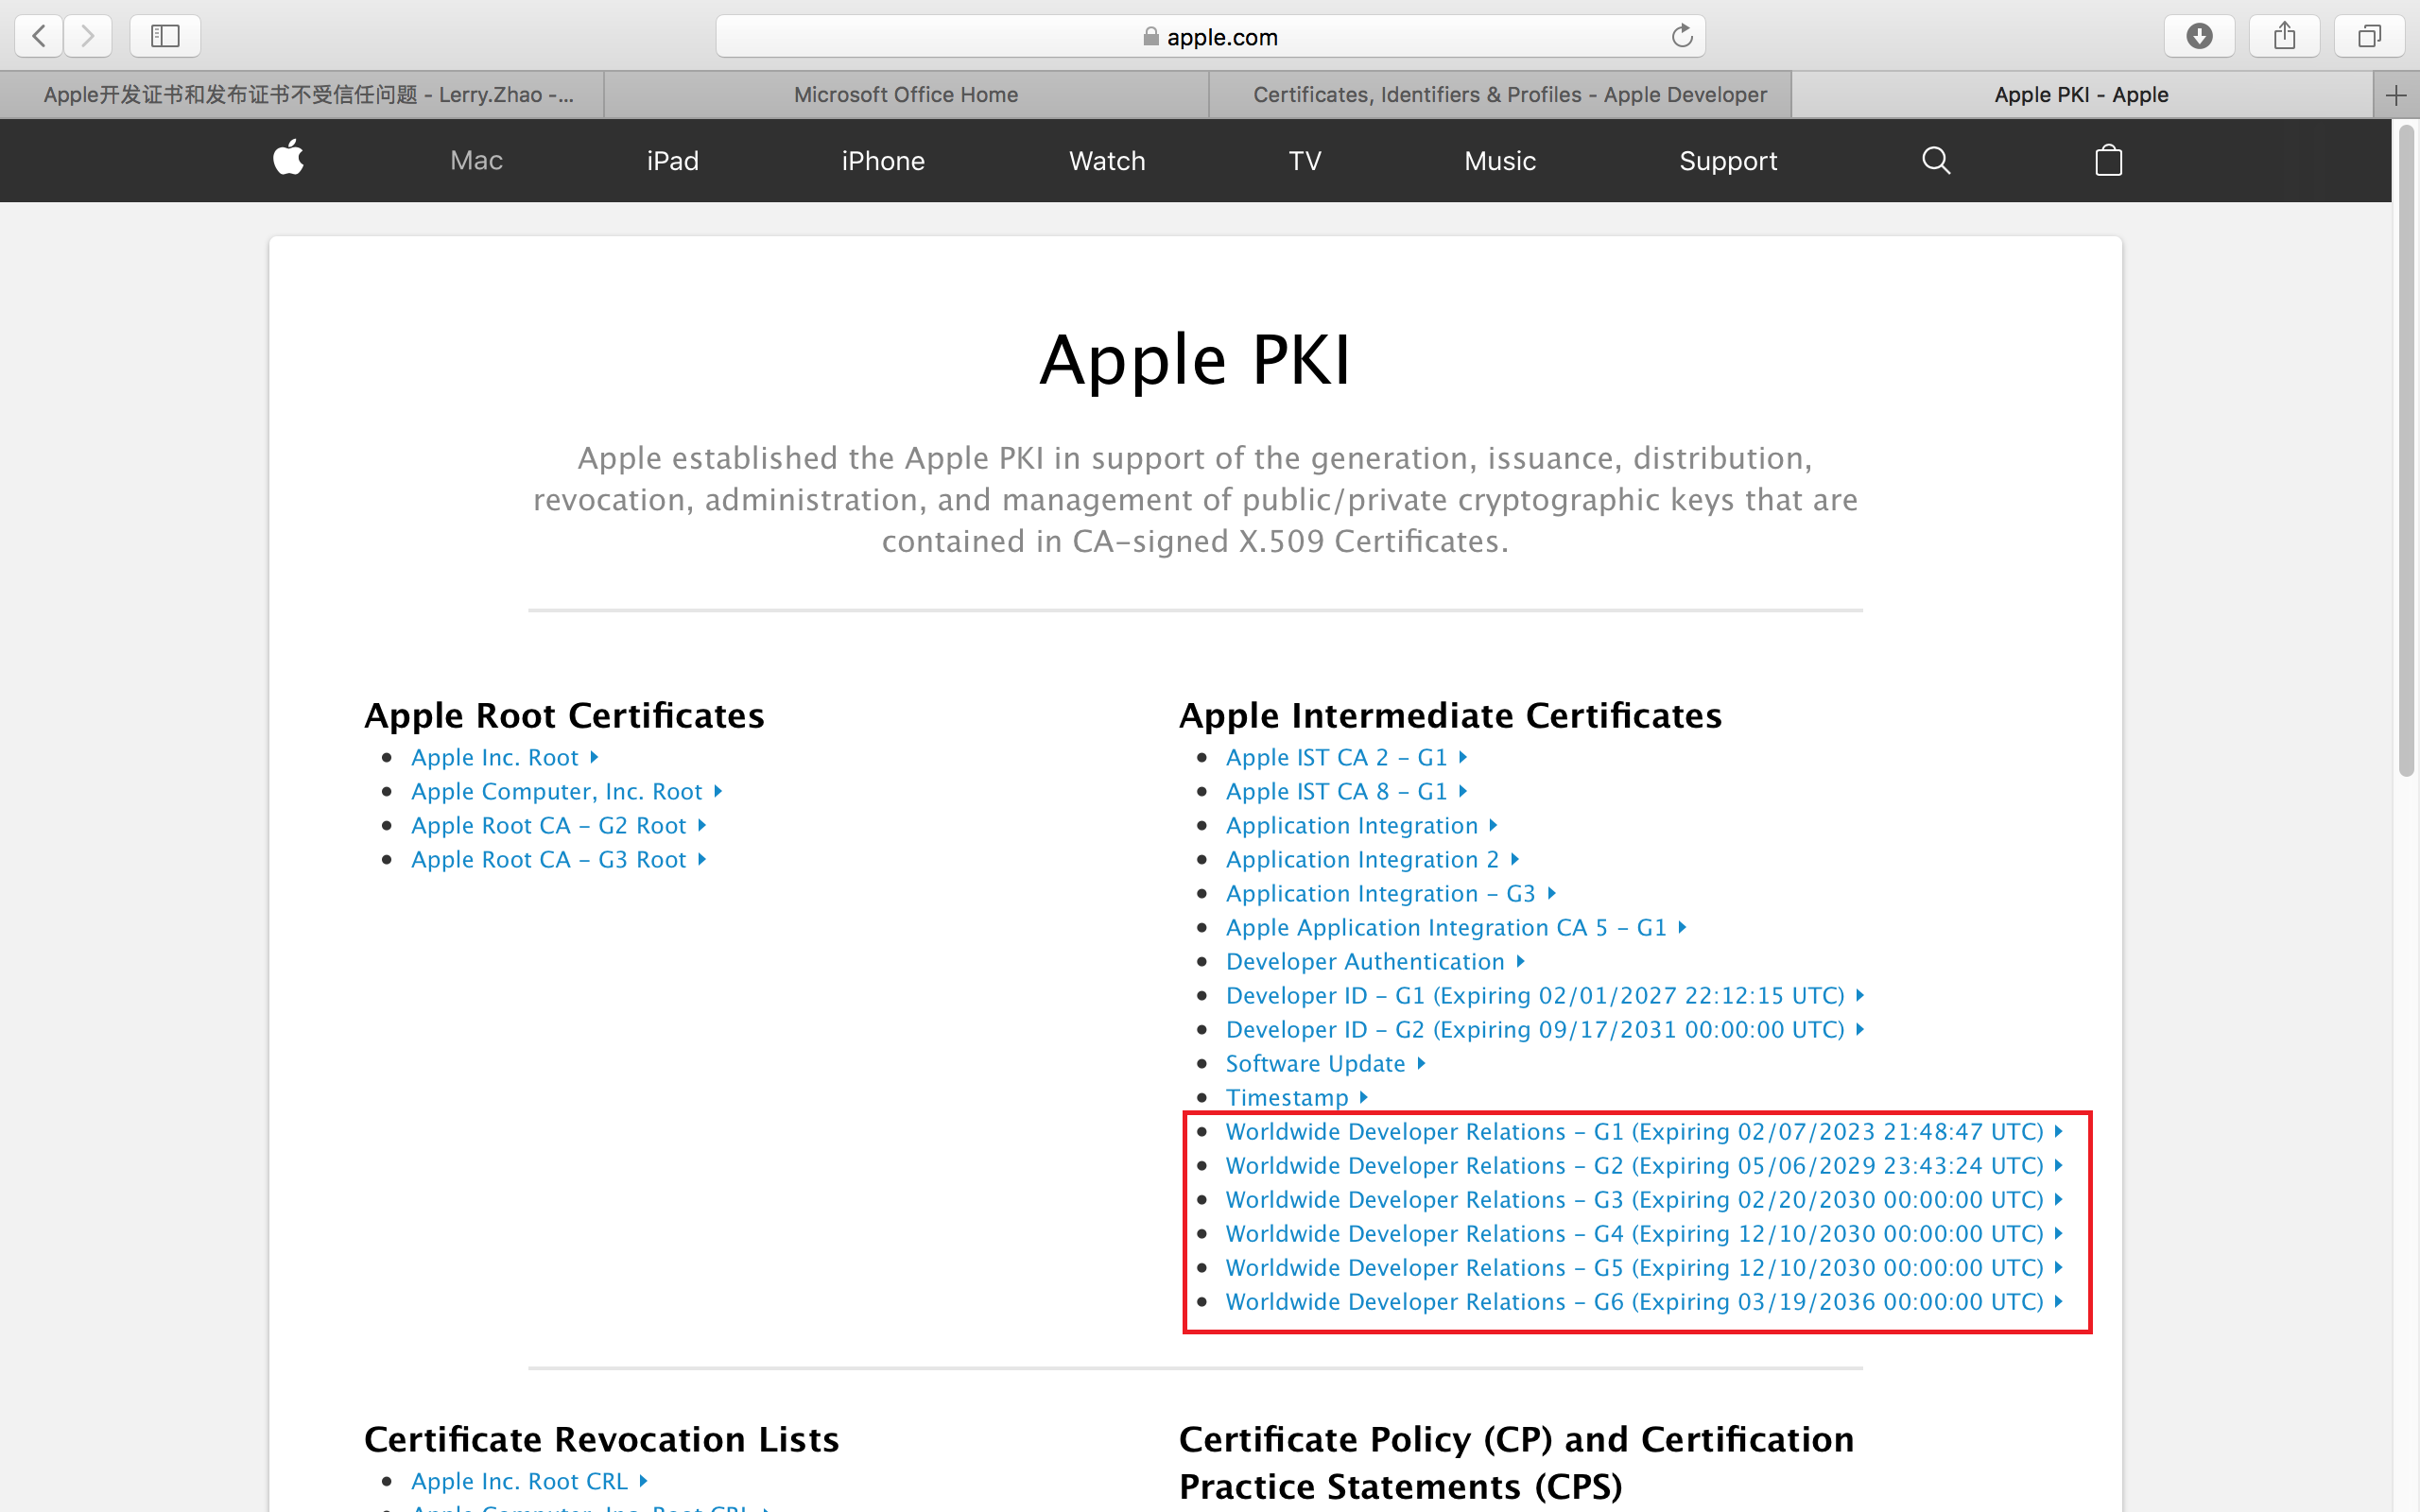
At this point, go to the [Apple PKI website](https://www.apple.com/certificateauthority/)
and install the certificate highlighted in the red box. After installation, the certificate status will change to "This certificate is valid."
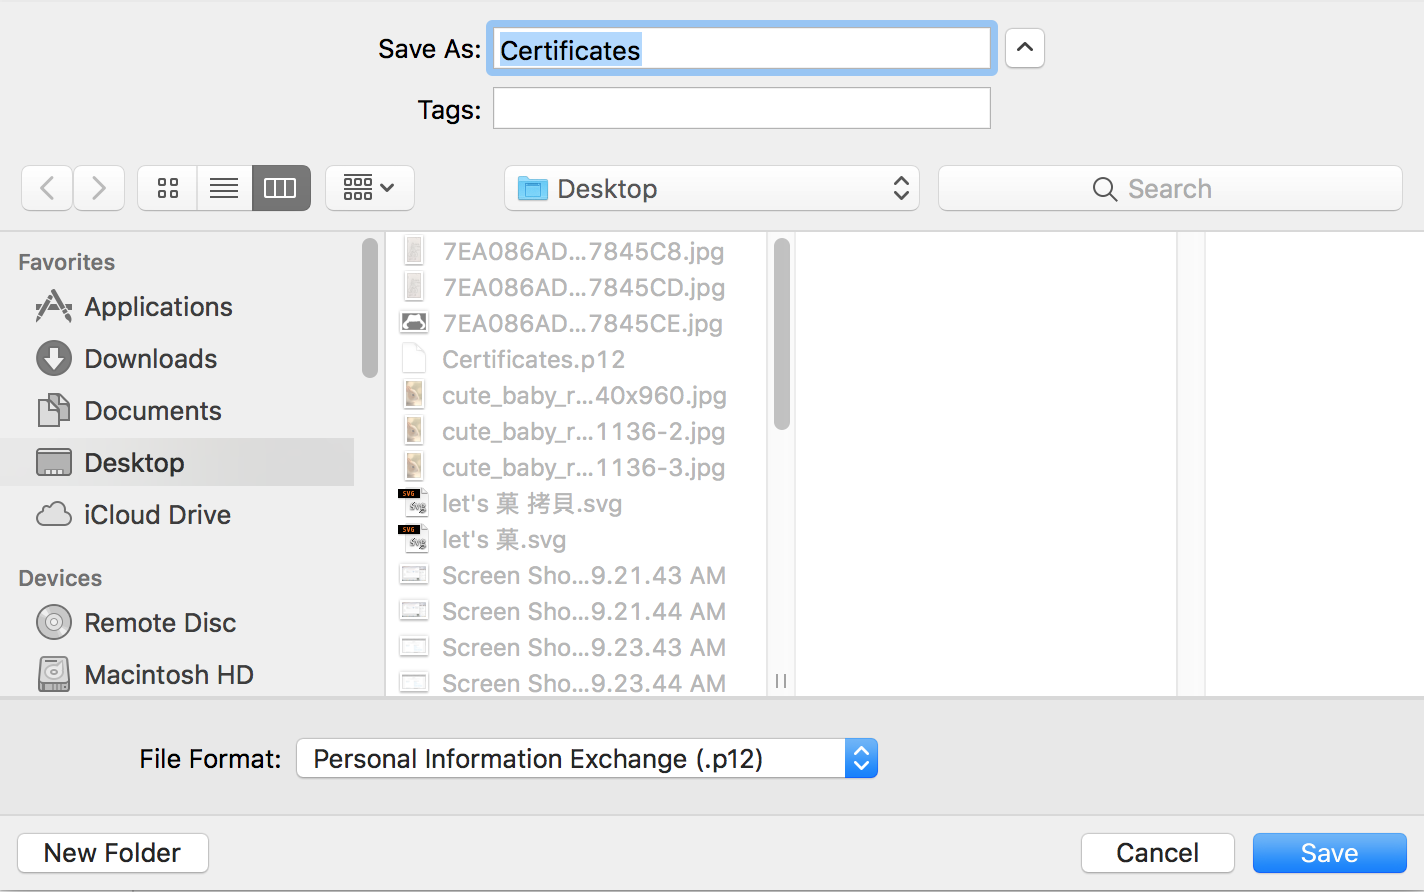
Right-click > Export (you can enter any password)
##### 3. Verify your domain
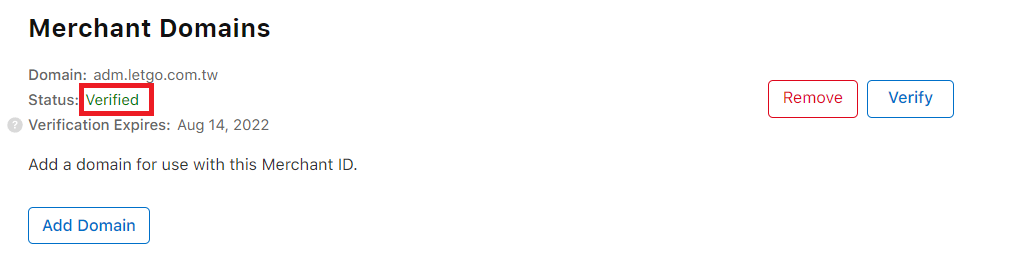
Enter the domain to verify > Download the verification file > Place it on your web server > Click the "Verify" button
## Writing the Code
By referencing Apple's [official Apple Pay Live Demo](https://applepaydemo.apple.com/), we can see that the main frontend event flow for Apple Pay includes:
* `onvalidatemerchant` (When the user clicks the button, validate the merchant via your backend)
* `onpaymentauthorized` (After successful merchant validation, this triggers the transaction)
* `onpaymentmethodselected` (When a payment method is selected)
* `onshippingcontactselected` (Triggered when shipping contact is selected)
* `onshippingmethodselected` (When a shipping method is selected)
### Frontend Code Example
```
Apple Pay Welcome
Apple Pay button is only show in safari!!!
123
```
### Backend Code (.NET MVC)
```
///
/// 商戶驗證
///
[HttpPost]
public JsonResult ValidateMerchant(VerifyMerchantRequest request) {
string strResult = string.Empty;
try {
ServicePointManager.SecurityProtocol = SecurityProtocolType.Tls12;
ServicePointManager.Expect100Continue = false;
System.Net.ServicePointManager.SecurityProtocol = System.Net.SecurityProtocolType.Tls12;
/* Merchant Identity憑證 */
string certPath = Request.MapPath(@"~/App_Data/ApplePay.p12"); //Merchant Identifier憑證路徑
string certPwd = "123"; //Merchant Identifier憑證密碼
X509Certificate2 cert = new X509Certificate2(certPath, certPwd, X509KeyStorageFlags.MachineKeySet);
/* 建立PayLoad */
var payload = new {
displayName = "letgo", // 名稱
initiative = "web", // 網頁
initiativeContext = "adm.letgo.com.tw", // 域名
merchantIdentifier = "merchant.letgo.com.tw.testPayment", // 商戶號
};
string strPayLoad = JsonConvert.SerializeObject(payload);
/* 將Payload以POST方式拋送至Apple提供的validationURL */
/* HTTP Request需以Merchant Identity憑證送出 */
/* 驗證成功後,Apple將會回傳Merchant Session物件*/
#region HTTP Web Result
HttpWebRequest httpRequest = (HttpWebRequest)HttpWebRequest.Create(request.ValidationUrl);
httpRequest.Method = WebRequestMethods.Http.Post;
httpRequest.ContentType = "application/json";
httpRequest.ContentLength = strPayLoad.Length;
httpRequest.ClientCertificates.Add(cert);
using (StreamWriter sw = new StreamWriter(httpRequest.GetRequestStream())) {
sw.Write(strPayLoad);
sw.Flush();
sw.Close();
}
HttpWebResponse response = httpRequest.GetResponse() as HttpWebResponse;
using (StreamReader sr = new StreamReader(response.GetResponseStream(), Encoding.UTF8)) {
strResult = sr.ReadToEnd();
sr.Close();
}
#endregion HTTP Web Result
}
catch (Exception ex) {
}
finally {
}
/* 將Merchant Session物件回應至Client端*/
return Json(strResult);
}
///
/// 付款
///
///
///
[HttpPost]
public async JsonResult PaymentProcess(PaymentProcessRequest)
{
// todo 和金流商串接,呼叫你的金流商付款 Api
}
}
```
## Problems Encountered During Integration
#### Backend request for merchant validation with Apple fails with "The underlying connection was closed: An unexpected error occurred on a send"
Apple's API gateway will not respond if the certificate is incorrect. Carefully check your merchant or domain validation, the certificate sent with the request, and ensure the payload is correct.
#### When creating an order with Cybersource, an "Invalid_Request" error occurs, pointing to the `paymentInformation.fluidData.value` field
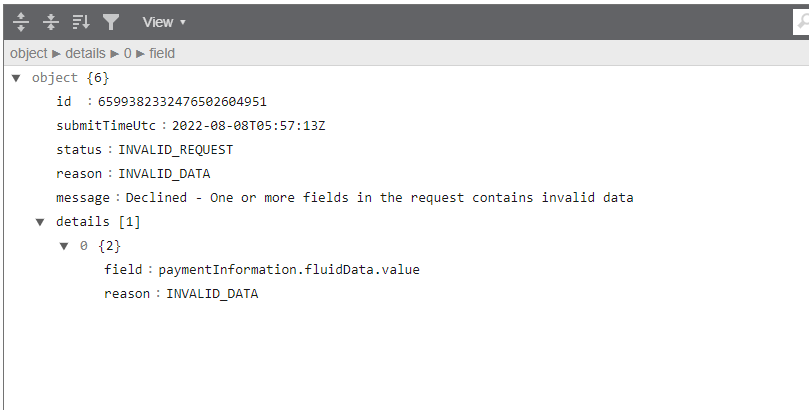
The main reason is that Cybersource does not provide a test environment for Apple Pay. You must use the production environment directly for development.
#### When including the Apple JS, a TypeScript error occurs in a project using TypeScript
```
npm install @types/applepayjs --save --dev
```
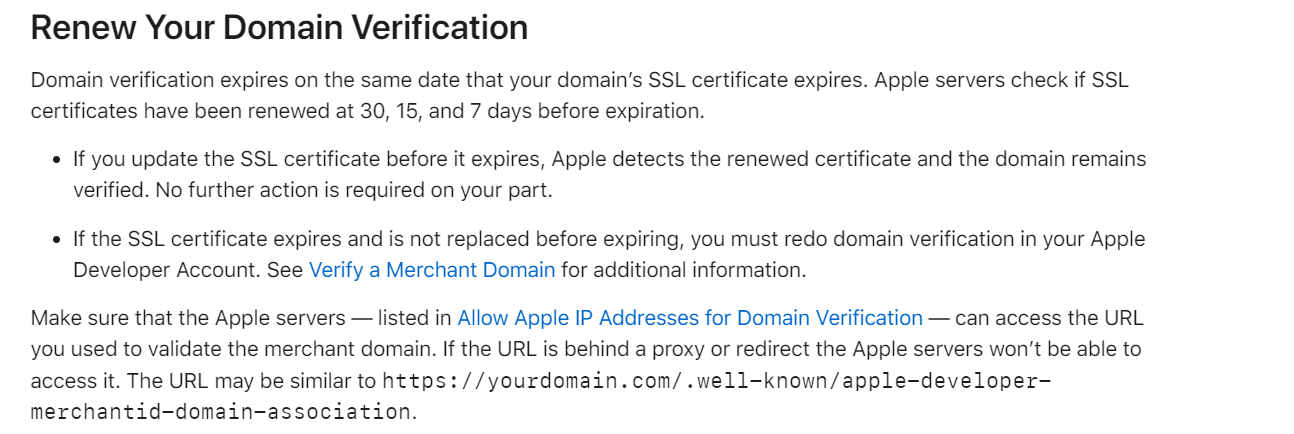
#### Very Important!!! Certificates are only valid for two years
According to the [official documentation](https://developer.apple.com/documentation/apple_pay_on_the_web/maintaining_your_environment), Apple will notify you before a certificate expires. However, every two years, you must regenerate the .p12 file and re-upload the payment processor's CSR.
#### The Apple Pay button appears but is unresponsive when clicked
* The amount must have two or fewer decimal places.
* The Apple Pay JS might be doing something in the background; it must be loaded early.
#### Apple Pay Test Card Numbers
[Official Documentation](https://developer.apple.com/apple-pay/sandbox-testing/)
## References
### [Cybersource Transaction Status Codes](https://support.cybersource.com/knowledgebase/Knowledgearticle/?code=000001630)
### [Apple Pay Official Website](https://developer.apple.com/apple-pay/planning/)
### [Everything You Need to Know About Apple Pay Integration and Development](https://zhuanlan.zhihu.com/p/45068888)
### [PayNow Online Payments Apple Pay Integration Document](https://www.paynow.com.tw/applepay/PayNow_ApplePay_v1.0.5.pdf)
### [Radial Payments & Fraud Documentation](https://docs.radial.com/ptf/Content/文章分類/payments/apple-pay-web.htm)
### [Dean's System Development Tidbits](https://ianwu.tw/press/programming/third_party/integrate_apple_pay_on_web.html#%E5%8F%83%E8%80%83%E8%B3%87%E6%96%99)
### [Reference Apple React Example Code](https://github.com/google-pay/google-pay-button/tree/main/src/button-react)
### [ECPay Apple Pay Payment Integration - .NET Example Code](https://github.com/ECPay/ApplePay_NET)
### [On-site Pay 2.0 - Integration Document](https://www.ecpay.com.tw/Content/files/gw_701.pdf)
---
## About this article and its author
Originally published on [Mark Ku's Tech Notes](https://blog.markkulab.net/en/post/apple-pay-on-web-cybersource-integration)
License: [CC BY 4.0](https://creativecommons.org/licenses/by/4.0/) — when reusing or quoting, credit the author and link back to the original
### About the author
**[Mark Ku](https://blog.markkulab.net/en/author/mark-ku)** — Software Solution Provider
- 10+ years senior software engineer, now an AI Builder
- Focused on large-platform architecture — North-American e-commerce, AI SaaS subscription billing
- Combining AI Agents and automation to build evolvable product foundations
### Free tools built by the author
All of these are free to use:
- [Free PDF Sign Tool](https://blog.markkulab.net/en/tools/pdf-sign): Online PDF sign tool — draw, type, or upload a signature, then drag, resize, and download. Everything runs in your browser; nothing is uploaded.
- [VS Code Refactory](https://blog.markkulab.net/en/tools/refactory): Refactory is a VS Code refactoring extension: 34 actions plus a 37-rule code-smell inspection layer with a Code Health dashboard, across 18 languages, backed by 534 tests. It learns your repo's conventions: where interfaces live, where DI is registered, whether 'use client' belongs. It ranks files by git churn × complexity so you know what to fix first, and hands any smell to the Claude Code already on your machine. Free to use, and your source never leaves your computer.
- [DB-Kit Database Manager](https://blog.markkulab.net/en/tools/db-kit): DB-Kit is a lightweight, cross-platform database manager built with Tauri + Rust + React. Manage MySQL, MariaDB, PostgreSQL, SQL Server, Oracle, SQLite, MongoDB, Redis, Kafka, Elasticsearch and RabbitMQ from one consistent interface: passwords encrypted in the OS keychain, SSH tunnels, full CRUD, a visual query builder, stacked multi-statement result sets, cross-connection data transfer and compare/sync, Excel / CSV import & export, visualized execution plans, ER diagrams, scheduled backups, SQL stress testing with p50–p99 latency percentiles, a 15-rule SQL review engine, Kafka message browsing with monitoring & alerts, a bilingual UI (Traditional Chinese / English), a built-in AI assistant (natural-language SQL, AI review and tuning advice) and the dbk CLI. Free and open source (MIT), with installers for Windows, macOS and Linux.
- [VS Code Super Mermaid](https://blog.markkulab.net/en/tools/super-mermaid): Super Mermaid is a VS Code extension for beautiful Mermaid diagrams out of the box: auto-colored live preview, mouse pan & zoom, high-res PNG / SVG export, 21 templates and multiple themes. Free and open source (MIT).
- [React Super Mermaid](https://blog.markkulab.net/en/tools/react-super-mermaid): react-super-mermaid is an open-source React component library: render beautiful Mermaid diagrams with a single , with built-in colorful / sketch themes, pan & zoom, in-diagram search, and high-res SVG / PNG export. Lightweight, SSR-safe, fully typed. Free and open source (MIT).
- [Jira / Confluence Super Mermaid](https://blog.markkulab.net/en/tools/jira-super-mermaid): An Atlassian Forge app: write Mermaid syntax directly inside a Jira issue or a Confluence page and get flowcharts, sequence diagrams, state machines and Gantt charts. 11 diagram types, SVG / PNG export, light and dark themes, full CJK support. Runs on Atlassian: your diagrams live in your own site and the app calls no third-party service. Free, coming soon to the Atlassian Marketplace.
- [Mermaid Live Preview](https://blog.markkulab.net/en/tools/mermaid-preview): Write Mermaid in your browser, see it render instantly, and share the whole diagram as a single link. No sign-up, nothing uploaded to a server, and mermaid.live share links work as-is.
- [React Intl Phone Number](https://blog.markkulab.net/en/tools/react-intl-phone-number): react-intl-phone-number is an open-source React component: framework-agnostic and antd-free, with E.164 in/out, a searchable flag / country-code dropdown, configurable validation levels (strict / mobile-strict / loose), themeable CSS, and i18n — phone logic powered by google-libphonenumber. Lightweight and fully typed. Free and open source (MIT).
- [Uptime Kuma Cluster](https://blog.markkulab.net/en/tools/uptime-kuma-cluster): Turn single-node Uptime Kuma into a highly available cluster: OpenResty + Lua smart load balancing, shared MariaDB state, health checks and automatic failover, plus cluster-management REST APIs. One Docker Compose command to start. Free and open source (MIT).
- [Special Education](https://blog.markkulab.net/en/education): Learning materials crafted for special education students
### Daily podcasts
- [Mark's Tech Insights — Daily AI News](https://blog.markkulab.net/en/category/tech-news): Daily curated AI and tech trends. Catch the latest developments via audio summaries — covering AI applications, software architecture, DevOps, and engineering practice. — RSS: https://blog.markkulab.net/feed.xml
- [AI股市蝦聊](https://blog.markkulab.net/en/category/ai-stock-chat): Every trading day, an AI-analyzed take on the Taiwan stock market, delivered as a two-host conversation covering the session and the next-day outlook. — RSS: https://blog.markkulab.net/ai-stock-chat/feed.xml
- [開源好物週報](https://blog.markkulab.net/en/category/open-source-weekly): A weekly two-host pick of free open-source tools surfaced from real Hacker News, GitHub, and Reddit buzz — what pain they solve and the fastest way to get started. — RSS: https://blog.markkulab.net/open-source-weekly/feed.xml
### Newsletter
[Subscribe to the newsletter](https://blog.markkulab.net/en/subscribe) — Be the first to know about new posts. No spam, unsubscribe anytime.